Why You Might Need to Delete a WordPress Site
Deleting a WordPress site may seem like a drastic measure, but there are several valid reasons why someone might need to take this step. Perhaps you’ve abandoned a project and no longer need the site, or maybe you’re consolidating multiple sites into one. Alternatively, you might be removing a test site that’s served its purpose. Whatever the reason, it’s essential to understand the implications of deleting a WordPress site and to take the necessary precautions to avoid any potential issues.
One common scenario where deleting a WordPress site might be necessary is when you’re migrating to a new platform or CMS. In this case, you’ll want to ensure that you’ve backed up your site and data before deleting the old site. This will prevent any loss of valuable content or data. Another scenario might be when you’re canceling a hosting plan or closing a business, and you need to remove the associated WordPress site.
In some cases, deleting a WordPress site might be necessary due to security concerns. For example, if your site has been hacked or compromised in some way, deleting it might be the best course of action to prevent further damage. Similarly, if you’ve installed a rogue plugin or theme that’s causing issues, deleting the site might be the only way to resolve the problem.
Before you delete your WordPress site, it’s crucial to consider the potential consequences. Deleting a site will remove all associated content, including posts, pages, and media files. It will also delete any customizations you’ve made to the site, such as themes, plugins, and widgets. Additionally, deleting a site may affect your search engine rankings, as the site will no longer be indexed by search engines.
Despite these potential consequences, deleting a WordPress site can be a necessary step in certain situations. By understanding the reasons why you might need to delete a site and taking the necessary precautions, you can ensure a smooth transition and minimize any potential issues.
Before You Begin: Backup Your Site and Data
Before deleting a WordPress site, it’s essential to backup your site and data to prevent any loss of valuable content or information. This step is crucial, as deleting a site will remove all associated content, including posts, pages, and media files. By backing up your site, you can ensure that you have a copy of your content and data, which can be restored if needed.
There are several ways to backup a WordPress site, including using plugins like UpdraftPlus or VaultPress. These plugins allow you to create a complete backup of your site, including all files, databases, and settings. You can also use these plugins to schedule regular backups, ensuring that your site is always protected.
To backup your WordPress site using UpdraftPlus, follow these steps:
1. Install and activate the UpdraftPlus plugin on your WordPress site.
2. Navigate to the UpdraftPlus settings page and click on the “Backup” tab.
3. Select the files and databases you want to backup, and choose a backup location.
4. Click on the “Backup” button to create a complete backup of your site.
Alternatively, you can use VaultPress to backup your WordPress site. VaultPress is a popular backup plugin that offers real-time backups, automated backups, and secure storage.
To backup your WordPress site using VaultPress, follow these steps:
1. Install and activate the VaultPress plugin on your WordPress site.
2. Navigate to the VaultPress settings page and click on the “Backup” tab.
3. Select the files and databases you want to backup, and choose a backup location.
4. Click on the “Backup” button to create a complete backup of your site.
By backing up your WordPress site, you can ensure that your content and data are safe, even if you need to delete the site. This step is essential before deleting a site, as it allows you to restore your content and data if needed.
Method 1: Deleting a WordPress Site from the Dashboard
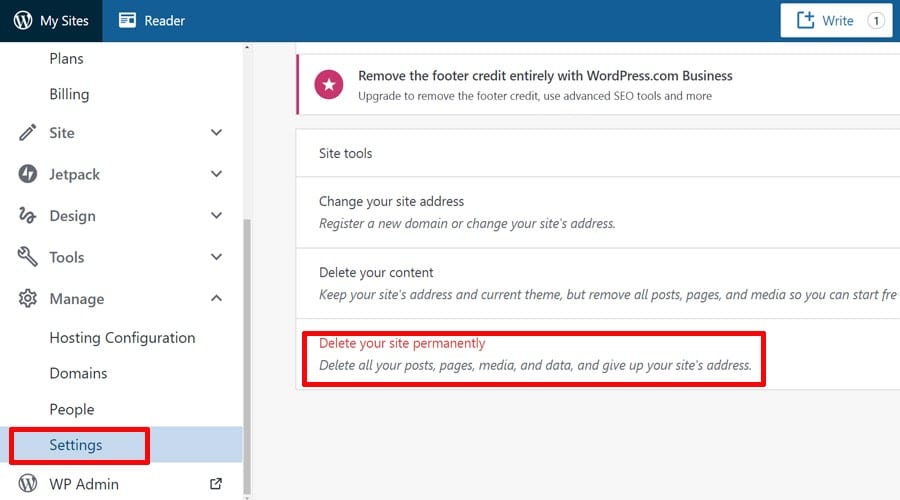
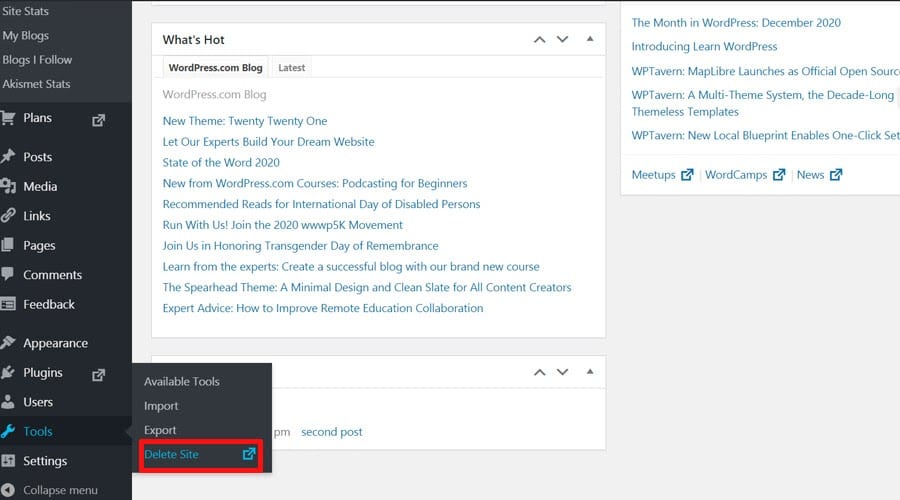
Deleting a WordPress site from the dashboard is a straightforward process that can be completed in a few steps. This method is recommended if you have access to the site’s dashboard and want to delete the site quickly and easily.
To delete a WordPress site from the dashboard, follow these steps:
1. Log in to the WordPress site you want to delete.
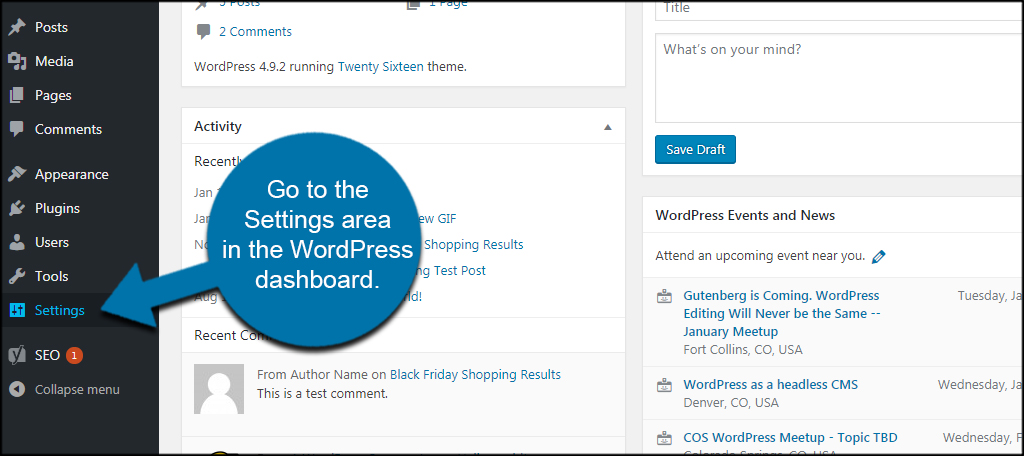
2. Navigate to the “Settings” page by clicking on the “Settings” link in the left-hand menu.
3. Scroll down to the “Delete Site” section and click on the “Delete Site” button.
4. Confirm that you want to delete the site by clicking on the “Delete Site” button again.
5. Wait for the site to be deleted. This may take a few minutes, depending on the size of the site and the speed of your server.
Once the site has been deleted, you will receive a confirmation message indicating that the site has been successfully deleted. You can then log out of the dashboard and verify that the site is no longer accessible.
It’s worth noting that deleting a WordPress site from the dashboard will also delete all associated content, including posts, pages, and media files. If you want to keep any of this content, you should backup the site before deleting it.
In addition, deleting a WordPress site from the dashboard will not affect any associated email accounts or social media accounts. However, it’s a good idea to update any links or references to the deleted site to avoid broken links or confusion.
Overall, deleting a WordPress site from the dashboard is a quick and easy process that can be completed in a few steps. However, it’s essential to backup the site and update any associated links or references before deleting the site.
Method 2: Deleting a WordPress Site via FTP or SFTP
Deleting a WordPress site via FTP or SFTP is a more technical approach that requires some knowledge of file management and FTP/SFTP clients. This method is recommended if you have access to the site’s files and want to delete the site manually.
To delete a WordPress site via FTP or SFTP, you will need to use an FTP/SFTP client like FileZilla or Cyberduck. Here are the steps to follow:
1. Connect to the site’s FTP/SFTP server using your FTP/SFTP client. You will need to enter the site’s FTP/SFTP credentials, including the hostname, username, and password.
2. Navigate to the site’s root directory, which is usually the public_html or www directory.
3. Select all the files and folders in the root directory and delete them. This will delete the entire WordPress site, including all files, databases, and settings.
4. Confirm that you want to delete the files and folders by clicking on the “Delete” button.
5. Wait for the files and folders to be deleted. This may take a few minutes, depending on the size of the site and the speed of your server.
Once the files and folders have been deleted, the WordPress site will be removed from the server. You can then verify that the site is no longer accessible by visiting the site’s URL in a web browser.
It’s worth noting that deleting a WordPress site via FTP/SFTP will also delete all associated content, including posts, pages, and media files. If you want to keep any of this content, you should backup the site before deleting it.
In addition, deleting a WordPress site via FTP/SFTP will not affect any associated email accounts or social media accounts. However, it’s a good idea to update any links or references to the deleted site to avoid broken links or confusion.
Overall, deleting a WordPress site via FTP/SFTP is a more technical approach that requires some knowledge of file management and FTP/SFTP clients. However, it can be a useful method if you have access to the site’s files and want to delete the site manually.
Method 3: Deleting a WordPress Site from the Hosting Provider
Deleting a WordPress site from the hosting provider’s control panel is a straightforward process that can be completed in a few steps. This method is recommended if you have access to the hosting provider’s control panel and want to delete the site quickly and easily.
To delete a WordPress site from the hosting provider’s control panel, follow these steps:
1. Log in to the hosting provider’s control panel using your username and password.
2. Navigate to the “Websites” or “Domains” section, depending on the hosting provider’s control panel.
3. Find the WordPress site you want to delete and click on the “Delete” or “Remove” button next to it.
4. Confirm that you want to delete the site by clicking on the “Delete” or “Remove” button again.
5. Wait for the site to be deleted. This may take a few minutes, depending on the hosting provider’s server speed.
Once the site has been deleted, you will receive a confirmation message indicating that the site has been successfully deleted. You can then verify that the site is no longer accessible by visiting the site’s URL in a web browser.
It’s worth noting that deleting a WordPress site from the hosting provider’s control panel will also delete all associated content, including posts, pages, and media files. If you want to keep any of this content, you should backup the site before deleting it.
In addition, deleting a WordPress site from the hosting provider’s control panel will not affect any associated email accounts or social media accounts. However, it’s a good idea to update any links or references to the deleted site to avoid broken links or confusion.
Overall, deleting a WordPress site from the hosting provider’s control panel is a quick and easy process that can be completed in a few steps. However, it’s essential to backup the site and update any associated links or references before deleting the site.
What Happens After Deletion: Understanding the Consequences
After a WordPress site is deleted, there are several consequences to consider. One of the most significant consequences is the impact on search engine rankings. When a site is deleted, all of its associated content, including posts, pages, and media files, is removed from the search engine’s index. This means that the site will no longer appear in search engine results, and any links to the site will be broken.
In addition to the impact on search engine rankings, deleting a WordPress site can also affect email accounts and social media accounts. If the site is connected to an email account, deleting the site may also delete the email account. Similarly, if the site is connected to social media accounts, deleting the site may also affect the social media accounts.
Another consequence of deleting a WordPress site is the loss of data and content. When a site is deleted, all of its associated data and content is removed, including posts, pages, and media files. This means that any data or content that was stored on the site will be lost, and it may not be possible to recover it.
Finally, deleting a WordPress site can also affect any associated plugins and themes. If the site is using plugins or themes that are not compatible with the new site, deleting the site may cause issues with the plugins and themes.
Overall, deleting a WordPress site can have significant consequences, and it’s essential to consider these consequences before deleting a site. By understanding the consequences of deleting a WordPress site, you can take steps to mitigate any potential issues and ensure a smooth transition.
It’s also worth noting that deleting a WordPress site is a permanent action, and it cannot be undone. Once a site is deleted, it is gone forever, and any data or content that was stored on the site will be lost. Therefore, it’s essential to be careful when deleting a WordPress site and to make sure that you have backed up any important data or content before deleting the site.
Troubleshooting Common Issues with Deleting a WordPress Site
When deleting a WordPress site, you may encounter some common issues that can prevent the deletion process from completing successfully. In this section, we will discuss some of the most common issues that may arise and provide solutions to help you troubleshoot them.
Error Messages: One of the most common issues that may arise when deleting a WordPress site is error messages. These error messages can be caused by a variety of factors, including plugin conflicts, theme issues, or server errors. To troubleshoot error messages, try disabling all plugins and themes and then attempt to delete the site again. If the issue persists, contact your hosting provider for assistance.
Locked Files: Another common issue that may arise when deleting a WordPress site is locked files. Locked files can prevent the deletion process from completing successfully, and can be caused by a variety of factors, including plugin conflicts or server errors. To troubleshoot locked files, try using a file manager like FileZilla or Cyberduck to manually delete the files.
Incomplete Deletions: In some cases, the deletion process may not complete successfully, resulting in an incomplete deletion. This can be caused by a variety of factors, including plugin conflicts or server errors. To troubleshoot incomplete deletions, try checking the site’s files and database to ensure that all content has been removed.
Database Errors: Database errors can also occur when deleting a WordPress site, and can be caused by a variety of factors, including plugin conflicts or server errors. To troubleshoot database errors, try using a database management tool like phpMyAdmin to manually delete the database tables.
By following these troubleshooting steps, you should be able to resolve any common issues that may arise when deleting a WordPress site. Remember to always backup your site and data before deleting, and to contact your hosting provider for assistance if you encounter any issues.
Conclusion: Successfully Removing a WordPress Site
Deleting a WordPress site can be a straightforward process, but it’s essential to follow the correct steps to ensure a smooth deletion process. In this article, we have discussed the reasons why someone might need to delete a WordPress site, the importance of backing up the site and data, and the different methods for deleting a WordPress site.
We have also discussed what happens after a WordPress site is deleted, including the impact on search engine rankings, email accounts, and social media accounts. Additionally, we have provided solutions to common issues that may arise when trying to delete a WordPress site, such as error messages, locked files, or incomplete deletions.
To ensure a smooth deletion process, it’s essential to follow these final tips:
1. Backup your site and data before deleting the site.
2. Use a reliable method for deleting the site, such as the dashboard or FTP/SFTP.
3. Verify that the site has been deleted successfully.
4. Update any associated email accounts or social media accounts.
5. Consider using a plugin or tool to help with the deletion process.
By following these tips and the steps outlined in this article, you should be able to successfully remove a WordPress site. Remember to always backup your site and data before deleting, and to contact your hosting provider for assistance if you encounter any issues.
Deleting a WordPress site can be a complex process, but with the right guidance and tools, it can be done efficiently and effectively. We hope this article has provided you with the information and resources you need to successfully remove a WordPress site.


