The Importance of Image Resizing in Digital Media
Image resizing is a crucial aspect of digital media, playing a vital role in various applications such as web design, social media, and graphic design. The process of resizing images can significantly affect their quality, making it essential to understand the best practices for preserving image quality. When images are resized, they can become pixelated, lose their sharpness, or appear distorted, which can negatively impact the overall visual appeal of a website, social media post, or graphic design project.
In today’s digital landscape, images are an integral part of online content, and their quality can make or break the user experience. For instance, a website with low-quality, poorly resized images can appear unprofessional and may deter visitors from engaging with the content. On the other hand, a website with high-quality, well-resized images can enhance the user experience, increase engagement, and ultimately drive more conversions.
Moreover, image resizing is not just about reducing the file size of an image; it’s also about maintaining its aspect ratio, resolution, and overall quality. When resizing images, it’s essential to consider the intended use of the image, the target audience, and the devices on which the image will be displayed. By understanding these factors, designers and developers can ensure that their images are resized correctly, preserving their quality and enhancing the overall visual appeal of their digital media projects.
One of the most common challenges of image resizing is maintaining the image’s quality while reducing its file size. This is particularly important for web designers, who need to ensure that their images load quickly without compromising their quality. To overcome this challenge, designers can use various image resizing techniques, such as compressing images using tools like TinyPNG or ShortPixel, or using image editing software like Adobe Photoshop to resize images while preserving their quality.
In conclusion, image resizing is a critical aspect of digital media, and its importance cannot be overstated. By understanding the best practices for resizing images, designers and developers can ensure that their images are displayed in the best possible quality, enhancing the overall user experience and driving more conversions. Whether you’re a web designer, social media marketer, or graphic designer, mastering the art of image resizing is essential for creating high-quality digital media projects that engage and inspire your audience.
Understanding Image File Formats and Compression
When it comes to image resizing, understanding the different image file formats and their compression algorithms is crucial for preserving image quality. The most common image file formats are JPEG, PNG, and GIF, each with its own strengths and weaknesses. JPEG (Joint Photographic Experts Group) is a compressed format that uses a lossy compression algorithm, which discards some of the image data to reduce the file size. This makes JPEG suitable for photographs and images with many colors, but it can lead to a loss of quality when resized.
PNG (Portable Network Graphics) is an uncompressed format that uses a lossless compression algorithm, which preserves the image data and maintains its quality. PNG is ideal for images with transparent backgrounds, logos, and graphics, but it can result in larger file sizes. GIF (Graphics Interchange Format) is another compressed format that uses a lossless compression algorithm, but it’s limited to 256 colors, making it less suitable for photographs.
When resizing images, it’s essential to choose the right file format and compression algorithm to maintain image quality. For example, if you’re resizing a photograph, JPEG might be the best choice, but if you’re resizing a logo or graphic, PNG might be more suitable. Additionally, some image editing software, such as Adobe Photoshop, allows you to adjust the compression level and choose the best compression algorithm for your image.
Compression algorithms can also affect image quality when resizing. For instance, some algorithms, like the JPEG compression algorithm, can introduce artifacts and distortions when resizing images. To avoid this, it’s recommended to use image editing software that allows you to adjust the compression level and choose the best compression algorithm for your image.
In summary, understanding image file formats and compression algorithms is vital for preserving image quality when resizing. By choosing the right file format and compression algorithm, you can ensure that your images look great and maintain their quality, even when resized. Whether you’re a web designer, social media marketer, or graphic designer, mastering image resizing techniques is essential for creating high-quality digital media projects that engage and inspire your audience.
How to Resize an Image Without Losing Quality: Best Practices
Resizing an image without losing quality requires a combination of technical skills and attention to detail. To achieve the best results, follow these step-by-step instructions and best practices for resizing images using image editing software.
Step 1: Choose the Right Image Editing Software
Select a reputable image editing software, such as Adobe Photoshop or GIMP, that offers advanced resizing features and algorithms. These software programs provide a range of tools and options to help you resize images without compromising their quality.
Step 2: Select the Right Resizing Algorithm
When resizing an image, it’s essential to choose the right algorithm to maintain its quality. The most common resizing algorithms are Bicubic, Bilinear, and Nearest Neighbor. Bicubic is generally considered the best algorithm for resizing images, as it produces the highest quality results.
Step 3: Adjust the Image Resolution and DPI
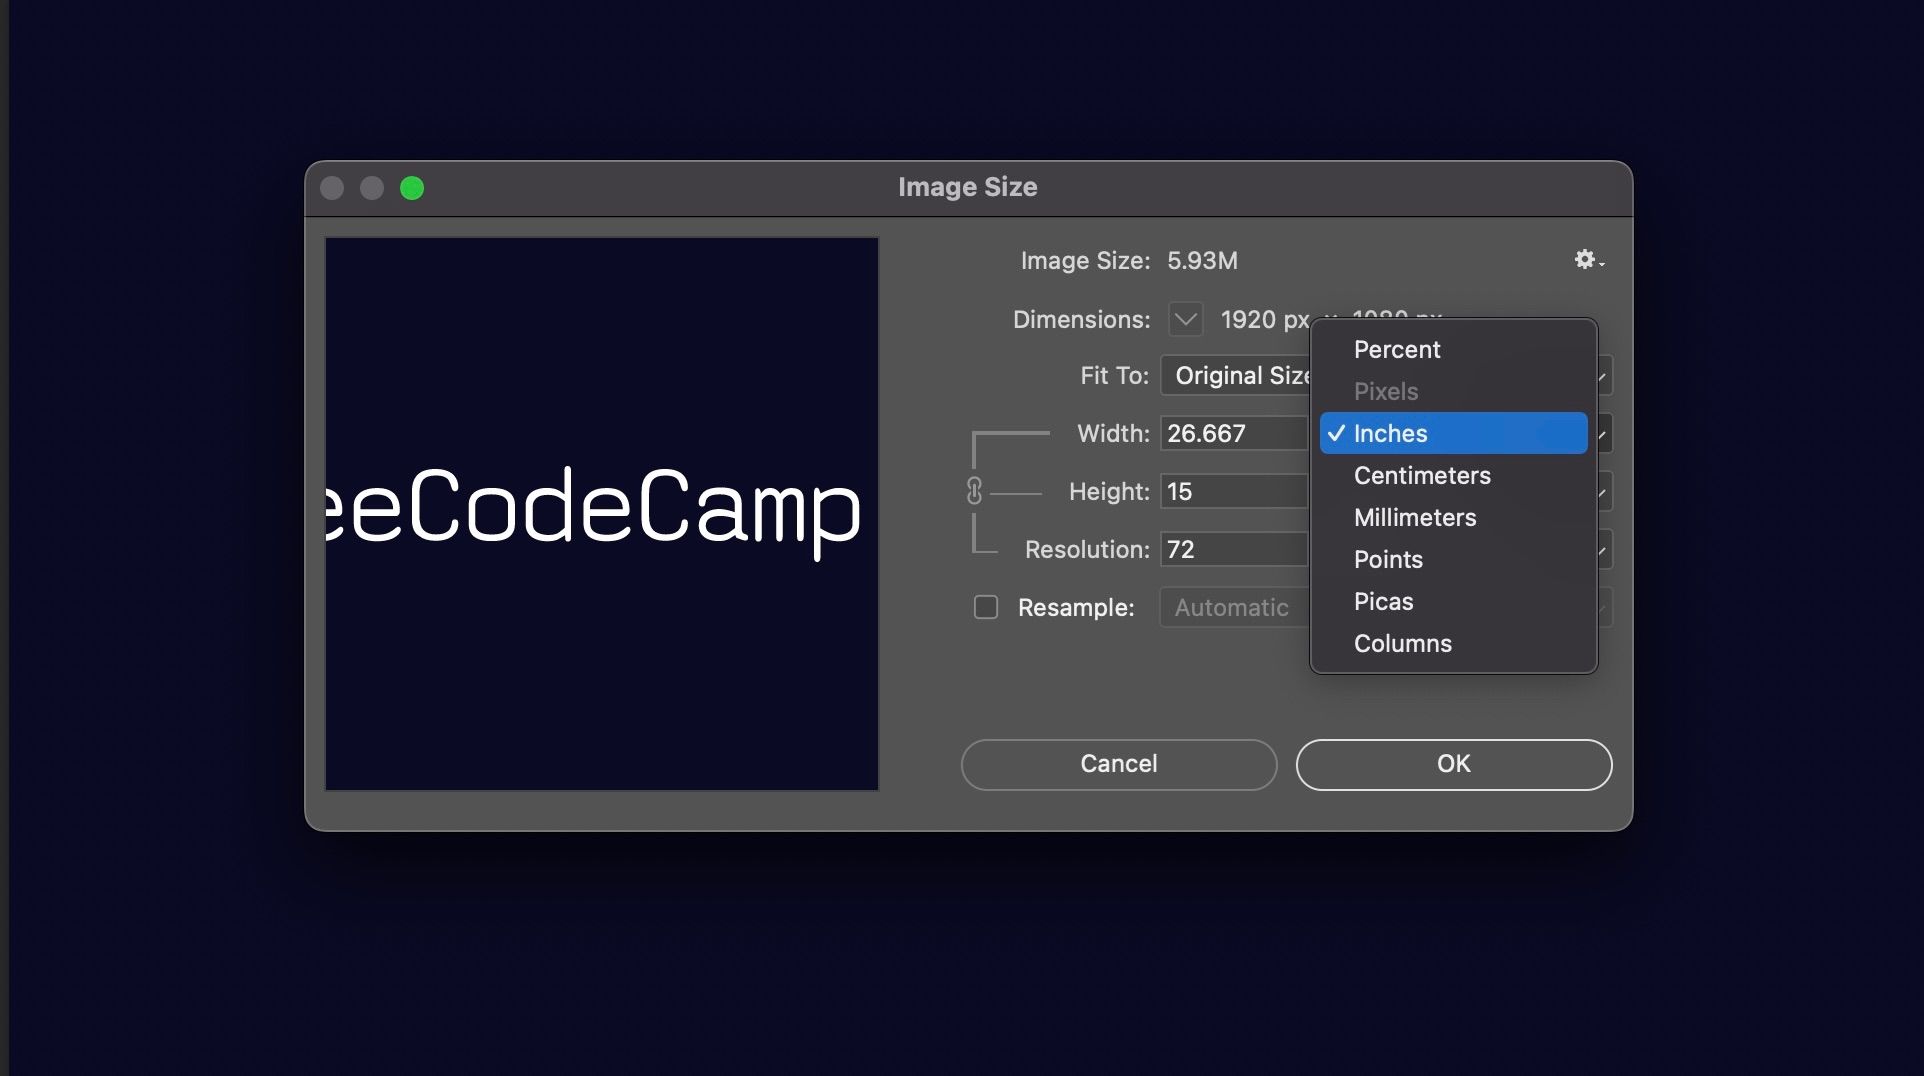
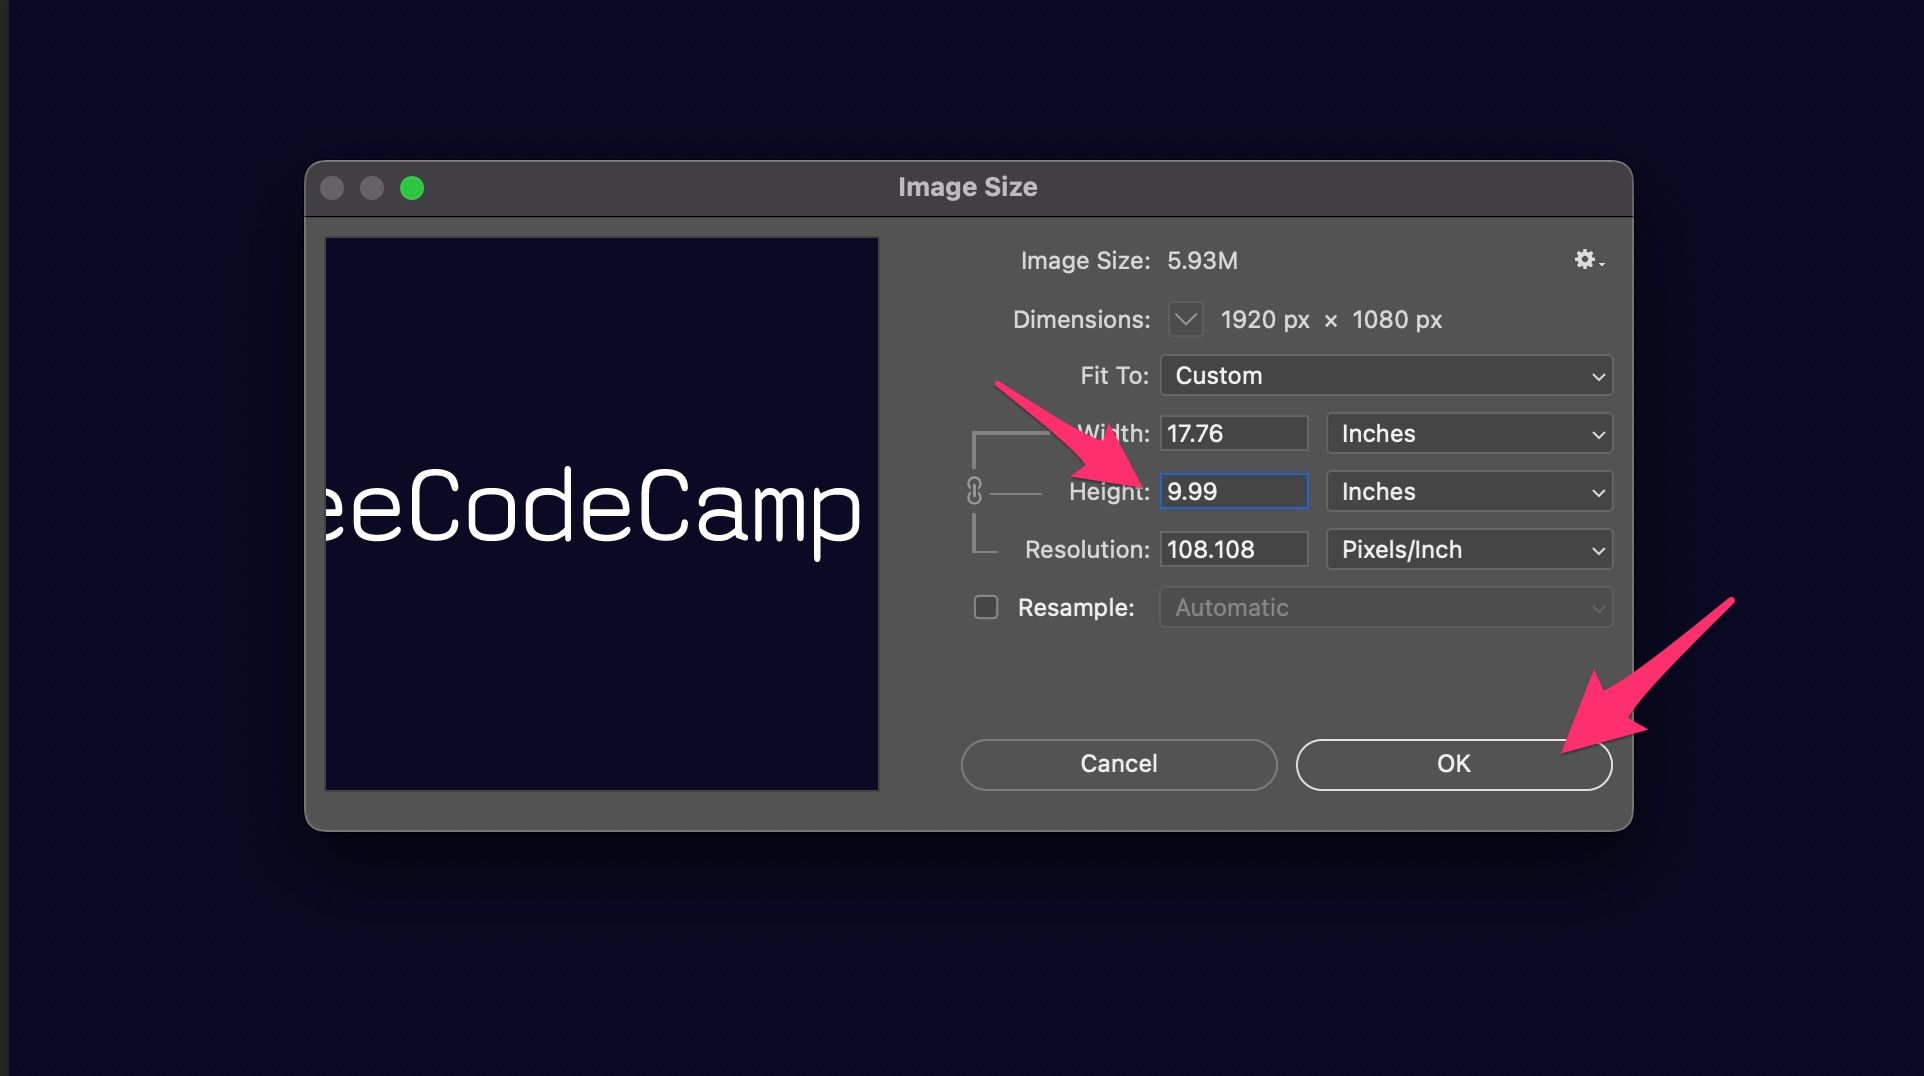
Before resizing an image, adjust its resolution and DPI (dots per inch) to ensure optimal quality. A higher resolution and DPI will result in a higher quality image, but may also increase the file size.
Step 4: Avoid Over-Compression
When resizing an image, avoid over-compressing it, as this can lead to a loss of quality. Use the software’s built-in compression tools to adjust the compression level and find the optimal balance between file size and image quality.
Step 5: Save the Image in the Right Format
Save the resized image in the right format, such as JPEG, PNG, or GIF, depending on the intended use of the image. JPEG is suitable for photographs, while PNG is better for graphics and logos.
By following these steps and best practices, you can resize images without losing quality and achieve professional-looking results. Remember to always use high-quality image editing software and pay attention to the resizing algorithm, resolution, and compression level to ensure the best possible outcome.
The Role of Resolution and DPI in Image Resizing
Resolution and DPI (dots per inch) are two critical factors to consider when resizing images. Understanding how to adjust these settings can help you achieve optimal image quality and ensure that your images look great on various devices.
Resolution refers to the number of pixels in an image, measured in pixels per inch (PPI). A higher resolution means more pixels, resulting in a more detailed and higher-quality image. However, increasing the resolution also increases the file size, which can affect the image’s loading time and overall performance.
DPI, on the other hand, refers to the number of dots per inch that a printer or display device can produce. A higher DPI means more dots, resulting in a more detailed and higher-quality image. However, increasing the DPI also increases the file size, which can affect the image’s loading time and overall performance.
When resizing an image, it’s essential to adjust the resolution and DPI to achieve optimal image quality. Here are some tips to help you do so:
For web images, a resolution of 72 PPI is standard, while for print images, a resolution of 300 PPI is recommended. For images that will be displayed on high-resolution devices, such as retina displays, a higher resolution of 144 PPI or higher may be necessary.
When adjusting the DPI, consider the intended use of the image. For example, if the image will be printed, a higher DPI of 300 or higher is recommended. If the image will be displayed on a screen, a lower DPI of 72 or 96 may be sufficient.
By understanding the role of resolution and DPI in image resizing, you can ensure that your images look great on various devices and achieve optimal image quality. Remember to adjust these settings according to the intended use of the image and the device on which it will be displayed.
Image Resizing Tools and Software: A Comparison
When it comes to resizing images, there are numerous tools and software available, each with its own strengths and weaknesses. In this section, we’ll compare and contrast some popular image resizing tools and software, including online tools and desktop applications.
Online Tools:
Canva is a popular online graphic design platform that offers a range of image resizing tools and features. It’s user-friendly, intuitive, and offers a wide range of templates and design elements. Canva is ideal for non-designers and professionals who need to resize images quickly and easily.
PicMonkey is another online image editing platform that offers a range of resizing tools and features. It’s known for its user-friendly interface and offers a range of filters, effects, and design elements. PicMonkey is ideal for those who need to resize images and add creative effects.
Desktop Applications:
Adobe Photoshop is a professional-grade image editing software that offers advanced resizing tools and features. It’s widely used by designers and photographers who need to resize images with precision and control. Adobe Photoshop is ideal for those who need to resize images for print or web use.
Skylum Luminar is a desktop image editing software that offers a range of resizing tools and features. It’s known for its intuitive interface and offers a range of filters, effects, and design elements. Skylum Luminar is ideal for those who need to resize images and add creative effects.
Comparison:
When comparing these tools and software, it’s essential to consider the features, pros, and cons of each. Canva and PicMonkey are ideal for non-designers and those who need to resize images quickly and easily. Adobe Photoshop and Skylum Luminar are ideal for professionals who need to resize images with precision and control.
In conclusion, the choice of image resizing tool or software depends on the individual’s needs and requirements. By understanding the features, pros, and cons of each, you can make an informed decision and choose the best tool for your image resizing needs.
Resizing Images for Web and Mobile Devices
Resizing images for web and mobile devices can be a challenging task, as it requires optimizing images for different screen sizes, resolutions, and devices. However, with the right techniques and tools, you can ensure that your images look great on various devices and provide an excellent user experience.
Optimizing Images for Different Screen Sizes:
When resizing images for web and mobile devices, it’s essential to consider the different screen sizes and resolutions. For example, a image that looks great on a desktop computer may not look as good on a mobile device with a smaller screen size. To optimize images for different screen sizes, you can use responsive design techniques, such as using relative units (e.g., percentages) instead of absolute units (e.g., pixels).
Optimizing Images for Different Resolutions:
In addition to optimizing images for different screen sizes, you also need to consider the different resolutions. For example, a image that looks great on a high-resolution device may not look as good on a low-resolution device. To optimize images for different resolutions, you can use image compression techniques, such as JPEG compression, to reduce the file size of the image without sacrificing quality.
Optimizing Images for Different Devices:
Finally, you need to consider the different devices that your images will be displayed on. For example, a image that looks great on a desktop computer may not look as good on a mobile device with a different operating system or browser. To optimize images for different devices, you can use device-specific image resizing techniques, such as using device-specific image formats (e.g., WebP for Android devices).
Tips for Resizing Images for Web and Mobile Devices:
Here are some tips for resizing images for web and mobile devices:
Use responsive design techniques to optimize images for different screen sizes.
Use image compression techniques to optimize images for different resolutions.
Use device-specific image resizing techniques to optimize images for different devices.
Test your images on different devices and screen sizes to ensure that they look great.
By following these tips and techniques, you can ensure that your images look great on various devices and provide an excellent user experience.
Common Mistakes to Avoid When Resizing Images
When resizing images, it’s easy to make mistakes that can affect the quality of the image. Here are some common mistakes to avoid when resizing images:
Over-Compression:
Over-compression is one of the most common mistakes people make when resizing images. When an image is compressed too much, it can lose its quality and become pixelated. To avoid over-compression, use the right compression algorithm and adjust the compression level accordingly.
Incorrect File Format Selection:
Choosing the wrong file format can also affect the quality of the image. For example, using a JPEG file format for an image with transparent background can result in a loss of quality. To avoid this mistake, choose the right file format for the image, such as PNG for images with transparent backgrounds.
Neglecting to Adjust Resolution and DPI:
Neglecting to adjust the resolution and DPI of an image can also affect its quality. When an image is resized, its resolution and DPI should be adjusted accordingly to maintain its quality. To avoid this mistake, adjust the resolution and DPI of the image according to its intended use.
Not Testing the Image:
Not testing the image after resizing it can also lead to mistakes. It’s essential to test the image on different devices and screen sizes to ensure that it looks great. To avoid this mistake, test the image on different devices and screen sizes before using it.
Advice on How to Avoid These Mistakes:
To avoid these mistakes, follow these tips:
Use the right compression algorithm and adjust the compression level accordingly.
Choose the right file format for the image.
Adjust the resolution and DPI of the image according to its intended use.
Test the image on different devices and screen sizes before using it.
By following these tips, you can avoid common mistakes when resizing images and ensure that your images look great.
Conclusion: Mastering Image Resizing for Professional Results
Mastering the art of image resizing is crucial for achieving professional-looking results in various digital media applications. By understanding the importance of image resizing, selecting the right file formats and compression algorithms, and following best practices for resizing, individuals can preserve image quality and ensure their visual content looks great across different devices and platforms. It is essential to remember that resizing images without losing quality requires attention to detail, the right tools, and a bit of practice.
Throughout this guide, we have explored the significance of image resizing, the role of resolution and DPI, and the best practices for resizing images without compromising quality. We have also compared popular image resizing tools and software, highlighting their features, pros, and cons. By applying the knowledge and techniques outlined in this article, individuals can confidently resize their images, ensuring they look great on various devices, from web browsers to mobile screens.
When it comes to how to resize an image without losing quality, it is vital to select the right resizing algorithm, avoid over-compression, and adjust resolution and DPI accordingly. By doing so, individuals can maintain the integrity of their images, ensuring they remain crisp, clear, and visually appealing. Whether you are a web designer, social media manager, or graphic designer, mastering image resizing techniques is essential for delivering high-quality visual content that engages and impresses your audience.
In conclusion, image resizing is a critical aspect of digital media production, and by following the guidelines and best practices outlined in this article, individuals can achieve professional-looking results. Remember, practice makes perfect, so don’t be afraid to experiment with different image resizing tools and techniques to find what works best for you. With time and practice, you will become proficient in resizing images without losing quality, ensuring your visual content stands out in a crowded digital landscape.


