Getting Started with Ticketmaster: Creating an Account
Creating a Ticketmaster account is the first step to selling tickets on the platform. Having a verified account provides access to sales tools and ensures a smooth ticket-selling experience. To create an account, navigate to the Ticketmaster website and click on the “Sell” tab. From there, follow the prompts to provide required information, such as name, email address, and password. Verify the account through the email confirmation link sent by Ticketmaster.
Once the account is created, it’s essential to familiarize yourself with the Ticketmaster dashboard. The dashboard provides an overview of your ticket listings, sales, and account activity. Take some time to explore the various sections, including the “My Tickets” tab, where you can view and manage your ticket inventory.
As a ticket seller on Ticketmaster, it’s crucial to understand the benefits of having a verified account. Verified accounts have access to advanced sales tools, such as the ability to list tickets for multiple events and manage inventory more efficiently. Additionally, verified accounts are more likely to appear in search results, increasing visibility and potential sales.
When creating an account, it’s also important to note that Ticketmaster has a strict verification process to ensure the authenticity of ticket sellers. This process may involve providing identification and proof of ticket ownership. Be prepared to provide this information to avoid any delays in the verification process.
By creating a Ticketmaster account and understanding the benefits of verification, you’ll be well on your way to successfully selling tickets on the platform. Remember to take the time to familiarize yourself with the dashboard and explore the various sales tools available to you. With a verified account and a solid understanding of the platform, you’ll be able to maximize your ticket sales and reach a wider audience.
Listing Your Tickets: A Step-by-Step Process
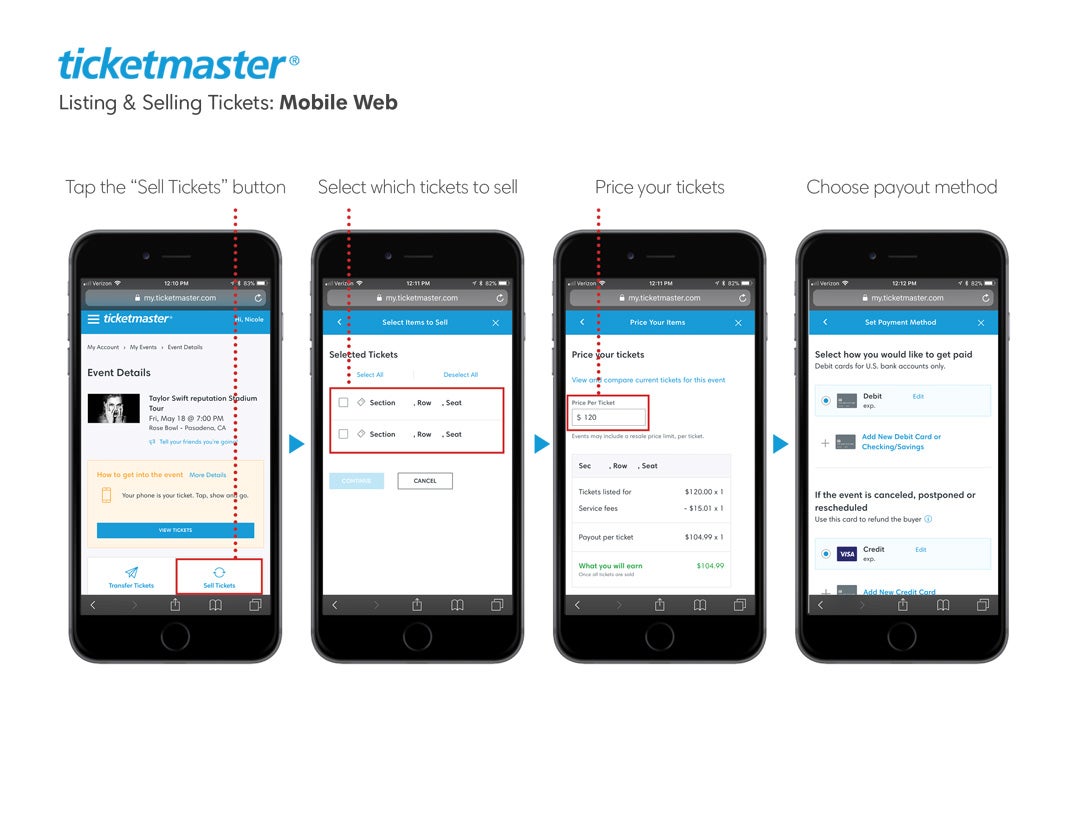
Once you have created a Ticketmaster account, the next step is to list your tickets for sale. This process involves several steps, including selecting the event, choosing ticket types, and setting prices. To list your tickets, navigate to the “Sell” tab on the Ticketmaster website and click on “List Tickets.”
Select the event for which you want to list tickets by searching for the event name or browsing through the list of available events. Make sure to select the correct event, as this will affect the visibility of your listing. Once you have selected the event, choose the ticket type you want to list, such as general admission or VIP tickets.
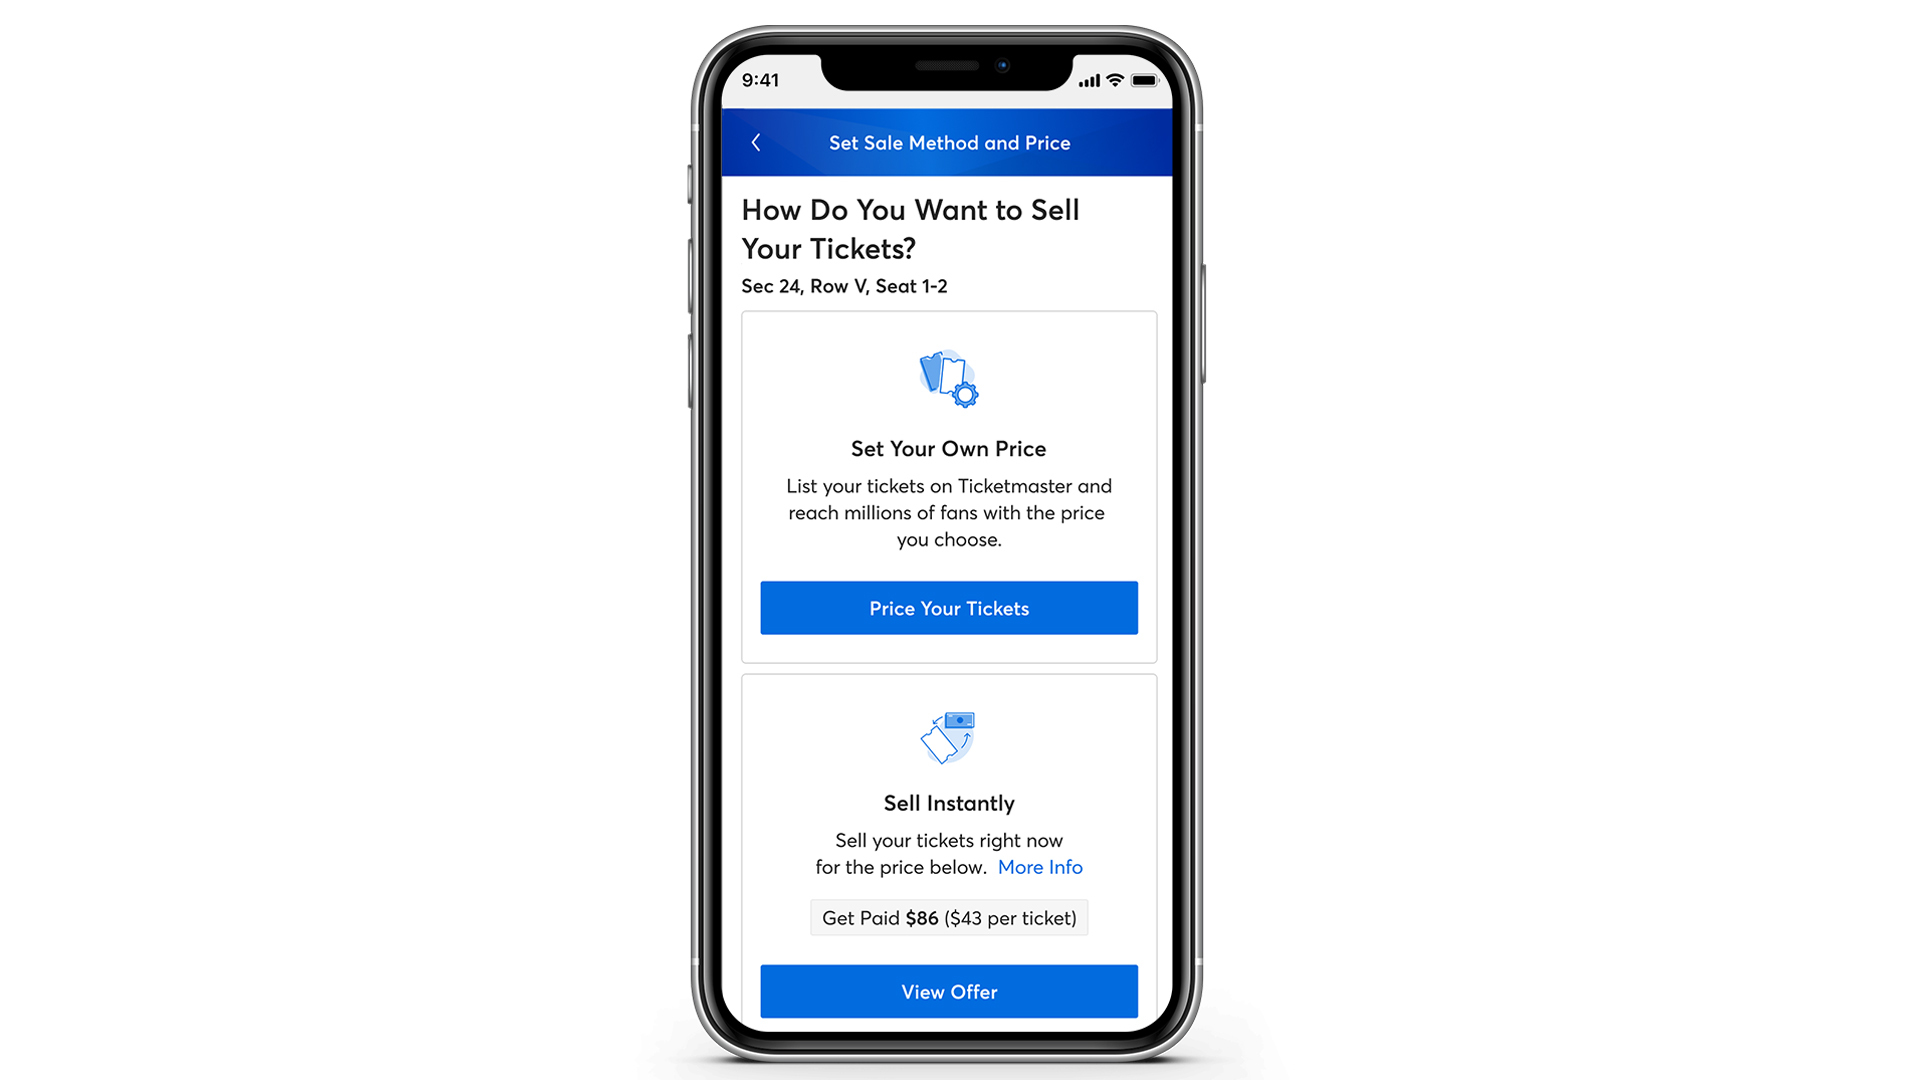
Next, set the price for your tickets. Ticketmaster allows you to set a fixed price or use the “Price Match” feature, which adjusts the price of your tickets based on demand. Be sure to research the market value of your tickets to ensure you are pricing them competitively. You can use tools like Ticketmaster’s pricing guide or check prices on other ticketing websites to determine the best price for your tickets.
After setting the price, add a detailed description of your tickets, including the seat location, row, and section. This information will help buyers make informed purchasing decisions. You can also add photos of the tickets or the event to enhance the listing.
Finally, review and confirm your listing details to ensure everything is accurate. Ticketmaster will review your listing to ensure it meets their guidelines and policies. Once your listing is approved, it will be visible to potential buyers on the Ticketmaster website.
By following these steps, you can successfully list your tickets on Ticketmaster and start selling them to eager buyers. Remember to keep your listings up-to-date and accurate to ensure a smooth and successful selling experience.
Setting Competitive Prices: Understanding Ticketmaster’s Pricing Structure
When it comes to selling tickets on Ticketmaster, setting competitive prices is crucial to attracting buyers and maximizing sales. Ticketmaster’s pricing structure is designed to help sellers set prices that are competitive with the market, while also ensuring that buyers are protected from inflated prices.
So, how do you set competitive prices for your tickets on Ticketmaster? The first step is to understand the factors that affect ticket prices. These include demand, supply, and event popularity. For example, tickets for popular events like concerts or sporting events tend to be more expensive than tickets for less popular events.
Ticketmaster’s pricing structure is based on a dynamic pricing model, which means that prices can fluctuate based on demand. This means that prices may be higher or lower depending on the time of day, the day of the week, and the proximity to the event date.
To set competitive prices, you can use Ticketmaster’s pricing guide, which provides a suggested price range for each event. You can also research prices on other ticketing websites, such as StubHub or Vivid Seats, to get an idea of what similar tickets are selling for.
Another important factor to consider is the fees associated with selling tickets on Ticketmaster. These fees can range from 10% to 15% of the ticket price, depending on the type of ticket and the seller’s account status. Make sure to factor these fees into your pricing strategy to ensure that you’re not losing money on your sales.
By understanding Ticketmaster’s pricing structure and setting competitive prices, you can increase your chances of selling your tickets quickly and for a good price. Remember to stay flexible and adjust your prices as needed to reflect changes in demand and market conditions.
Uploading Tickets: A Guide to Ticketmaster’s Ticket Upload Process
Uploading tickets to Ticketmaster is a straightforward process that requires some basic documentation and formatting. To ensure a successful upload, make sure you have the following information ready:
A clear and legible copy of the ticket, including the ticket number, event name, and seat information. Ticketmaster accepts tickets in PDF, JPEG, or PNG format.
A completed ticket upload form, which can be downloaded from the Ticketmaster website. This form requires information such as the ticket number, event name, and seat location.
Once you have gathered the necessary documentation, navigate to the “Sell” tab on the Ticketmaster website and click on “Upload Tickets.” Follow the prompts to select the event and ticket type, and then upload your ticket documentation.
Ticketmaster’s ticket upload process typically takes a few minutes to complete, depending on the number of tickets you are uploading. Once the upload is complete, you will receive a confirmation email from Ticketmaster with details about your ticket listing.
To avoid common errors during the ticket upload process, make sure to:
Use a clear and legible font when filling out the ticket upload form.
Ensure that the ticket documentation is complete and accurate, including the ticket number, event name, and seat information.
Use the correct file format for your ticket documentation, such as PDF, JPEG, or PNG.
By following these tips and guidelines, you can ensure a successful ticket upload and start selling your tickets on Ticketmaster.
Managing Your Listings: Tips for Success
Once you have listed your tickets on Ticketmaster, it’s essential to manage your listings effectively to ensure a smooth and successful selling experience. Here are some tips to help you manage your listings:
Monitor your sales: Keep track of your ticket sales and adjust your listings accordingly. If you notice that your tickets are not selling as quickly as you expected, consider adjusting your prices or updating your listings to make them more attractive to buyers.
Respond to buyer inquiries: Respond promptly to buyer inquiries and messages to ensure that you provide excellent customer service and build trust with potential buyers.
Update your listings: Keep your listings up-to-date and accurate, including the ticket details, prices, and availability. This will help you avoid any issues or disputes with buyers.
Use Ticketmaster’s sales tools: Ticketmaster provides a range of sales tools and features to help you manage your listings and maximize your sales. Take advantage of these tools to promote your listings, track your sales, and analyze your performance.
Keep your account information up-to-date: Make sure that your account information, including your contact details and payment information, is up-to-date and accurate. This will help you avoid any issues or delays with your sales.
By following these tips, you can effectively manage your listings and ensure a successful selling experience on Ticketmaster. Remember to stay organized, respond promptly to buyer inquiries, and keep your listings up-to-date to maximize your sales and build trust with potential buyers.
Ticketmaster’s Fees and Payment Terms: What You Need to Know
When selling tickets on Ticketmaster, it’s essential to understand the fees and payment terms associated with the platform. Ticketmaster charges various fees to sellers, including a listing fee, a payment processing fee, and a delivery fee.
The listing fee is a flat fee charged to sellers for each ticket listed on the platform. The payment processing fee is a percentage-based fee charged on the sale price of each ticket. The delivery fee is a flat fee charged to buyers for the delivery of tickets.
In addition to these fees, Ticketmaster also charges sellers a payment processing fee on the sale price of each ticket. This fee is typically a percentage of the sale price, and it’s used to cover the costs associated with processing payments.
It’s also important to note that Ticketmaster has a payment schedule that outlines when sellers can expect to receive payment for their ticket sales. Sellers can typically expect to receive payment within 5-7 business days after the event has taken place.
Understanding Ticketmaster’s fees and payment terms is crucial to avoiding any surprises or disputes when selling tickets on the platform. By knowing what to expect, sellers can better manage their finances and ensure a smooth selling experience.
Additionally, Ticketmaster also offers a variety of payment options to sellers, including direct deposit, check, and PayPal. Sellers can choose the payment option that best suits their needs, and Ticketmaster will handle the payment processing and delivery of funds.
By understanding Ticketmaster’s fees and payment terms, sellers can maximize their earnings and ensure a successful selling experience on the platform.
Common Issues and Solutions: Troubleshooting Your Ticketmaster Account
When selling tickets on Ticketmaster, you may encounter some common issues that can affect your sales and overall experience. In this section, we’ll address some of the most common issues and provide solutions and troubleshooting tips to help you resolve them.
Account Verification Issues: One of the most common issues that sellers face is account verification. If you’re having trouble verifying your account, make sure that you’ve provided all the required information and that your account is in good standing. You can also contact Ticketmaster’s customer support team for assistance.
Ticket Upload Errors: Another common issue is ticket upload errors. If you’re experiencing issues uploading your tickets, make sure that you’ve followed the correct formatting and documentation guidelines. You can also try uploading your tickets again or contacting Ticketmaster’s customer support team for assistance.
Buyer Disputes: Buyer disputes can be a challenge for sellers on Ticketmaster. If you’re experiencing issues with a buyer, make sure that you’ve communicated clearly and provided all the necessary information. You can also contact Ticketmaster’s customer support team for assistance in resolving the dispute.
Payment Issues: Payment issues can also arise when selling tickets on Ticketmaster. If you’re experiencing issues with payment, make sure that you’ve provided all the necessary payment information and that your account is in good standing. You can also contact Ticketmaster’s customer support team for assistance.
By understanding these common issues and solutions, you can troubleshoot and resolve any problems that may arise when selling tickets on Ticketmaster. Remember to always follow the guidelines and best practices outlined in this article to ensure a smooth and successful selling experience.
Maximizing Your Sales: Tips for Selling Tickets on Ticketmaster
To maximize your sales on Ticketmaster, it’s essential to promote your listings effectively. Here are some tips to help you increase your visibility and attract more buyers:
Promote your listings on social media: Share your listings on social media platforms like Facebook, Twitter, and Instagram to reach a wider audience. Use relevant hashtags and tag relevant accounts to increase your visibility.
Utilize Ticketmaster’s marketing tools: Ticketmaster offers a range of marketing tools to help you promote your listings. Use these tools to create eye-catching ads and promote your listings to potential buyers.
Leverage email marketing: Email marketing is a powerful way to promote your listings and attract more buyers. Use Ticketmaster’s email marketing tools to create targeted campaigns and reach potential buyers.
Optimize your listings for search: Make sure your listings are optimized for search by including relevant keywords and descriptions. This will help your listings appear in search results and attract more buyers.
Offer competitive pricing: Make sure your prices are competitive with other sellers on Ticketmaster. Research your competition and adjust your prices accordingly to attract more buyers.
Provide excellent customer service: Providing excellent customer service is essential to building trust with potential buyers. Respond promptly to inquiries and provide detailed information about your listings to attract more buyers.
By following these tips, you can maximize your sales on Ticketmaster and attract more buyers. Remember to stay proactive and continually monitor and adjust your listings to ensure the best possible results.


