Understanding the Importance of Image Resolution
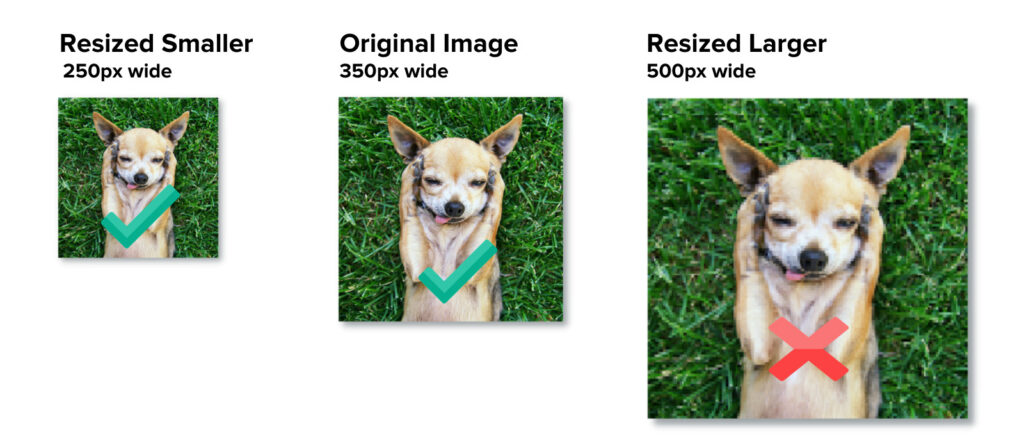
Image resolution refers to the number of pixels that make up an image, measured in pixels per inch (PPI) or dots per inch (DPI). A higher resolution means a more detailed and clearer image. When resizing an image, it’s essential to preserve its resolution to maintain its quality. However, resizing an image can affect its resolution, leading to a loss of quality if not done correctly. This is why it’s crucial to understand how to resize an image without losing quality.

Click Image to Find Market Products
When an image is resized, the pixels are either added or removed, depending on whether the image is being enlarged or reduced. If the image is enlarged, new pixels are created through a process called interpolation, which can lead to a loss of detail and a softening of the image. On the other hand, if the image is reduced, pixels are removed, which can result in a loss of detail and a degradation of the image quality.
To preserve the quality of an image when resizing, it’s essential to use the correct techniques and tools. This includes using image editing software that can resize images without losing quality, such as Adobe Photoshop or GIMP. It’s also important to understand the different resampling methods available, such as bicubic or bilinear interpolation, and to choose the one that best suits the image being resized.
Additionally, it’s crucial to avoid over-compressing images, as this can lead to a significant loss of quality. Compression algorithms, such as JPEG, can reduce the file size of an image, but they can also discard important data, resulting in a loss of detail and a degradation of the image quality.
By understanding the importance of image resolution and how to resize an image without losing quality, individuals can ensure that their images remain clear and detailed, even after resizing. This is particularly important for professionals who rely on high-quality images for their work, such as graphic designers, photographers, and web developers.
Choosing the Right Image Editing Software
When it comes to resizing images without losing quality, having the right image editing software is crucial. There are several popular options available, each with their own unique features and capabilities. In this section, we’ll take a closer look at some of the most popular image editing software, including Adobe Photoshop, GIMP, and Canva.
Adobe Photoshop is one of the most widely used image editing software, and for good reason. It offers a wide range of features and tools, including advanced resizing options, that make it ideal for professionals and hobbyists alike. Photoshop’s resizing capabilities include the ability to use different resampling methods, such as bicubic and bilinear interpolation, which can help preserve image quality.
GIMP, on the other hand, is a free and open-source image editing software that offers many of the same features as Photoshop. It’s a great option for those on a budget or who prefer a more lightweight solution. GIMP’s resizing options are also robust, with support for various resampling methods and the ability to resize images in batches.
Canva is a popular graphic design software that also offers image editing capabilities. While it may not have all the advanced features of Photoshop or GIMP, it’s a great option for those who want to quickly and easily resize images without losing quality. Canva’s resizing options are intuitive and easy to use, making it a great choice for beginners.
When choosing an image editing software for resizing images, consider the following factors: the type of images you’ll be working with, the level of control you need over the resizing process, and the software’s compatibility with your operating system. By selecting the right software, you’ll be able to resize your images with confidence and achieve professional-looking results.
In addition to these popular options, there are many other image editing software available, each with their own strengths and weaknesses. Some other notable options include Skylum Luminar, Capture One, and Affinity Photo. When evaluating image editing software, look for features such as support for various file formats, advanced resizing options, and batch processing capabilities.
By investing in the right image editing software, you’ll be able to resize your images without losing quality and achieve professional-looking results. Whether you’re a professional photographer, graphic designer, or simply a hobbyist, having the right tools at your disposal can make all the difference in the quality of your work.

The Art of Resizing: Best Practices for Preserving Image Quality
Resizing an image can be a delicate process, and it’s essential to follow best practices to preserve image quality. When resizing an image, the goal is to maintain the original image’s clarity, detail, and overall appearance. To achieve this, it’s crucial to use the correct resampling method, avoid over-compression, and use image editing software to resize images.
One of the most critical factors in preserving image quality is choosing the right resampling method. Resampling methods determine how the image is resized, and different methods can produce varying results. The most common resampling methods are nearest neighbor, bilinear, and bicubic. Nearest neighbor is the fastest method but can produce a low-quality image. Bilinear and bicubic methods are more accurate but can be slower.
When resizing an image, it’s also essential to avoid over-compression. Compression can reduce the file size of an image, but it can also discard important data, leading to a loss of quality. To avoid over-compression, it’s recommended to use a moderate compression level, depending on the image’s intended use. For example, if the image is for web use, a higher compression level may be acceptable, but if the image is for print, a lower compression level is recommended.
Using image editing software is also crucial when resizing images. Software like Adobe Photoshop, GIMP, and Canva offer advanced resizing options and tools that can help preserve image quality. These software options allow users to adjust the resampling method, compression level, and other settings to achieve the best possible results.
In addition to using the correct resampling method and avoiding over-compression, there are other best practices to follow when resizing images. These include:
- Resizing images in small increments to avoid significant quality loss
- Using the original image file whenever possible to avoid degradation
- Avoiding resizing images multiple times, as this can lead to cumulative quality loss
- Using image editing software to resize images, rather than relying on online tools or other software
By following these best practices and using the correct techniques, it’s possible to resize images without losing quality. Whether you’re a professional photographer, graphic designer, or simply a hobbyist, mastering the art of resizing images is essential for achieving professional-looking results.
Remember, when resizing an image, the goal is to preserve the original image’s quality and appearance. By using the correct resampling method, avoiding over-compression, and using image editing software, you can achieve high-quality results that meet your needs.
How to Resize an Image Using Adobe Photoshop
Adobe Photoshop is a powerful image editing software that offers advanced resizing options. In this section, we’ll provide a step-by-step guide on how to resize an image using Adobe Photoshop, including how to use the Image Size dialog box and the Resample Image option.
To resize an image in Adobe Photoshop, follow these steps:
- Open the image you want to resize in Adobe Photoshop.
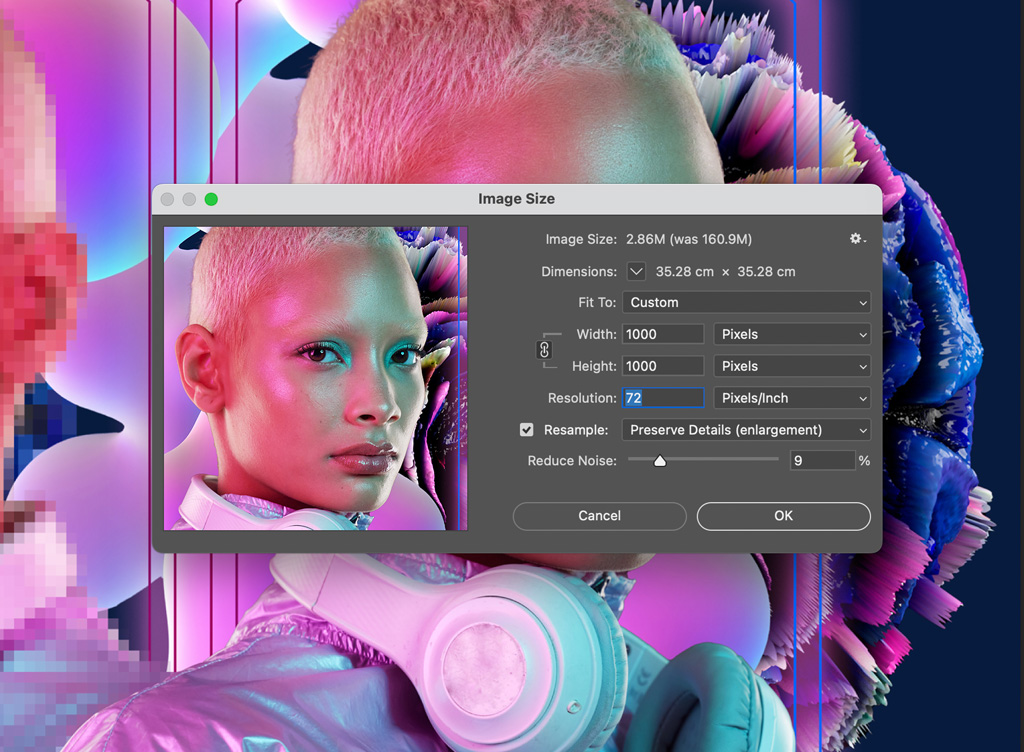
- Go to the “Image” menu and select “Image Size” from the drop-down menu.
- In the Image Size dialog box, enter the new dimensions for the image in the “Width” and “Height” fields.
- Select the “Resample Image” checkbox to enable the resampling options.
- Choose the resampling method from the “Resample Image” dropdown menu. The most common methods are “Bicubic”, “Bilinear”, and “Nearest Neighbor”.
- Adjust the “Resolution” field to set the desired resolution for the image.
- Click “OK” to apply the changes and resize the image.
It’s essential to note that when resizing an image, the resolution and pixel dimensions are closely related. If you increase the resolution, the pixel dimensions will also increase, and vice versa. To maintain the image quality, it’s recommended to keep the resolution consistent with the original image.
In addition to using the Image Size dialog box, Adobe Photoshop also offers other resizing options, such as the “Transform” tool and the “Crop” tool. The “Transform” tool allows you to resize the image by dragging the corners or edges, while the “Crop” tool enables you to crop the image to a specific size.
When resizing an image in Adobe Photoshop, it’s also important to consider the image’s aspect ratio. The aspect ratio is the ratio of the image’s width to its height. To maintain the image’s original aspect ratio, make sure to check the “Constrain Proportions” checkbox in the Image Size dialog box.
By following these steps and using the correct resampling method, you can resize an image in Adobe Photoshop without losing quality. Remember to always save the resized image in a suitable file format, such as JPEG or PNG, to ensure the best possible results.
Alternative Methods: Resizing Images Online and Using Other Software
In addition to using Adobe Photoshop, there are several alternative methods for resizing images, including online tools and other software options. These alternatives can be useful for those who don’t have access to Adobe Photoshop or prefer a more streamlined process.
Online tools such as TinyPNG and ImageResize.org offer a quick and easy way to resize images without losing quality. These tools use advanced algorithms to compress images and reduce file size, making them ideal for web use. Simply upload your image, select the desired dimensions, and download the resized image.
Other software options like IrfanView and XnView also offer image resizing capabilities. IrfanView is a free image viewer and editor that allows you to resize images using various resampling methods. XnView is a free image viewer and converter that also offers image resizing options.
When using online tools or alternative software, it’s essential to consider the image’s file format and compression level. Some online tools may compress images too much, resulting in a loss of quality. Others may not support certain file formats, such as PNG or GIF.
To ensure the best possible results, it’s recommended to use a combination of online tools and software. For example, you can use an online tool to resize an image and then use Adobe Photoshop to fine-tune the image and make any necessary adjustments.
Some popular online tools for resizing images include:
- TinyPNG: A popular online tool for compressing and resizing images.
- ImageResize.org: A free online tool for resizing images without losing quality.
- ResizeImage.net: A free online tool for resizing images and converting file formats.
Some popular alternative software for resizing images include:
- IrfanView: A free image viewer and editor that offers image resizing capabilities.
- XnView: A free image viewer and converter that also offers image resizing options.
- GIMP: A free and open-source image editing software that offers advanced resizing options.
By exploring these alternative methods, you can find the best solution for your image resizing needs and achieve professional-looking results.

Common Mistakes to Avoid When Resizing Images
When resizing images, it’s easy to make mistakes that can compromise the quality of the image. In this section, we’ll highlight some common mistakes to avoid when resizing images, including using the wrong resampling method, over-compressing images, and not saving images in the correct format.
One of the most common mistakes people make when resizing images is using the wrong resampling method. Resampling methods determine how the image is resized, and different methods can produce varying results. For example, using the “nearest neighbor” resampling method can result in a low-quality image, while using the “bicubic” resampling method can produce a higher-quality image.
Another mistake people make is over-compressing images. Compression can reduce the file size of an image, but it can also discard important data, leading to a loss of quality. To avoid over-compressing images, it’s essential to use a moderate compression level, depending on the image’s intended use.
Not saving images in the correct format is also a common mistake. Different file formats have different compression algorithms and capabilities, and using the wrong format can result in a loss of quality. For example, saving an image as a JPEG when it should be saved as a PNG can result in a loss of transparency and detail.
Other common mistakes to avoid when resizing images include:
- Not considering the image’s aspect ratio when resizing
- Not using image editing software to resize images
- Not saving images in the correct color mode (e.g., RGB, CMYK)
- Not using the correct resolution for the image’s intended use
By avoiding these common mistakes, you can ensure that your resized images maintain their quality and look professional. Remember to always use the correct resampling method, avoid over-compressing images, and save images in the correct format.
In addition to avoiding these mistakes, it’s also essential to understand the different file formats and their capabilities. For example, JPEG is a compressed format that’s ideal for photographs, while PNG is an uncompressed format that’s ideal for graphics and logos.
By mastering the art of image resizing and avoiding common mistakes, you can achieve professional-looking results and ensure that your images look their best.

Optimizing Images for Web Use: A Guide to File Formats and Compression
When it comes to using images on the web, optimizing them for web use is crucial to ensure fast loading times and a good user experience. In this section, we’ll discuss the importance of choosing the right file format and using compression techniques to reduce file size.
File formats play a significant role in image optimization. Different file formats have different compression algorithms and capabilities, and choosing the right one can make a big difference in image quality and file size. For example, JPEG is a compressed format that’s ideal for photographs, while PNG is an uncompressed format that’s ideal for graphics and logos.
When it comes to compression, there are several techniques that can be used to reduce file size without compromising image quality. One of the most common techniques is lossy compression, which discards some of the image data to reduce file size. Another technique is lossless compression, which compresses the image data without discarding any of it.
Some popular file formats for web use include:
- JPEG: A compressed format ideal for photographs
- PNG: An uncompressed format ideal for graphics and logos
- GIF: A compressed format ideal for animations and graphics
- WebP: A compressed format developed by Google that’s ideal for web use
When choosing a file format, consider the type of image, the intended use, and the desired level of compression. For example, if you’re using a photograph on a website, JPEG may be the best choice. If you’re using a graphic or logo, PNG may be the best choice.
In addition to choosing the right file format, using compression techniques can also help reduce file size. Some popular compression tools include:
- TinyPNG: A popular online tool for compressing PNG images
- ImageOptim: A popular online tool for compressing JPEG and PNG images
- ShortPixel: A popular online tool for compressing JPEG and PNG images
By choosing the right file format and using compression techniques, you can optimize your images for web use and ensure fast loading times and a good user experience.
Remember, optimizing images for web use is an important step in ensuring a good user experience. By following these tips and best practices, you can ensure that your images are optimized for web use and look their best.

Conclusion: Mastering Image Resizing for Professional Results
In conclusion, mastering image resizing techniques is essential for achieving professional-looking results. By understanding the importance of image resolution, choosing the right image editing software, and using the correct resampling method, you can ensure that your images are resized without losing quality.
Additionally, avoiding common mistakes such as over-compressing images, not saving images in the correct format, and using the wrong resampling method can help you achieve the best possible results.
By following the tips and best practices outlined in this article, you can master the art of image resizing and achieve professional-looking results. Whether you’re a graphic designer, photographer, or web developer, mastering image resizing techniques is essential for creating high-quality images that meet your needs.
Remember, image resizing is a critical step in the image editing process, and it’s essential to get it right. By taking the time to learn about image resizing and mastering the techniques outlined in this article, you can ensure that your images are resized without losing quality and achieve professional-looking results.
In summary, mastering image resizing techniques requires a combination of knowledge, skill, and practice. By understanding the importance of image resolution, choosing the right image editing software, and using the correct resampling method, you can achieve professional-looking results and take your image editing skills to the next level.
So, the next time you need to resize an image, remember to use the correct resampling method, avoid over-compressing images, and save images in the correct format. With practice and patience, you can master the art of image resizing and achieve professional-looking results.