Unlocking the Power of CSS in WordPress
CSS (Cascading Style Sheets) is a crucial component of web development, allowing developers to control the layout, typography, and visual styling of a website. In WordPress, CSS plays a vital role in customizing the design of a site, enabling users to create a unique and engaging user experience. When it comes to editing CSS in WordPress, understanding its importance is essential to unlocking the full potential of a website’s design.
By editing CSS in WordPress, users can enhance the visual appeal of their site, improve user experience, and increase engagement. CSS can be used to create custom layouts, modify typography, and add visual effects, making it an essential tool for any WordPress user. Whether you’re a beginner or an experienced developer, understanding how to edit CSS in WordPress is crucial to creating a professional-looking website.
One of the primary benefits of editing CSS in WordPress is the ability to customize the design of a site without modifying the underlying HTML structure. This allows users to make changes to the layout, typography, and visual styling of a site without affecting the content or functionality. Additionally, CSS can be used to create responsive designs, ensuring that a website looks great on all devices, from desktops to mobile phones.
When it comes to editing CSS in WordPress, there are several methods to choose from, including the use of the built-in Theme Editor, a child theme, or a third-party plugin. Each method has its advantages and disadvantages, and understanding the best approach for your needs is essential to editing CSS effectively in WordPress.
In the next section, we’ll explore the different ways to access and edit CSS files in WordPress, including the use of the Theme Editor, child themes, and third-party plugins. By understanding the various methods available, you’ll be able to choose the best approach for your needs and start editing CSS in WordPress with confidence.
Accessing and Editing CSS Files in WordPress
When it comes to editing CSS in WordPress, there are several methods to access and edit CSS files. Understanding the different approaches can help you choose the best method for your needs and ensure a smooth editing experience.
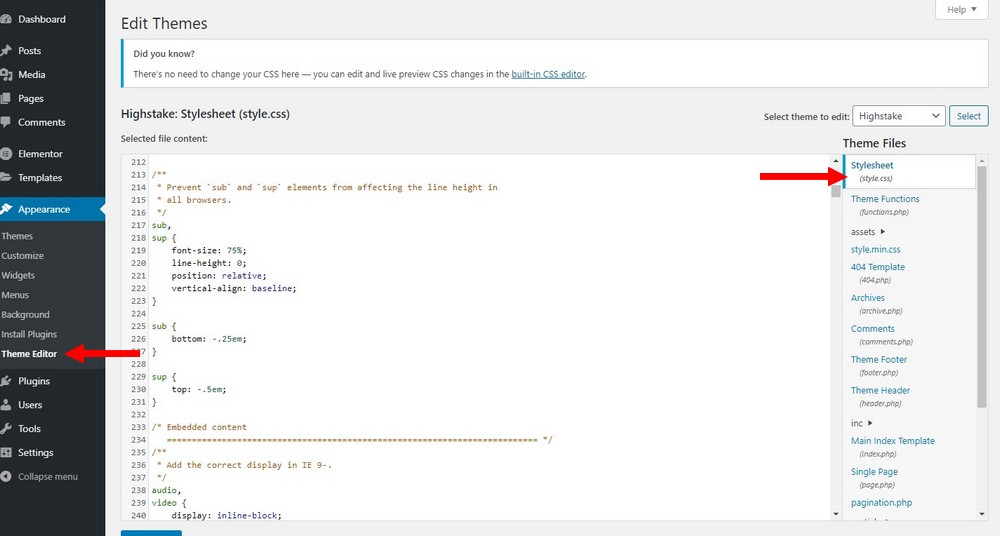
One of the most common methods for editing CSS in WordPress is through the built-in Theme Editor. Located in the WordPress dashboard, the Theme Editor allows you to access and edit your theme’s CSS files directly. To access the Theme Editor, navigate to Appearance > Editor and select the CSS file you want to edit. From there, you can make changes to the code and save your updates.
Another popular method for editing CSS in WordPress is through the use of a child theme. A child theme is a separate theme that inherits the functionality of a parent theme, allowing you to make changes to the CSS without modifying the parent theme. To create a child theme, you’ll need to create a new folder in your WordPress themes directory and add a style.css file. From there, you can add your custom CSS code and activate the child theme.
Third-party plugins like WPBakery or Elementor also offer a convenient way to edit CSS in WordPress. These plugins provide a visual interface for editing CSS, allowing you to make changes to your site’s design without writing code. To use a third-party plugin, simply install and activate the plugin, and then navigate to the plugin’s settings to access the CSS editor.
Regardless of the method you choose, it’s essential to use caution when editing CSS in WordPress. Make sure to create a backup of your site before making any changes, and test your updates thoroughly to ensure they don’t break your site’s functionality. Additionally, consider using a CSS preprocessor like Sass or Less to streamline your workflow and improve your code’s efficiency.
By understanding the different methods for accessing and editing CSS files in WordPress, you can take control of your site’s design and make changes with confidence. In the next section, we’ll explore the basics of CSS selectors and properties, including how to target specific HTML elements and apply styles to different elements.
Understanding CSS Selectors and Properties
CSS selectors and properties are the building blocks of CSS, allowing you to target specific HTML elements and apply styles to different elements. In WordPress, understanding CSS selectors and properties is crucial to customizing your site’s design and creating a unique user experience.
A CSS selector is a pattern used to select the HTML elements you want to style. There are several types of CSS selectors, including element selectors, class selectors, and ID selectors. Element selectors target HTML elements by their name, such as `h1` or `p`. Class selectors target HTML elements with a specific class attribute, such as `.header` or `.footer`. ID selectors target HTML elements with a specific ID attribute, such as `#logo` or `#nav`.
CSS properties, on the other hand, define the styles you want to apply to the selected HTML elements. There are many different CSS properties, including `color`, `font-size`, `background-color`, and `margin`. By combining CSS selectors and properties, you can create complex styles and layouts for your WordPress site.
For example, to change the font size of all paragraph elements on your WordPress site, you could use the following CSS code: `p { font-size: 18px; }`. This code targets all paragraph elements (`p`) and applies a font size of 18 pixels to each element.
In WordPress, you can use CSS selectors and properties to customize your site’s design in many different ways. For example, you could use CSS to change the layout of your site’s header, add a background image to your site’s footer, or create a custom design for your site’s blog posts.
Some common CSS selectors and properties used in WordPress themes include:
- `body { background-color: #f2f2f2; }` – sets the background color of the entire page
- `h1 { font-size: 36px; }` – sets the font size of all heading 1 elements
- `.header { background-color: #333; }` – sets the background color of the header element
- `#nav { margin-top: 20px; }` – sets the margin top of the navigation element
By understanding CSS selectors and properties, you can take control of your WordPress site’s design and create a unique user experience. In the next section, we’ll explore how to use the WordPress Customizer to edit CSS and make changes to your site’s design in real-time.
Using the WordPress Customizer to Edit CSS
The WordPress Customizer is a powerful tool that allows you to make changes to your site’s design in real-time. One of the most useful features of the Customizer is the Additional CSS panel, which allows you to edit your site’s CSS code directly within the Customizer.
To access the Customizer, navigate to Appearance > Customize in your WordPress dashboard. From there, you can access the Additional CSS panel by clicking on the “Additional CSS” button in the left-hand menu.
Once you’re in the Additional CSS panel, you can start editing your site’s CSS code. The Customizer will automatically update your site’s design in real-time, allowing you to see the changes you’re making as you make them.
One of the benefits of using the Customizer to edit CSS is that it allows you to make changes to your site’s design without having to write code. The Customizer provides a user-friendly interface that makes it easy to make changes to your site’s layout, typography, and visual styling.
Another benefit of using the Customizer is that it allows you to preview changes in real-time. This means that you can see how your changes will affect your site’s design before you save them, which can help you avoid making mistakes.
However, there are some limitations to using the Customizer to edit CSS. For example, the Customizer only allows you to edit the CSS code for the current theme, which means that you won’t be able to make changes to the CSS code for other themes. Additionally, the Customizer can be slow to load and may not work well with complex CSS code.
Despite these limitations, the Customizer is a powerful tool that can be used to make a wide range of changes to your site’s design. By using the Customizer to edit CSS, you can create a unique and customized design for your WordPress site.
Some examples of how to use the Customizer to edit CSS include:
- Changing the font size and color of your site’s headings
- Adding a background image to your site’s header
- Changing the layout of your site’s footer
- Adding custom CSS classes to your site’s HTML elements
By using the Customizer to edit CSS, you can take control of your site’s design and create a unique user experience. In the next section, we’ll explore some best practices for editing CSS in WordPress, including how to use a child theme and create a backup of your site.
Best Practices for Editing CSS in WordPress
When editing CSS in WordPress, it’s essential to follow best practices to ensure a smooth and efficient editing experience. Here are some tips to help you edit CSS in WordPress like a pro:
1. Use a child theme: A child theme is a separate theme that inherits the functionality of a parent theme. Using a child theme allows you to make changes to your site’s design without modifying the parent theme. This is especially useful when editing CSS, as it ensures that your changes won’t be overwritten when the parent theme is updated.
2. Create a backup of your site: Before making any changes to your site’s CSS, create a backup of your site. This will ensure that you can restore your site to its previous state if something goes wrong.
3. Test changes thoroughly: When making changes to your site’s CSS, test them thoroughly to ensure that they don’t break your site’s functionality. Use tools like the WordPress Customizer’s preview feature to test changes in real-time.
4. Comment your code: Commenting your code is essential when editing CSS in WordPress. This will help you keep track of your changes and make it easier to debug your code.
5. Use a CSS preprocessor like Sass or Less: CSS preprocessors like Sass or Less can help you write more efficient and modular CSS code. They also provide features like variables, nesting, and mixins that can make your CSS code more readable and maintainable.
6. Use a code editor with syntax highlighting: A code editor with syntax highlighting can help you write more efficient and error-free CSS code. It will also make it easier to read and understand your code.
7. Test for cross-browser compatibility: When editing CSS in WordPress, it’s essential to test for cross-browser compatibility. This will ensure that your site’s design looks and functions correctly in different browsers.
By following these best practices, you can ensure a smooth and efficient editing experience when editing CSS in WordPress. In the next section, we’ll discuss common mistakes to avoid when editing CSS in WordPress.
Common CSS Editing Mistakes to Avoid in WordPress
When editing CSS in WordPress, it’s easy to make mistakes that can break your site’s design or functionality. Here are some common CSS editing mistakes to avoid in WordPress:
1. Overwriting parent theme styles: When editing CSS in WordPress, it’s essential to avoid overwriting parent theme styles. This can cause your site’s design to break or become inconsistent. Instead, use a child theme to make changes to your site’s design.
2. Using !important excessively: The !important keyword in CSS is used to override other styles. However, using it excessively can make your CSS code difficult to maintain and debug. Instead, use it sparingly and only when necessary.
3. Neglecting to test for cross-browser compatibility: When editing CSS in WordPress, it’s essential to test for cross-browser compatibility. This ensures that your site’s design looks and functions correctly in different browsers. Use tools like BrowserStack or CrossBrowserTesting to test your site’s design in different browsers.
4. Not commenting your code: Commenting your CSS code is essential for maintaining and debugging your code. It also helps other developers understand your code. Use comments to explain what each section of your code does.
5. Not using a CSS preprocessor like Sass or Less: CSS preprocessors like Sass or Less can help you write more efficient and modular CSS code. They also provide features like variables, nesting, and mixins that can make your CSS code more readable and maintainable.
6. Not testing changes thoroughly: When editing CSS in WordPress, it’s essential to test changes thoroughly. This ensures that your site’s design looks and functions correctly after making changes. Use tools like the WordPress Customizer’s preview feature to test changes in real-time.
By avoiding these common CSS editing mistakes, you can ensure a smooth and efficient editing experience when editing CSS in WordPress. In the next section, we’ll discuss advanced CSS editing techniques for WordPress.
Advanced CSS Editing Techniques for WordPress
Once you have a solid understanding of the basics of CSS editing in WordPress, you can start exploring more advanced techniques to enhance your site’s design. Here are some advanced CSS editing techniques for WordPress:
1. Using CSS preprocessors like Sass or Less: CSS preprocessors like Sass or Less can help you write more efficient and modular CSS code. They also provide features like variables, nesting, and mixins that can make your CSS code more readable and maintainable.
2. Creating custom layouts with CSS Grid or Flexbox: CSS Grid and Flexbox are powerful layout systems that can help you create custom layouts for your WordPress site. They provide a flexible and efficient way to arrange elements on your site.
3. Using CSS frameworks like Bootstrap or Foundation: CSS frameworks like Bootstrap or Foundation can help you create a consistent and responsive design for your WordPress site. They provide pre-built CSS classes and layouts that can save you time and effort.
4. Creating custom animations and transitions with CSS: CSS animations and transitions can help you add visual interest and interactivity to your WordPress site. They can be used to create custom animations, transitions, and effects that enhance the user experience.
5. Using CSS media queries to create responsive designs: CSS media queries can help you create responsive designs that adapt to different screen sizes and devices. They allow you to apply different styles based on the screen size, device type, and other factors.
By using these advanced CSS editing techniques, you can take your WordPress site’s design to the next level and create a unique and engaging user experience. In the next section, we’ll discuss how to troubleshoot common CSS issues in WordPress.
Troubleshooting Common CSS Issues in WordPress
When editing CSS in WordPress, it’s not uncommon to encounter issues that can affect the design and functionality of your site. Here are some common CSS issues in WordPress and how to troubleshoot them:
1. Identifying and fixing errors: When editing CSS in WordPress, it’s essential to identify and fix errors that can break your site’s design or functionality. Use tools like the WordPress Debug Bar or the Chrome DevTools to identify errors and fix them.
2. Using browser developer tools: Browser developer tools like Chrome DevTools or Firefox Developer Edition can help you troubleshoot CSS issues in WordPress. They provide features like element inspection, CSS editing, and debugging that can help you identify and fix issues.
3. Seeking help from the WordPress community: The WordPress community is a great resource for troubleshooting CSS issues in WordPress. Use online forums like the WordPress Support Forums or Stack Overflow to seek help from experienced developers and designers.
4. Checking for cross-browser compatibility: When editing CSS in WordPress, it’s essential to check for cross-browser compatibility to ensure that your site’s design looks and functions correctly in different browsers. Use tools like BrowserStack or CrossBrowserTesting to test your site’s design in different browsers.
5. Using CSS debugging tools: CSS debugging tools like CSS Lint or CSS Validator can help you identify and fix CSS issues in WordPress. They provide features like CSS validation, error detection, and debugging that can help you troubleshoot CSS issues.
By following these tips, you can troubleshoot common CSS issues in WordPress and ensure that your site’s design looks and functions correctly. Remember to always test your site’s design in different browsers and devices to ensure cross-browser compatibility.


