What is a Favicon and Why is it Important?
A favicon, short for “favorite icon,” is a small icon that appears in the address bar, bookmarks, and tabs of a web browser. It serves as a visual representation of a website’s brand and is often the first thing users notice when visiting a site. In WordPress, a favicon plays a crucial role in establishing a website’s identity and credibility. A well-designed favicon can improve website recognition, making it easier for users to distinguish a site from others. Moreover, a favicon can also enhance user experience by providing a consistent visual element across different devices and browsers.
When it comes to changing the favicon in WordPress, it’s essential to understand the importance of this small icon. A favicon can be a simple image, but its impact on a website’s branding and user experience cannot be overstated. By changing the favicon, website owners can refresh their brand’s image, improve user engagement, and increase website recognition. In this article, we will explore the different methods for changing the favicon in WordPress, including using the built-in Customizer, a plugin, or manual code editing.
Before diving into the methods for changing the favicon, it’s crucial to understand the technical requirements for a WordPress favicon. The recommended size for a favicon is 16×16 pixels, although some devices may support larger sizes. The file format should be in .ico, .png, or .gif, with .ico being the most widely supported. By meeting these technical requirements, website owners can ensure that their favicon displays correctly across different devices and browsers.
Changing the favicon in WordPress can seem daunting, but with the right approach, it can be a straightforward process. Whether you’re looking to refresh your brand’s image or improve user experience, changing the favicon is an essential step in customizing your WordPress site. In the following sections, we will explore the different methods for changing the favicon, including using the built-in Customizer, a plugin, or manual code editing.
Understanding the Requirements for a WordPress Favicon
When it comes to creating a favicon for your WordPress site, there are several technical requirements to keep in mind. A favicon should be a small, square image that is optimized for display on a variety of devices and browsers. The recommended size for a favicon is 16×16 pixels, although some devices may support larger sizes. It’s also important to choose the right file format for your favicon, with .ico, .png, and .gif being the most widely supported options.
In terms of design, a favicon should be simple, yet distinctive. A good favicon should be easily recognizable, even at small sizes, and should reflect the branding and style of your WordPress site. When designing your favicon, consider using a bold, contrasting color scheme and a simple, iconic design that will stand out against a variety of backgrounds.
To create a favicon that meets these requirements, you can use a variety of design tools and software. Adobe Photoshop and Illustrator are popular choices for creating favicons, although there are also many free and online design tools available. When creating your favicon, be sure to save it in the correct file format and size, and test it on a variety of devices and browsers to ensure that it displays correctly.
By understanding the technical requirements for a WordPress favicon and following best practices for design, you can create a favicon that will help to establish your brand and improve the user experience on your WordPress site. In the next section, we’ll explore the different methods for changing the favicon in WordPress, including using the built-in Customizer, a plugin, or manual code editing.
Methods for Changing the Favicon in WordPress
When it comes to changing the favicon in WordPress, there are several methods to choose from. Each method has its own pros and cons, and the best approach will depend on your specific needs and level of technical expertise. In this section, we’ll explore the different methods for changing the favicon in WordPress, including using the built-in Customizer, a plugin, or manual code editing.
One of the easiest ways to change the favicon in WordPress is by using the built-in Customizer. This method is ideal for users who are not comfortable with coding or who want a simple and straightforward solution. The Customizer allows you to upload a new favicon and preview it in real-time, making it easy to test and adjust your favicon until you get it just right.
Another popular method for changing the favicon in WordPress is by using a plugin. There are many plugins available that can help you change your favicon, including plugins that offer advanced features such as favicon animation and customization. Using a plugin can be a good option if you want more control over your favicon or if you need to change your favicon frequently.
For more advanced users, manual code editing is also an option. This method involves editing the code of your WordPress theme to change the favicon. While this method can be more complex and time-consuming, it offers the most flexibility and control over your favicon. However, it’s essential to be careful when editing code, as mistakes can cause errors and break your site.
Regardless of which method you choose, it’s essential to test your favicon in different browsers and devices to ensure that it displays correctly. In the next section, we’ll provide a step-by-step guide on how to change the favicon using the WordPress Customizer, including screenshots and detailed instructions to make it easy to follow.
Using the WordPress Customizer to Change the Favicon
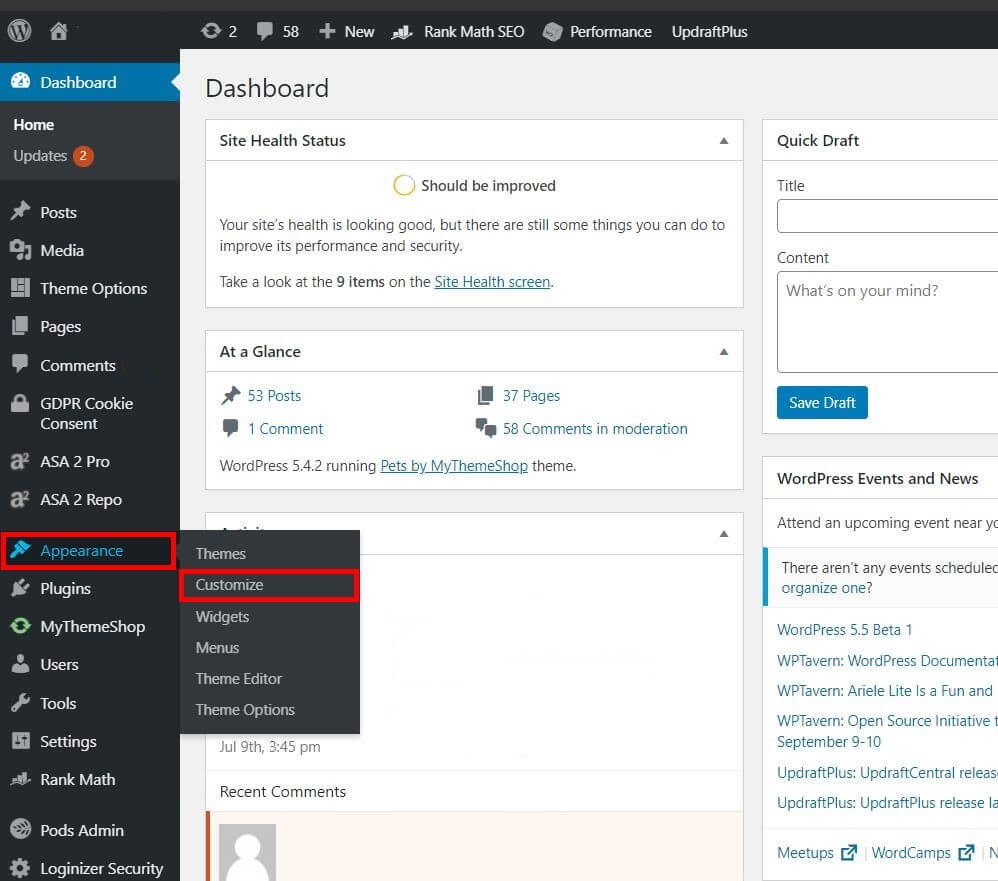
Changing the favicon in WordPress using the Customizer is a straightforward process that can be completed in a few steps. To get started, log in to your WordPress dashboard and navigate to the Customizer by clicking on the “Appearance” tab and then selecting “Customize”.
Once you are in the Customizer, click on the “Site Identity” tab and then click on the “Select site icon” button. This will open a new window where you can upload your new favicon.
To upload your favicon, click on the “Select file” button and then choose the favicon file from your computer. Make sure that your favicon is in the correct format (such as .ico, .png, or .gif) and is the correct size (such as 16×16 pixels).
Once you have uploaded your favicon, you can preview it in the Customizer to make sure it looks correct. If everything looks good, click on the “Publish” button to save your changes.
That’s it Your new favicon should now be displayed on your WordPress site. If you encounter any issues or if your favicon is not displaying correctly, you can try troubleshooting the problem or seeking help from a WordPress expert.
Here’s a screenshot of the Customizer interface to help you visualize the process:

As you can see, the Customizer makes it easy to change the favicon in WordPress without having to edit any code. This method is ideal for users who are not comfortable with coding or who want a simple and straightforward solution.
Changing the Favicon using a Plugin
Another popular method for changing the favicon in WordPress is by using a plugin. There are many plugins available that can help you change your favicon, including plugins that offer advanced features such as favicon animation and customization.
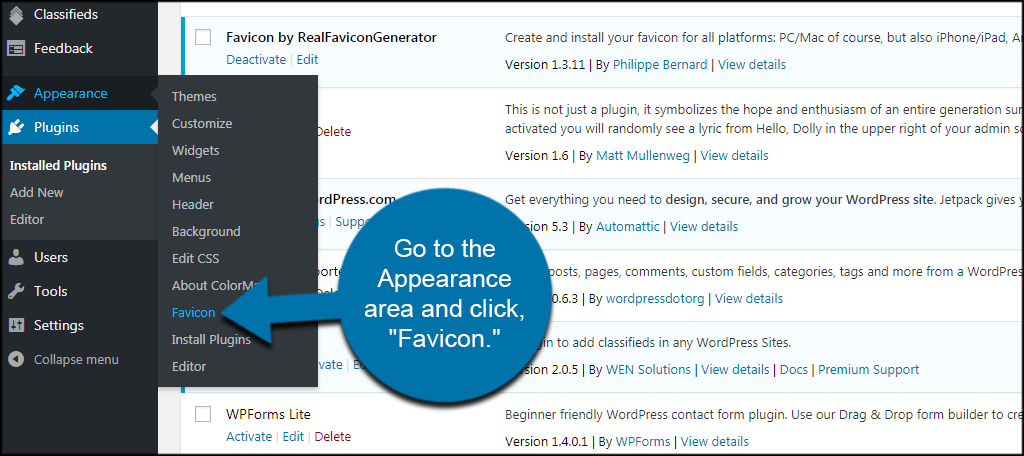
One popular plugin for changing the favicon is the “Favicon by RealFaviconGenerator” plugin. This plugin allows you to easily upload and customize your favicon, and also provides advanced features such as favicon animation and retina display support.
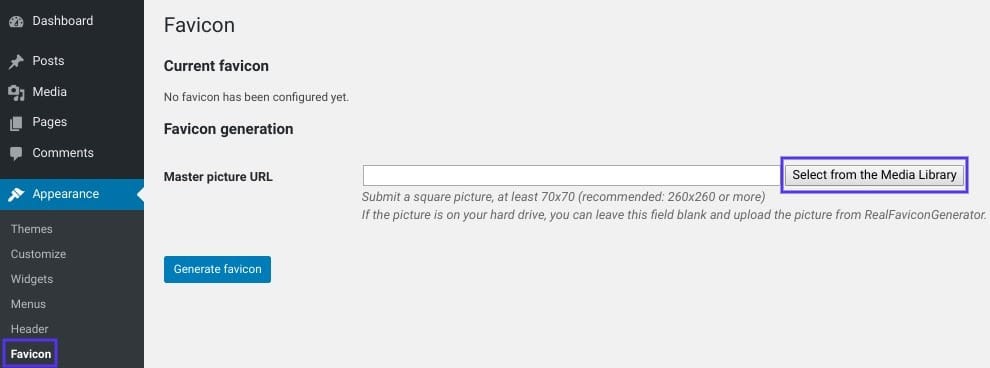
To use the “Favicon by RealFaviconGenerator” plugin, simply install and activate it on your WordPress site. Then, navigate to the plugin’s settings page and click on the “Upload Favicon” button. Select your favicon file and click on the “Upload” button to upload it to your site.
Once your favicon is uploaded, you can customize it using the plugin’s settings page. You can choose from a variety of options, including the ability to animate your favicon and add retina display support.
The “Favicon by RealFaviconGenerator” plugin is a great option for users who want a simple and easy-to-use solution for changing their favicon. It’s also a good option for users who want advanced features such as favicon animation and customization.
Here’s a screenshot of the plugin’s settings page to help you visualize the process:
![]()
Using a plugin to change the favicon in WordPress is a great option for users who want a simple and easy-to-use solution. It’s also a good option for users who want advanced features such as favicon animation and customization.
Manually Editing the Code to Change the Favicon
Manually editing the code to change the favicon in WordPress requires a good understanding of HTML, CSS, and PHP. This method is recommended for advanced users who are comfortable with coding and want to have more control over their favicon.
To manually edit the code to change the favicon, you will need to access your WordPress site’s files using a file manager or FTP client. Once you have access to the files, you will need to locate the favicon file, which is usually located in the root directory of your site.
The favicon file is typically named “favicon.ico” and is located in the root directory of your site. To change the favicon, you will need to replace this file with a new one. You can do this by uploading a new favicon file to the root directory of your site, or by editing the existing favicon file using a code editor.
Once you have replaced the favicon file, you will need to update the code in your WordPress site’s header file to point to the new favicon file. This can be done by adding the following code to the header file:
<link rel="icon" type="image/x-icon" href="/favicon.ico" />
This code tells WordPress to use the new favicon file as the icon for your site. You will need to update the code to point to the correct location of your new favicon file.
Manually editing the code to change the favicon can be a bit tricky, and there is a risk of breaking your site if you make a mistake. Therefore, it’s recommended to use a plugin or the Customizer to change the favicon, unless you are comfortable with coding and want to have more control over your favicon.
Here’s a screenshot of the code editor to help you visualize the process:

Manually editing the code to change the favicon requires a good understanding of HTML, CSS, and PHP. This method is recommended for advanced users who are comfortable with coding and want to have more control over their favicon.
Troubleshooting Common Favicon Issues in WordPress
When changing the favicon in WordPress, you may encounter some common issues that can prevent your favicon from displaying correctly. In this section, we’ll discuss some of the most common issues and provide troubleshooting tips and solutions to resolve them.
One of the most common issues is that the favicon is not displaying at all. This can be due to a number of reasons, including the favicon file not being uploaded correctly, the file being in the wrong location, or the code not being updated correctly. To resolve this issue, make sure that the favicon file is uploaded to the correct location and that the code is updated correctly.
Another common issue is that the favicon is displaying, but it’s the wrong size. This can be due to the favicon file not being the correct size or the code not being updated correctly. To resolve this issue, make sure that the favicon file is the correct size and that the code is updated correctly.
Some other common issues that you may encounter when changing the favicon in WordPress include:
- The favicon not displaying in certain browsers or devices
- The favicon being distorted or pixelated
- The favicon not updating correctly after making changes
To resolve these issues, make sure that you are using a compatible favicon file format and that the code is updated correctly. You can also try clearing your browser cache and cookies to see if that resolves the issue.
Here are some additional troubleshooting tips to help you resolve common favicon issues in WordPress:
- Check the favicon file format and make sure it’s compatible with WordPress
- Verify that the favicon file is uploaded to the correct location
- Check the code and make sure it’s updated correctly
- Clear your browser cache and cookies to see if that resolves the issue
By following these troubleshooting tips and solutions, you should be able to resolve common favicon issues in WordPress and get your favicon displaying correctly.
Best Practices for Creating a Favicon that Works Well in WordPress
Creating a favicon that works well in WordPress requires careful consideration of several factors, including design, size, and format. In this section, we’ll offer best practices for creating a favicon that will help you achieve a professional-looking website.
Design:
- Keep it simple: A simple design is essential for a favicon, as it will be displayed in a small size.
- Use a bold color scheme: A bold color scheme will help your favicon stand out and be easily recognizable.
- Use a consistent design: Use a consistent design throughout your website, including your favicon, to create a cohesive brand identity.
Size:
- Use a square shape: A square shape is recommended for favicons, as it will be displayed in a square shape in most browsers.
- Use a minimum size of 16×16 pixels: A minimum size of 16×16 pixels is recommended for favicons, as it will ensure that your favicon is displayed clearly in most browsers.
Format:
- Use a PNG or ICO format: A PNG or ICO format is recommended for favicons, as it will ensure that your favicon is displayed correctly in most browsers.
- Avoid using JPEG or GIF formats: JPEG and GIF formats are not recommended for favicons, as they may not be displayed correctly in some browsers.
Testing:
- Test your favicon in different browsers: Test your favicon in different browsers, including Google Chrome, Mozilla Firefox, and Safari, to ensure that it is displayed correctly.
- Test your favicon on different devices: Test your favicon on different devices, including desktops, laptops, and mobile devices, to ensure that it is displayed correctly.
By following these best practices, you can create a favicon that will help you achieve a professional-looking website and improve your website’s recognition and credibility.


