Understanding the Importance of Blocking Unwanted Users
Facebook is a social media platform designed to connect people and facilitate online interactions. However, with the rise of online harassment, spam, and unwanted contact, it has become essential to know how to block a user in Facebook to maintain a positive and safe online experience. Blocking a user on Facebook is a straightforward process that can help prevent further contact and protect your online identity.
There are several reasons why blocking a user on Facebook may be necessary. For instance, if you are experiencing online harassment or bullying, blocking the perpetrator can help put an end to the abuse. Similarly, if you are receiving spam messages or friend requests from unknown individuals, blocking them can help prevent further unwanted contact.
In addition to preventing online harassment and spam, blocking a user on Facebook can also help you maintain control over your online experience. By blocking unwanted users, you can ensure that your Facebook feed remains a positive and safe space for you to connect with friends and family.
Furthermore, blocking a user on Facebook can also help prevent the spread of misinformation and fake news. By blocking users who share fake or misleading content, you can help prevent the spread of false information and maintain a safe and trustworthy online environment.
In the next section, we will provide step-by-step instructions on how to locate the block feature on Facebook, making it easy for you to take control of your online experience and block unwanted users.
Locating the Block Feature on Facebook
To block a user on Facebook, you need to locate the block feature on the platform. This feature is easily accessible from the user’s profile page. To access the block feature, follow these steps:
Step 1: Navigate to the user’s profile page by searching for their name in the Facebook search bar or by clicking on their name from your friend list.
Step 2: Once you are on the user’s profile page, click on the three dots (⋯) located on the top right corner of the page, next to the “Message” button.
Step 3: From the dropdown menu, select “Block” to access the block feature.
Alternatively, you can also access the block feature from the Facebook settings page. To do this, follow these steps:
Step 1: Click on the downward arrow located on the top right corner of the Facebook page.
Step 2: From the dropdown menu, select “Settings” to access the Facebook settings page.
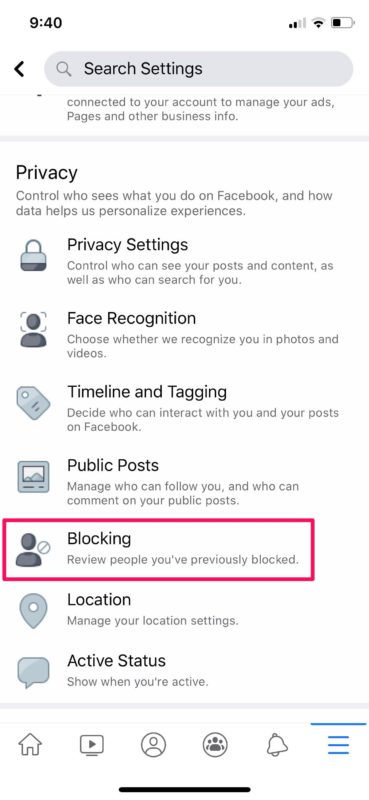
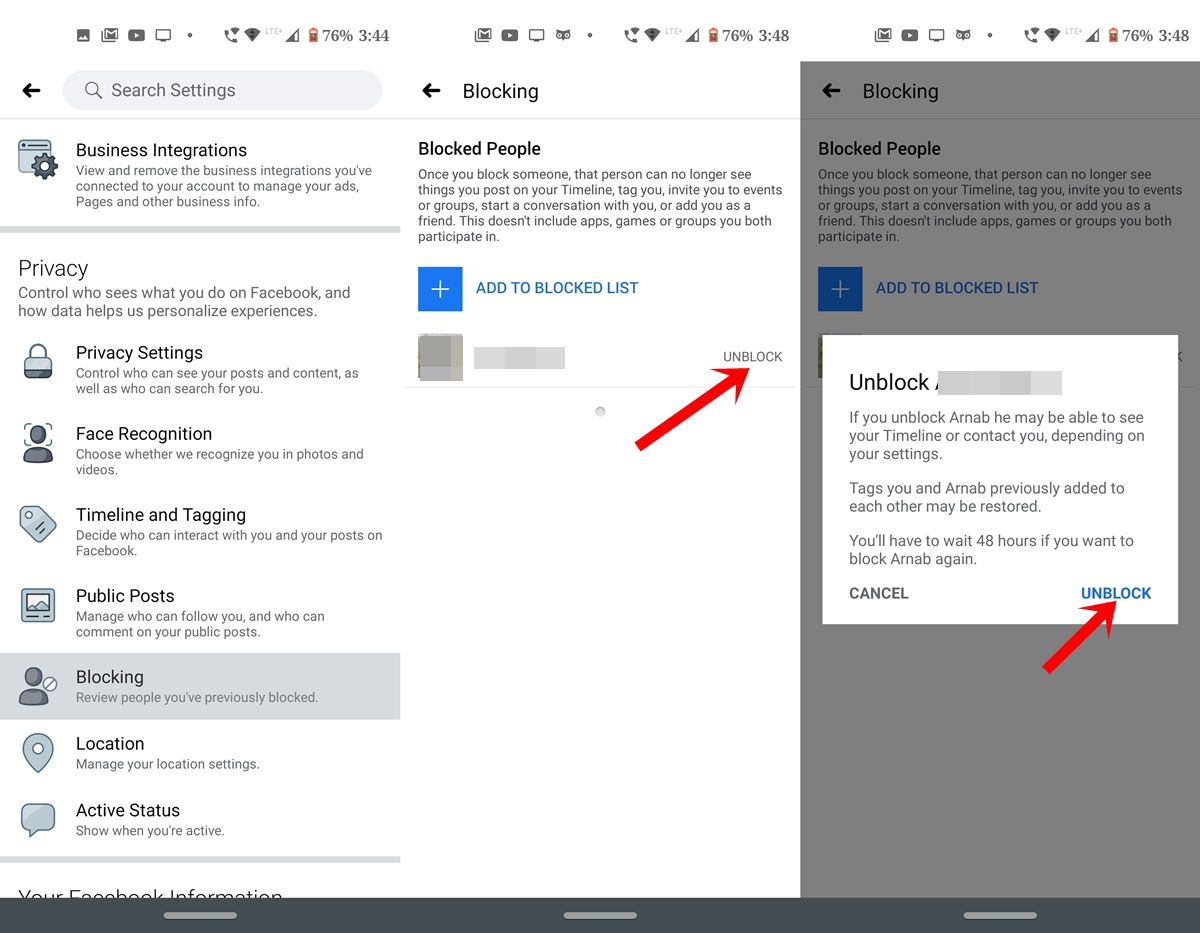
Step 3: On the settings page, click on “Blocking” from the left-hand menu.
Step 4: Enter the name or email address of the user you want to block in the “Block users” field.
By following these steps, you can easily locate the block feature on Facebook and block unwanted users from contacting you or viewing your profile.
In the next section, we will provide a detailed, step-by-step guide on how to block a user on Facebook, including confirming the block action and understanding the implications of blocking.
Blocking a User on Facebook: A Step-by-Step Guide
Now that you have located the block feature on Facebook, it’s time to learn how to block a user on the platform. Blocking a user on Facebook is a straightforward process that can be completed in a few steps.
Step 1: Confirm the Block Action
Once you have accessed the block feature, you will be prompted to confirm the block action. This is an important step, as blocking a user will prevent them from seeing your profile, posts, or messages.
Step 2: Enter the User’s Name or Email Address
To block a user on Facebook, you will need to enter their name or email address in the “Block users” field. You can find this field on the block feature page.
Step 3: Select the User’s Profile
Once you have entered the user’s name or email address, select their profile from the search results. This will ensure that you are blocking the correct user.
Step 4: Confirm the Block
After selecting the user’s profile, confirm the block by clicking on the “Block” button. This will prevent the user from seeing your profile, posts, or messages.
Understanding the Implications of Blocking
Blocking a user on Facebook can have significant implications, including preventing the user from seeing your profile, posts, or messages. It’s essential to understand these implications before blocking a user.
When you block a user on Facebook, you are preventing them from:
Seeing your profile or posts
Sending you messages or friend requests
Tagging you in posts or photos
Inviting you to events or groups
By understanding the implications of blocking, you can make an informed decision about whether or not to block a user on Facebook.
What Happens When You Block a User on Facebook
When you block a user on Facebook, it prevents them from interacting with you on the platform. This includes seeing your profile, posts, or messages, as well as tagging you in posts or photos.
The blocked user will not be able to:
See your profile or posts
Send you messages or friend requests
Tag you in posts or photos
Invite you to events or groups
Additionally, blocking a user on Facebook will also prevent them from seeing your comments or likes on other people’s posts.
It’s worth noting that blocking a user on Facebook does not delete any previous interactions you may have had with them. For example, if you had a conversation with the user before blocking them, the conversation will still be visible in your message history.
However, blocking a user on Facebook will prevent them from seeing any new posts or updates you make to your profile. This can be a useful way to maintain your online safety and prevent unwanted contact.
In some cases, you may need to block a user on Facebook to prevent harassment or bullying. If you are experiencing online harassment, it’s essential to take steps to protect yourself, including blocking the user and reporting the behavior to Facebook.
By understanding what happens when you block a user on Facebook, you can take control of your online experience and maintain a safe and positive environment.
Blocking vs. Unfriending: What’s the Difference?
When it comes to managing your Facebook relationships, you may be wondering what the difference is between blocking and unfriending someone. While both actions can help you maintain a positive and safe online experience, they have distinct implications and uses.
Unfriending someone on Facebook means that you are removing them from your friend list, but they can still see your public posts and interact with you in other ways. Unfriending is a good option if you want to limit your interaction with someone, but don’t want to completely cut them off.
Blocking someone on Facebook, on the other hand, is a more severe action that prevents them from seeing your profile, posts, or messages. Blocking is a good option if you want to completely cut off contact with someone, or if you’re experiencing harassment or bullying.
Here are some key differences between blocking and unfriending on Facebook:
Blocking:
Prevents the user from seeing your profile, posts, or messages
Prevents the user from interacting with you in any way
Is a more severe action that can help prevent harassment or bullying
Unfriending:
Removes the user from your friend list
Allows the user to still see your public posts and interact with you in other ways
Is a less severe action that can help limit your interaction with someone
When deciding whether to block or unfriend someone on Facebook, consider the severity of the situation and your personal comfort level. If you’re experiencing harassment or bullying, blocking may be the best option. If you simply want to limit your interaction with someone, unfriending may be a better choice.
Blocking Multiple Users at Once
In some cases, you may need to block multiple users on Facebook at the same time. This can be a useful feature if you’re experiencing harassment or bullying from multiple individuals, or if you want to block a group of people who are spamming or sending unwanted messages.
To block multiple users at once on Facebook, follow these steps:
Step 1: Go to the Facebook Settings page
Step 2: Click on “Blocking” from the left-hand menu
Step 3: Enter the names or email addresses of the users you want to block in the “Block users” field
Step 4: Click on the “Block” button to block the selected users
Alternatively, you can also use the “Block Users” feature to block multiple users at once. To do this, follow these steps:
Step 1: Go to the Facebook Settings page
Step 2: Click on “Blocking” from the left-hand menu
Step 3: Click on the “Block Users” button
Step 4: Enter the names or email addresses of the users you want to block in the “Block users” field
Step 5: Click on the “Block” button to block the selected users
Managing Blocked Users
Once you’ve blocked multiple users on Facebook, you can manage your blocked users list by going to the Facebook Settings page and clicking on “Blocking” from the left-hand menu. From here, you can view your list of blocked users, unblock users, or block new users.
It’s also important to note that blocking multiple users at once can help prevent harassment or bullying, but it’s also important to report any suspicious activity to Facebook to help prevent further incidents.
Troubleshooting Common Issues with Blocking on Facebook
While blocking a user on Facebook can be an effective way to maintain a safe and positive online experience, there may be instances where issues arise. In this section, we’ll address some common issues that may occur when blocking a user on Facebook and provide troubleshooting tips to resolve them.
Error Messages When Blocking a User
If you encounter an error message when trying to block a user on Facebook, it may be due to a technical issue or a problem with your account. To resolve this issue, try the following:
Check your internet connection and ensure that it is stable.
Clear your browser cache and cookies.
Try blocking the user again after a few minutes.
Blocked User Still Being Able to See Posts
If you’ve blocked a user on Facebook, but they’re still able to see your posts, it may be due to a few reasons. Here are some possible explanations and solutions:
Check your post’s privacy settings to ensure that they are set to “Friends” or “Private”.
Make sure that the blocked user is not tagged in any of your posts.
Consider using Facebook’s “Restricted” list to limit the user’s access to your posts.
Other Common Issues with Blocking on Facebook
Other common issues that may arise when blocking a user on Facebook include:
The blocked user being able to send you messages or friend requests.
The blocked user being able to see your profile or posts through a mutual friend’s account.
To resolve these issues, try the following:
Report the blocked user to Facebook for violating their terms of service.
Use Facebook’s “Block” feature to block the user’s messages and friend requests.
Consider using Facebook’s “Two-Factor Authentication” feature to add an extra layer of security to your account.
Best Practices for Maintaining a Safe and Positive Facebook Experience
Maintaining a safe and positive Facebook experience requires ongoing effort and attention. Here are some best practices to help you stay safe and positive on Facebook:
Regularly Review Blocked Users
It’s essential to regularly review your blocked users list to ensure that you’re not missing any important updates or messages from friends or family members. You can review your blocked users list by going to the Facebook Settings page and clicking on “Blocking” from the left-hand menu.
Be Cautious When Accepting Friend Requests
When accepting friend requests, be cautious and make sure that you know the person well. Avoid accepting friend requests from people you don’t know or who seem suspicious. You can also use Facebook’s “Friend Request Filter” feature to filter out friend requests from people you don’t know.
Report Suspicious Activity
If you notice any suspicious activity on Facebook, such as spam or harassment, report it immediately. You can report suspicious activity by clicking on the three dots on the top right corner of the post or message and selecting “Report” from the dropdown menu.
Use Facebook’s Safety Features
Facebook offers several safety features that can help you maintain a safe and positive experience on the platform. These features include:
Two-Factor Authentication: This feature adds an extra layer of security to your account by requiring you to enter a code sent to your phone or email in addition to your password.
Privacy Settings: You can use Facebook’s privacy settings to control who can see your posts and information. You can also use the “Restricted” list to limit the visibility of your posts to certain friends or groups.
Blocking: You can use Facebook’s blocking feature to block users who are harassing or spamming you.
By following these best practices, you can maintain a safe and positive Facebook experience and enjoy the benefits of connecting with friends and family on the platform.


:max_bytes(150000):strip_icc()/005-facebook-block-someone-4165789-0911131551d34f5392ca4719f4447009.jpg)


