Understanding the Importance of a Custom Header in WordPress
A custom header is a crucial element in WordPress website design, playing a significant role in branding, user experience, and search engine optimization. A well-designed header can instantly convey a website’s identity, values, and tone, setting the stage for a engaging and memorable user experience. Moreover, a custom header can help improve a website’s search engine ranking by incorporating relevant keywords and meta tags. In this article, we will explore the process of modifying a WordPress header, providing a step-by-step guide on how to change header WordPress and take your website to the next level.
When it comes to creating a custom header, WordPress offers a range of options and flexibility. With the right tools and techniques, website owners can create a unique and captivating header that reflects their brand’s personality and style. Whether you’re a beginner or an experienced web developer, understanding the importance of a custom header is essential for creating a successful and engaging online presence.
In addition to its aesthetic appeal, a custom header can also improve a website’s functionality and usability. By incorporating navigation menus, search bars, and other interactive elements, a custom header can enhance the user experience, making it easier for visitors to find what they’re looking for. Furthermore, a custom header can be optimized for mobile devices, ensuring that your website looks and functions great on all screens.
With the rise of WordPress as a popular content management system, creating a custom header has become more accessible than ever. With a range of themes, plugins, and page builders available, website owners can create a custom header that meets their unique needs and goals. In the following sections, we will explore the different methods for modifying a WordPress header, including using the WordPress Customizer, page builders, and editing header code.
Accessing the WordPress Customizer: A Beginner’s Guide
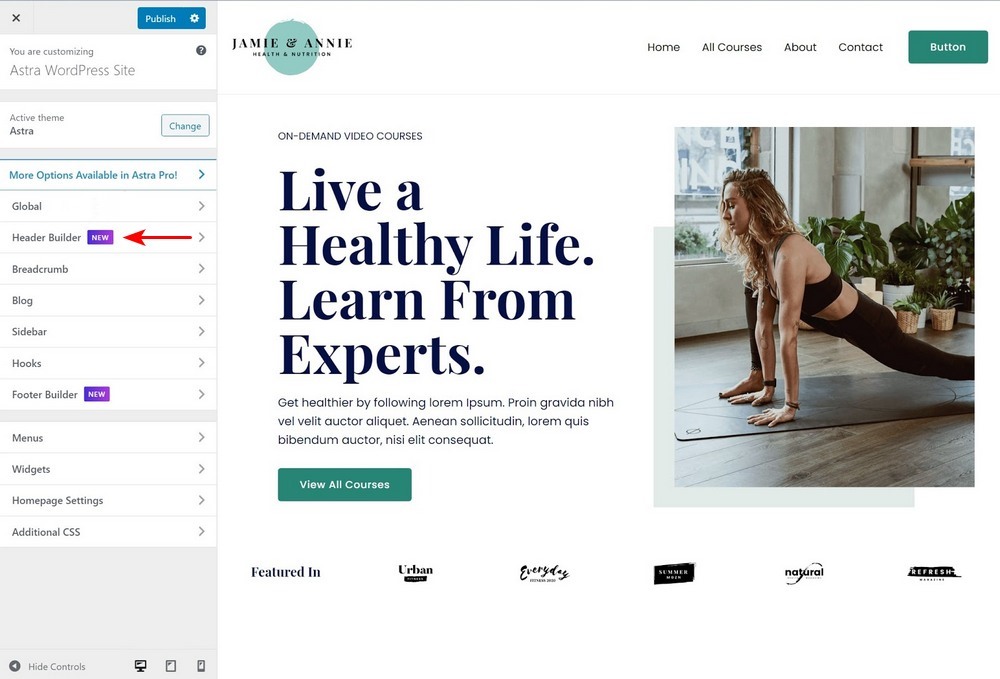
The WordPress Customizer is a powerful tool that allows users to modify their website’s design and layout without requiring extensive coding knowledge. To access the Customizer, users can follow these simple steps: log in to their WordPress dashboard, navigate to the Appearance section, and click on the Customize option. Alternatively, users can also access the Customizer by clicking on the Customize link in the WordPress admin bar.
Once inside the Customizer, users will be presented with a range of panels and options that allow them to modify various aspects of their website’s design. The Customizer is divided into several sections, including the Header section, which is where users can modify their website’s header. In this section, users can upload a custom logo, change the header background, and adjust the header layout.
The Customizer also provides a live preview of the website, allowing users to see the changes they make in real-time. This makes it easy to experiment with different design options and see how they will look on the live website. Additionally, the Customizer includes a range of controls and settings that allow users to fine-tune their website’s design, including options for typography, colors, and layout.
For users who are new to WordPress, the Customizer can seem overwhelming at first. However, with a little practice and patience, it’s easy to get started with modifying your website’s design. In the next section, we’ll take a closer look at how to modify your header using the WordPress Customizer, including how to upload a custom logo and change the header background.
When it comes to modifying your website’s header, the Customizer provides a range of options and flexibility. By using the Customizer, users can create a custom header that reflects their brand’s personality and style, without requiring extensive coding knowledge. Whether you’re looking to make a few simple changes or completely overhaul your website’s design, the Customizer is a powerful tool that can help you achieve your goals.
Modifying Your Header Using the WordPress Customizer
Now that we’ve covered how to access the WordPress Customizer, let’s dive into the process of modifying your header using this powerful tool. The Customizer provides a range of options for customizing your header, including the ability to upload a custom logo, change the header background, and adjust the header layout.
To get started, navigate to the Header section of the Customizer. Here, you’ll find a range of options for customizing your header, including the ability to upload a custom logo. To upload a custom logo, simply click on the “Select logo” button and choose the image file you want to use. You can also adjust the logo size and position using the controls provided.
Next, let’s take a look at how to change the header background. To do this, navigate to the “Header” section of the Customizer and click on the “Background” option. Here, you can choose from a range of background options, including solid colors, gradients, and images. You can also adjust the background size and position using the controls provided.
Finally, let’s take a look at how to adjust the header layout. To do this, navigate to the “Header” section of the Customizer and click on the “Layout” option. Here, you can choose from a range of layout options, including the ability to adjust the header width, height, and padding. You can also add or remove header elements, such as the site title and tagline.
By using the WordPress Customizer to modify your header, you can create a unique and customized design that reflects your brand’s personality and style. Whether you’re looking to make a few simple changes or completely overhaul your website’s design, the Customizer provides a range of options and flexibility to help you achieve your goals.
In addition to the options mentioned above, the Customizer also provides a range of other features and settings for customizing your header. For example, you can use the Customizer to add or remove header widgets, adjust the header font and color, and even add custom CSS code to further customize your header.
By taking advantage of these features and settings, you can create a custom header that is both visually appealing and functional. Whether you’re a beginner or an experienced web developer, the WordPress Customizer provides a powerful tool for modifying your header and taking your website to the next level.
Using a Page Builder to Create a Custom Header in WordPress
Another way to create a custom header in WordPress is by using a page builder. Page builders, such as Elementor or Beaver Builder, provide a drag-and-drop interface that allows users to create custom layouts and designs without requiring extensive coding knowledge. By using a page builder, users can create a custom header that is both visually appealing and functional.
One of the benefits of using a page builder to create a custom header is the level of control and flexibility it provides. With a page builder, users can easily add or remove elements, adjust the layout, and customize the design to suit their needs. Additionally, page builders often include a range of pre-built templates and modules that can be used to create a custom header quickly and easily.
However, using a page builder to create a custom header also has its drawbacks. For example, page builders can add extra code to the website, which can slow down page loading times. Additionally, some page builders may not be compatible with all WordPress themes, which can limit their use.
Despite these drawbacks, using a page builder to create a custom header can be a great option for users who want to create a unique and customized design without requiring extensive coding knowledge. By choosing the right page builder and using it effectively, users can create a custom header that is both visually appealing and functional.
Some popular page builders for creating custom headers in WordPress include Elementor, Beaver Builder, and Divi Builder. Each of these page builders has its own strengths and weaknesses, and the right choice will depend on the user’s specific needs and goals.
When using a page builder to create a custom header, it’s also important to consider the importance of responsive design. A responsive design ensures that the header looks and functions great on all devices, including desktops, tablets, and smartphones. By using a page builder that includes responsive design features, users can create a custom header that is both visually appealing and functional across all devices.
In addition to using a page builder, users can also use other tools and plugins to create a custom header in WordPress. For example, users can use a plugin like Header Footer Builder to create a custom header without requiring extensive coding knowledge. By using the right tools and plugins, users can create a custom header that is both visually appealing and functional.
Editing Your Header Code: A Guide for Advanced Users
For advanced users who want to take their WordPress site to the next level, editing the header code can be a powerful way to customize their site’s design and functionality. In this section, we’ll provide a guide on how to edit the header code in WordPress, including how to access the theme files, use a child theme, and modify the header PHP code.
To access the theme files, users can navigate to the WordPress dashboard and click on the “Appearance” tab. From there, they can click on the “Editor” option and select the theme file they want to edit. Alternatively, users can also access the theme files via FTP or SFTP.
Once users have accessed the theme files, they can use a child theme to modify the header code without affecting the parent theme. A child theme is a separate theme that inherits the functionality of the parent theme, but allows users to make customizations without affecting the parent theme.
To modify the header PHP code, users can navigate to the “header.php” file in the theme editor and make the necessary changes. For example, they can add or remove HTML elements, modify the CSS styles, or add custom PHP code to enhance the header’s functionality.
However, editing the header code can be complex and requires a good understanding of PHP, HTML, and CSS. Users should be careful when making changes to the header code, as it can affect the site’s functionality and design.
To avoid any potential issues, users can use a plugin like “Header Footer Builder” to create a custom header without requiring extensive coding knowledge. This plugin provides a user-friendly interface for creating custom headers, including the ability to add or remove elements, adjust the layout, and customize the design.
Another option for advanced users is to use a code editor like “Sublime Text” or “Atom” to edit the header code. These code editors provide a range of features and tools for editing code, including syntax highlighting, auto-completion, and debugging.
By editing the header code, advanced users can take their WordPress site to the next level and create a custom design that reflects their brand’s personality and style. However, it’s essential to be careful when making changes to the header code, as it can affect the site’s functionality and design.
Troubleshooting Common Header Issues in WordPress
When customizing your WordPress header, you may encounter some common issues that can affect the appearance and functionality of your site. In this section, we’ll provide solutions to some of the most common header issues in WordPress, including how to fix a broken header, resolve header layout problems, and troubleshoot header customization issues.
One of the most common header issues in WordPress is a broken header. This can occur when the header code is incorrect or when there are conflicts with other plugins or themes. To fix a broken header, try checking the header code for errors and conflicts with other plugins or themes. You can also try resetting the header to its default settings or seeking help from a WordPress developer.
Another common issue is header layout problems. This can occur when the header layout is not responsive or when there are issues with the header’s width or height. To resolve header layout problems, try adjusting the header’s width or height, or try using a responsive header layout. You can also try using a plugin like “Header Footer Builder” to create a custom header with a responsive layout.
Header customization issues are also common in WordPress. This can occur when the header customization options are not working as expected or when there are issues with the header’s design or layout. To troubleshoot header customization issues, try checking the header customization options for errors or conflicts with other plugins or themes. You can also try seeking help from a WordPress developer or using a plugin like “Header Footer Builder” to create a custom header with a responsive layout.
In addition to these common issues, there are also some best practices to keep in mind when customizing your WordPress header. For example, it’s essential to ensure that your header is responsive and works well on all devices, including desktops, tablets, and smartphones. You should also ensure that your header is optimized for search engines and includes relevant keywords and meta tags.
By following these best practices and troubleshooting common header issues, you can create a custom header that is both visually appealing and functional. Remember to always test your header on different devices and browsers to ensure that it works well and is responsive.
Finally, if you’re experiencing any issues with your WordPress header, don’t hesitate to seek help from a WordPress developer or a reputable plugin or theme provider. They can provide you with expert advice and support to help you resolve any issues and create a custom header that meets your needs.
Best Practices for Designing a Custom Header in WordPress
When designing a custom header in WordPress, there are several best practices to keep in mind to ensure that your header is both visually appealing and functional. In this section, we’ll share some tips on header size, image optimization, and responsive design to help you create a custom header that meets your needs.
One of the most important considerations when designing a custom header is header size. A header that is too large can overwhelm the rest of the page, while a header that is too small can get lost. A good rule of thumb is to keep your header size between 100-200 pixels in height. This will ensure that your header is visible and prominent without overwhelming the rest of the page.
Another important consideration is image optimization. When using images in your header, it’s essential to optimize them for web use to ensure that they load quickly and don’t slow down your site. You can use tools like TinyPNG or ImageOptim to compress your images and reduce their file size.
Responsive design is also crucial when designing a custom header. A responsive header will adapt to different screen sizes and devices, ensuring that your site looks great on desktops, tablets, and smartphones. You can use CSS media queries to create a responsive header that adapts to different screen sizes.
In addition to these best practices, it’s also essential to consider the overall design and layout of your header. A well-designed header should include a clear and prominent logo, navigation menu, and any other essential elements that you want to include. You should also consider the color scheme and typography of your header to ensure that it matches your brand’s identity.
By following these best practices, you can create a custom header that is both visually appealing and functional. Remember to always test your header on different devices and browsers to ensure that it works well and is responsive.
Finally, don’t forget to consider the user experience when designing your custom header. A good header should be easy to navigate and provide a clear and prominent call-to-action. You should also consider the accessibility of your header to ensure that it is accessible to all users.
Conclusion: Taking Your WordPress Site to the Next Level with a Custom Header
In conclusion, having a custom header in WordPress is essential for creating a unique and professional-looking website. By following the tips and techniques outlined in this article, you can take your WordPress site to the next level and create a custom header that reflects your brand’s identity and style.
Remember, a custom header is not just about aesthetics; it’s also about functionality and user experience. By incorporating a custom header into your WordPress site, you can improve your site’s navigation, increase engagement, and boost conversions.
Whether you’re a beginner or an advanced user, creating a custom header in WordPress is easier than you think. With the right tools and techniques, you can create a custom header that meets your needs and takes your site to the next level.
So, what are you waiting for? Start creating your custom header today and take your WordPress site to the next level. With a little creativity and experimentation, you can create a custom header that reflects your brand’s identity and style, and helps you achieve your online goals.
By implementing the tips and techniques outlined in this article, you can create a custom header that is both visually appealing and functional. Remember to always test your header on different devices and browsers to ensure that it works well and is responsive.
Finally, don’t forget to keep your custom header up-to-date and fresh. Regularly update your header with new content, images, and styles to keep your site looking modern and relevant.


