Understanding the Importance of Image Resolution
Image resolution plays a vital role in various contexts, including digital photography, graphic design, and online publishing. The resolution of an image affects its quality and usability, making it essential to understand its significance. In digital photography, high-resolution images capture more details, resulting in better print quality and a more immersive viewing experience. In graphic design, high-resolution images enable designers to create visually appealing and detailed graphics. In online publishing, high-resolution images help to enhance the overall user experience, making websites and online content more engaging and professional.
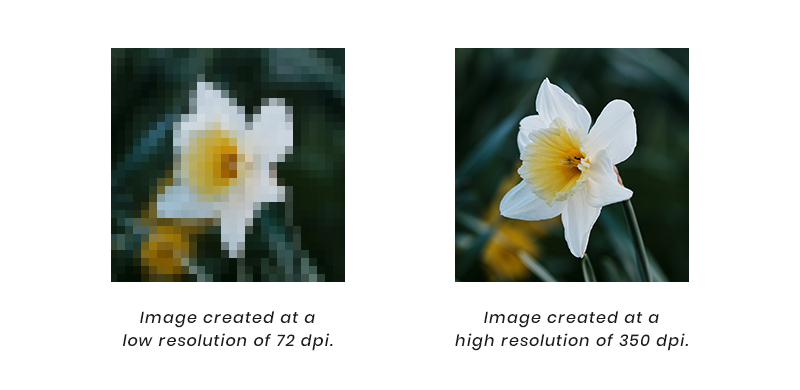
In addition to its impact on image quality, resolution also affects the usability of an image. For instance, high-resolution images can be easily resized and cropped without compromising their quality, making them ideal for various applications. On the other hand, low-resolution images may appear pixelated or blurry when resized, limiting their usability. Furthermore, high-resolution images can be used in various formats, such as print, web, and social media, without sacrificing their quality.
When working with images, it’s essential to consider the intended use and audience to determine the required resolution. For example, images intended for web use typically require a lower resolution than those intended for print. Understanding the importance of image resolution helps individuals and organizations to create high-quality images that meet their specific needs and enhance their overall visual communication.
Learning how to check picture resolution is crucial in ensuring that images meet the required standards. By understanding image resolution and its significance, individuals can create high-quality images that enhance their visual communication and engage their audience. Whether you’re a photographer, graphic designer, or online publisher, understanding image resolution is essential for producing high-quality images that meet your specific needs.
What is Image Resolution, Anyway?
Image resolution refers to the number of pixels that make up an image, measured in terms of width and height. It is typically expressed in pixels per inch (PPI) or dots per inch (DPI). The higher the resolution, the more detailed and clear the image will be. Pixel density, aspect ratio, and file size are all closely related to image resolution.
Pixel density refers to the number of pixels packed into a given area, usually measured in pixels per inch (PPI). A higher pixel density results in a higher resolution image. Aspect ratio, on the other hand, refers to the proportion of the image’s width to its height. Common aspect ratios include 4:3, 16:9, and 1:1.
File size is also closely tied to image resolution. Higher resolution images typically result in larger file sizes, as more data is required to store the increased number of pixels. This can impact the image’s usability, particularly when sharing or uploading images online.
Common resolution standards include HD (1280×720 pixels), Full HD (1920×1080 pixels), and 4K (3840×2160 pixels). These standards are widely used in various applications, including digital photography, video production, and online publishing. Understanding these standards can help individuals and organizations to create high-quality images that meet their specific needs.
When working with images, it’s essential to consider the resolution requirements for the intended use. For example, images intended for web use typically require a lower resolution than those intended for print. By understanding image resolution and its relationship to pixel density, aspect ratio, and file size, individuals can create high-quality images that meet their specific needs and enhance their overall visual communication.
Learning how to check picture resolution is crucial in ensuring that images meet the required standards. By understanding the basics of image resolution, individuals can take the first step towards creating high-quality images that engage their audience and enhance their visual communication.
How to Check Picture Resolution on Your Computer
Checking the resolution of an image on a computer is a straightforward process that can be done using various operating systems and image viewing software. Here’s a step-by-step guide on how to check picture resolution on your computer:
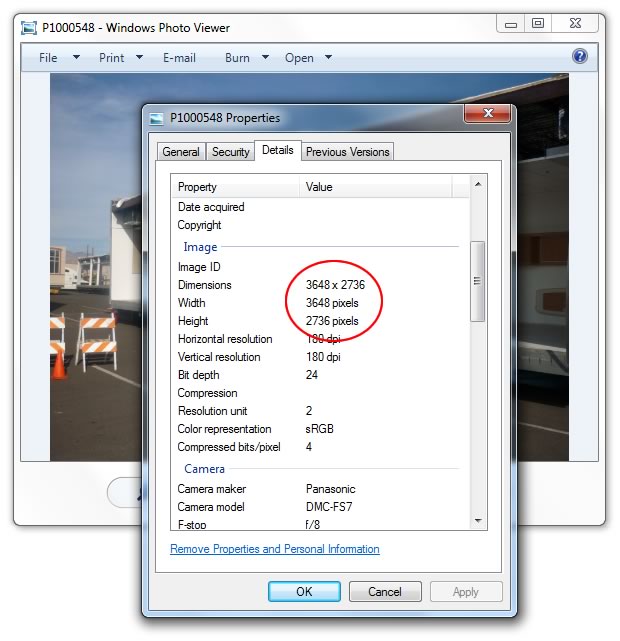
Windows: To check the resolution of an image on a Windows computer, follow these steps:
- Open the image in Windows Photo Viewer or any other image viewing software.
- Right-click on the image and select “Properties.”
- In the Properties window, click on the “Details” tab.
- Look for the “Image” section, where you’ll find the image’s resolution, width, and height.
macOS: To check the resolution of an image on a Mac, follow these steps:
- Open the image in Preview or any other image viewing software.
- Click on “Tools” in the menu bar and select “Show Inspector.”
- In the Inspector window, click on the “Image” tab.
- Look for the “Resolution” section, where you’ll find the image’s resolution, width, and height.
Linux: To check the resolution of an image on a Linux computer, follow these steps:
- Open the image in any image viewing software, such as GIMP or Image Viewer.
- Right-click on the image and select “Properties” or “Image Properties.”
- In the Properties window, look for the “Image” section, where you’ll find the image’s resolution, width, and height.
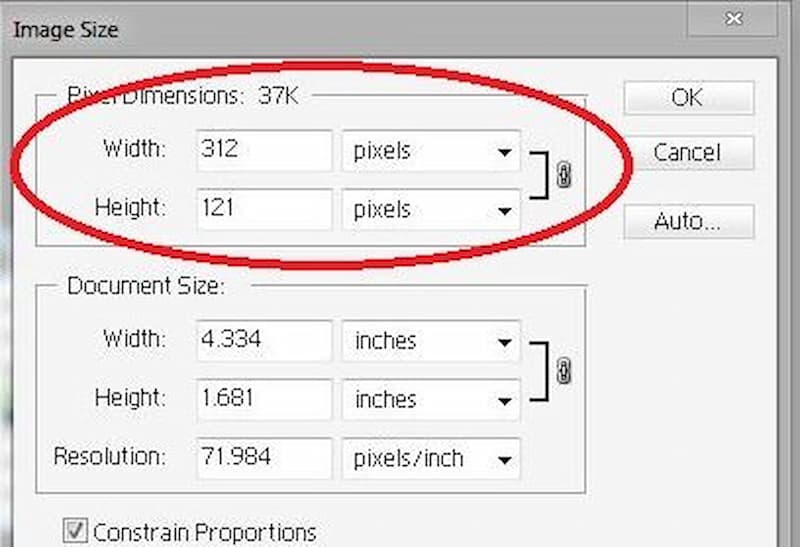
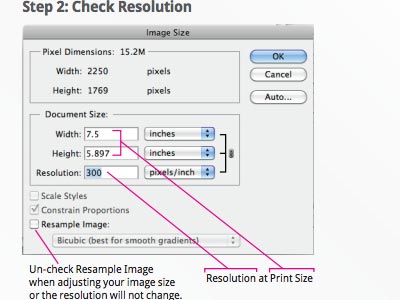
Adobe Photoshop: To check the resolution of an image in Adobe Photoshop, follow these steps:
- Open the image in Adobe Photoshop.
- Go to “Image” > “Image Size” in the menu bar.
- In the Image Size window, look for the “Resolution” section, where you’ll find the image’s resolution, width, and height.
By following these steps, you can easily check the resolution of an image on your computer using various operating systems and image viewing software. This can help you ensure that your images meet the required standards for your specific needs.
Using Online Tools to Check Image Resolution
In addition to checking image resolution on your computer or mobile device, there are also online tools and websites that can help you determine the resolution of an image. These tools can be especially useful if you need to check the resolution of an image quickly or if you don’t have access to image viewing software.
Some popular online tools for checking image resolution include:
- TinyPNG: A free online tool that allows you to upload an image and view its resolution, as well as compress the image to reduce its file size.
- ImageOptim: A free online tool that allows you to upload an image and view its resolution, as well as optimize the image for web use.
- Online-Convert: A free online tool that allows you to upload an image and view its resolution, as well as convert the image to different file formats.
These online tools can be useful for a variety of tasks, such as:
- Checking the resolution of an image before uploading it to a website or social media platform.
- Compressing an image to reduce its file size and improve page load times.
- Converting an image to a different file format for use in a specific application or platform.
When using online tools to check image resolution, keep in mind the following benefits and limitations:
- Benefits: Online tools are often free and easy to use, and can provide quick and accurate results.
- Limitations: Online tools may have file size limits or other restrictions, and may not provide as much detailed information as image viewing software.
By using online tools to check image resolution, you can quickly and easily determine the resolution of an image and make informed decisions about how to use it. Whether you’re a web developer, graphic designer, or simply someone who wants to ensure that your images look their best, online tools can be a valuable resource in your workflow.
Checking Picture Resolution on Mobile Devices
With the increasing use of mobile devices for capturing and sharing images, it’s essential to know how to check picture resolution on your smartphone or tablet. Here’s a step-by-step guide on how to check image resolution on mobile devices:
Android:
- Open the image in the Photos app or Gallery app.
- Tap the three dots (⋯) on the top right corner of the screen.
- Select “Details” or “Info” from the menu.
- Look for the “Resolution” or “Image size” section, which will display the image’s resolution, width, and height.
iOS:
- Open the image in the Photos app.
- Tap the “Share” icon (a box with an arrow coming out of it).
- Select “Get Info” from the menu.
- Look for the “Resolution” or “Image size” section, which will display the image’s resolution, width, and height.
Alternatively, you can use third-party apps to check image resolution on your mobile device. Some popular apps include:
- Photo Editor (Android, iOS): A photo editing app that also allows you to view image resolution and other metadata.
- Image Size (Android, iOS): A simple app that allows you to view image resolution and other metadata.
When checking image resolution on your mobile device, keep in mind the following tips:
- Make sure you have the latest version of the Photos app or Gallery app installed.
- Use a third-party app if you need more advanced features or metadata information.
- Be aware that some apps may not display the exact resolution of the image, so it’s always a good idea to double-check using multiple methods.
By following these steps, you can easily check the resolution of an image on your mobile device and ensure that your images look their best.
Understanding Resolution in Different File Formats
Image resolution can vary significantly depending on the file format used to store the image. Different file formats have different compression algorithms, color depths, and pixel densities, which can affect the image’s resolution. Here’s a breakdown of how image resolution is affected by different file formats:
JPEG (Joint Photographic Experts Group): JPEG is a compressed file format that uses a lossy compression algorithm, which discards some of the image data to reduce the file size. JPEG files typically have a lower resolution than other file formats, but they are widely supported and can be easily shared online.
PNG (Portable Network Graphics): PNG is an uncompressed file format that uses a lossless compression algorithm, which preserves all the image data. PNG files typically have a higher resolution than JPEG files, but they can be larger in size.
TIFF (Tagged Image File Format): TIFF is an uncompressed file format that uses a lossless compression algorithm. TIFF files typically have a high resolution and are often used in professional photography and graphic design.
GIF (Graphics Interchange Format): GIF is a compressed file format that uses a lossy compression algorithm. GIF files typically have a lower resolution than other file formats and are often used for web graphics and animations.
When working with images, it’s essential to consider the file format and its impact on image resolution. Here are some pros and cons of each file format:
- JPEG: Pros – widely supported, small file size; Cons – lower resolution, lossy compression.
- PNG: Pros – high resolution, lossless compression; Cons – larger file size, limited support.
- TIFF: Pros – high resolution, lossless compression; Cons – large file size, limited support.
- GIF: Pros – small file size, widely supported; Cons – lower resolution, lossy compression.
By understanding how image resolution is affected by different file formats, you can make informed decisions about which file format to use for your images. Whether you’re a photographer, graphic designer, or web developer, choosing the right file format can help you achieve the best possible image quality.
Best Practices for Working with High-Resolution Images
Working with high-resolution images requires careful attention to detail to maintain image quality. Here are some best practices to follow when working with high-resolution images:
Image Editing: When editing high-resolution images, it’s essential to use image editing software that can handle large files. Adobe Photoshop and Lightroom are popular choices among professionals. When editing, make sure to work on a duplicate layer to preserve the original image data.
Resizing: Resizing high-resolution images can be tricky. To avoid losing image quality, use the “Image Size” feature in Adobe Photoshop or the “Resize” feature in Lightroom. Make sure to select the “Bicubic” or “Bicubic Sharper” interpolation method to maintain image sharpness.
Compression: Compressing high-resolution images can help reduce file size, but it’s essential to use the right compression algorithm. JPEG is a popular choice for compressing high-resolution images, but it can lead to loss of image quality. Use the “Save for Web” feature in Adobe Photoshop or the “Export” feature in Lightroom to compress images while maintaining image quality.
File Format: Choosing the right file format is crucial when working with high-resolution images. TIFF and PSD are popular choices for high-resolution images, as they preserve image data and allow for non-destructive editing.
Color Mode: Working in the right color mode is essential for maintaining image quality. Use the “RGB” color mode for web and digital applications, and the “CMYK” color mode for print applications.
By following these best practices, you can ensure that your high-resolution images maintain their quality and look their best in various applications.
Additionally, here are some general tips to keep in mind when working with high-resolution images:
- Always work on a duplicate layer to preserve the original image data.
- Use the “Save for Web” feature in Adobe Photoshop or the “Export” feature in Lightroom to compress images while maintaining image quality.
- Choose the right file format and color mode for your application.
- Use image editing software that can handle large files.
By following these tips and best practices, you can ensure that your high-resolution images look their best and maintain their quality in various applications.
Troubleshooting Common Issues with Image Resolution
Despite the importance of image resolution, many users encounter issues with blurry or pixelated images. Here are some common issues related to image resolution and their solutions:
Blurry Images: Blurry images can be caused by a low resolution or a poor quality image. To resolve this issue, try increasing the resolution of the image or using a higher quality image. You can also try sharpening the image using image editing software.
Pixelated Images: Pixelated images can be caused by a low resolution or a poor quality image. To resolve this issue, try increasing the resolution of the image or using a higher quality image. You can also try resizing the image using image editing software.
Image Distortion: Image distortion can be caused by a poor aspect ratio or a low resolution. To resolve this issue, try adjusting the aspect ratio of the image or increasing the resolution. You can also try using image editing software to correct the distortion.
Image Compression: Image compression can be caused by a low quality image or a poor compression algorithm. To resolve this issue, try using a higher quality image or a better compression algorithm. You can also try adjusting the compression settings in image editing software.
By troubleshooting common issues with image resolution, you can ensure that your images look their best and maintain their quality. Remember to always check the resolution of your images before sharing or publishing them, and use image editing software to make adjustments as needed.
In addition to these solutions, here are some general tips for troubleshooting image resolution issues:
- Always check the resolution of your images before sharing or publishing them.
- Use image editing software to make adjustments to the resolution, aspect ratio, and compression of your images.
- Use a high-quality image editing software to ensure that your images look their best.
- Experiment with different compression algorithms and settings to find the best one for your images.
By following these tips and troubleshooting common issues with image resolution, you can ensure that your images look their best and maintain their quality.

