Understanding the Importance of Image Resolution
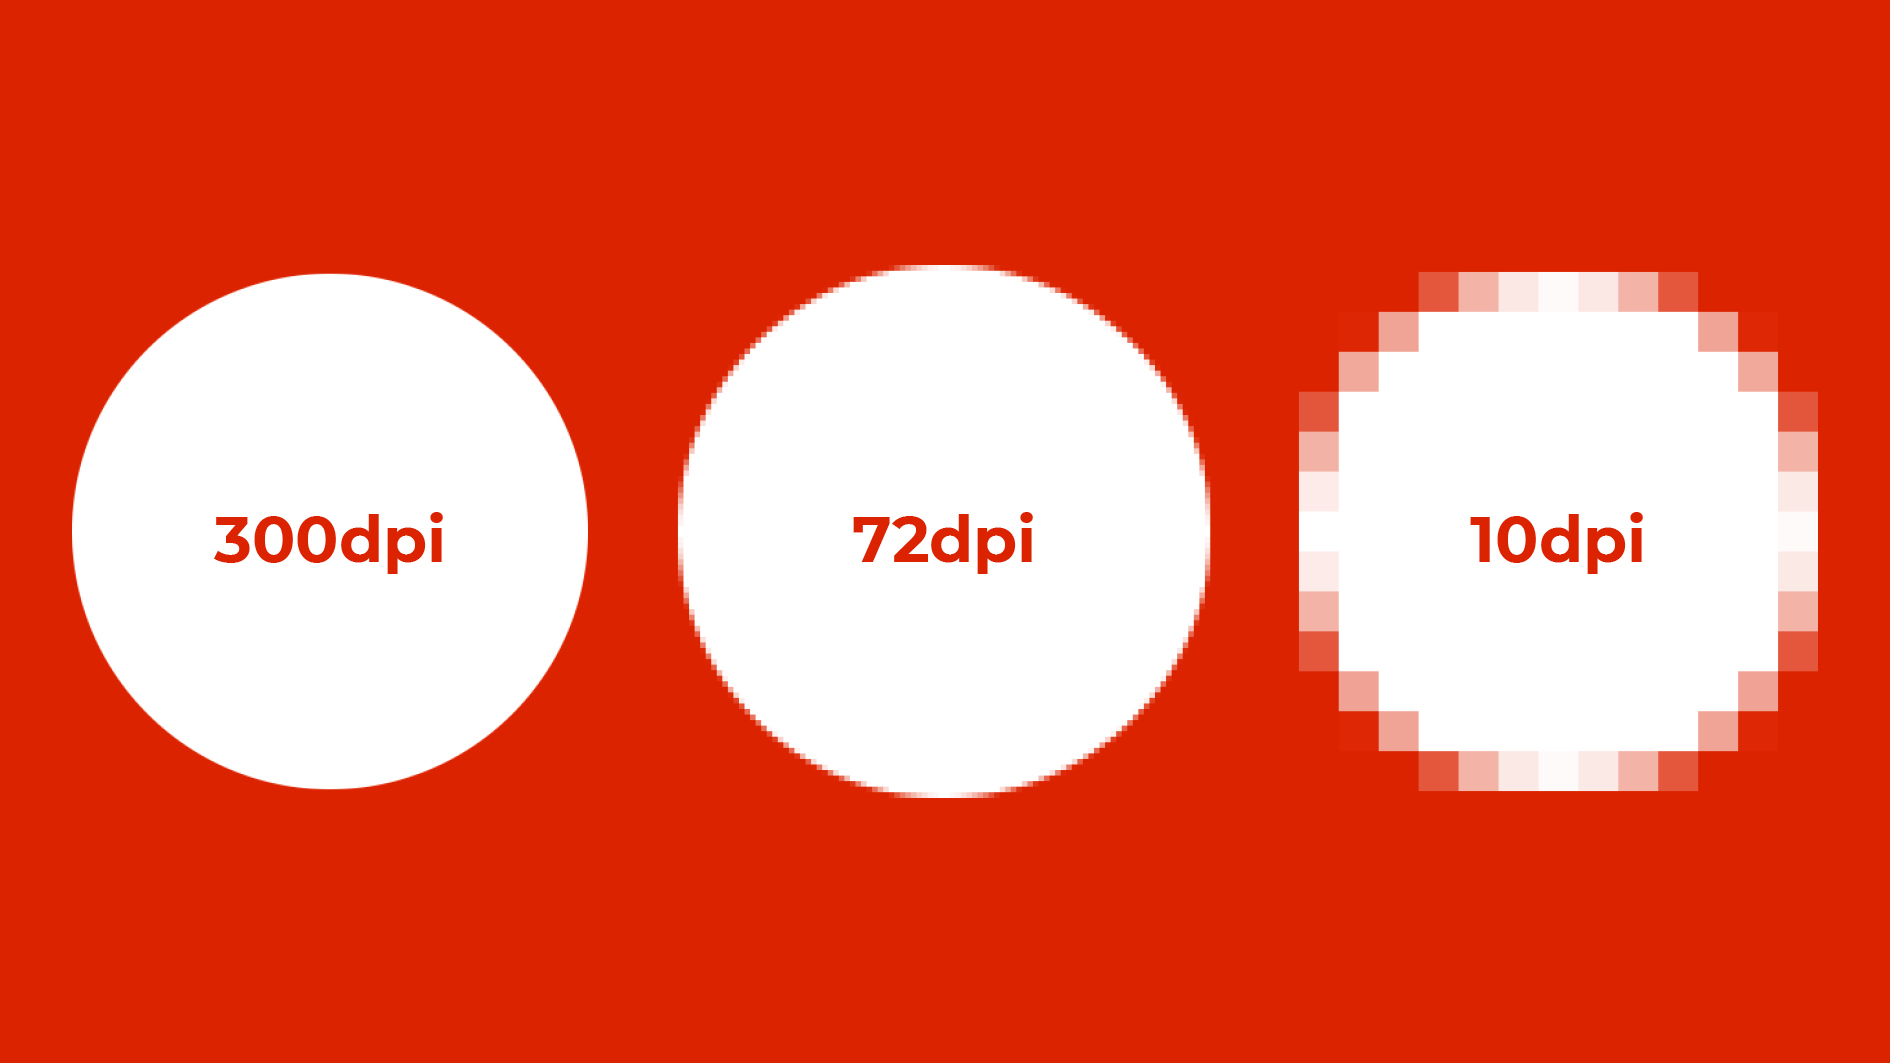
Image resolution is a critical factor in determining the quality of an image, whether it’s for printing, online display, or other applications. The resolution of an image is measured in dots per inch (DPI), which refers to the number of dots of ink or pixels that are used to create the image. A higher DPI typically results in a sharper, clearer image, while a lower DPI can lead to a pixelated or blurry image.
In the context of printing, image resolution plays a crucial role in determining the final output quality. For instance, an image with a high DPI (e.g., 300 DPI) will generally produce a sharper, more detailed print than an image with a lower DPI (e.g., 72 DPI). Similarly, when displaying images online, a higher DPI can help ensure that the image appears clear and crisp, even when viewed on high-resolution devices.
Verifying the DPI of an image is essential to ensure that it meets the required standards for a particular application. For example, if you’re designing a brochure or flyer, you’ll want to ensure that the images used have a high enough DPI to produce a clear, professional-looking print. Similarly, if you’re creating images for online display, you’ll want to ensure that they have a sufficient DPI to appear clear and crisp on a variety of devices.
Fortunately, checking the DPI of an image is a relatively straightforward process, and there are several methods to do so. By understanding the importance of image resolution and learning how to verify the DPI of an image, you can ensure that your images meet the required standards and produce professional-looking results.
What is DPI and How Does it Impact Image Quality?
DPI, or dots per inch, is a measure of the number of dots of ink or pixels that are used to create an image. It is a critical factor in determining the quality of an image, as it affects the sharpness, clarity, and overall visual appeal of the image. A higher DPI typically results in a sharper, more detailed image, while a lower DPI can lead to a pixelated or blurry image.
The relationship between DPI and image quality is complex, and it depends on various factors, including the intended use of the image, the type of device or medium it will be displayed on, and the level of detail required. For example, an image with a high DPI (e.g., 300 DPI) may be suitable for printing, while an image with a lower DPI (e.g., 72 DPI) may be sufficient for online display.
When it comes to image quality, DPI is just one of the factors to consider. Other factors, such as image compression, formatting, and storage, can also impact the quality of an image. However, DPI is a critical factor, and understanding its impact on image quality is essential for achieving professional-looking results.
By understanding the role of DPI in determining image quality, you can make informed decisions when working with images. Whether you’re designing graphics, editing photos, or creating digital art, knowing how to check the DPI of an image can help you achieve the desired level of quality and ensure that your images look their best.
How to Check the DPI of an Image: A Beginner’s Guide
Checking the DPI of an image is a straightforward process that can be done using various methods. In this section, we will provide a step-by-step guide on how to check the DPI of an image using image editing software, online tools, and operating system features.
Method 1: Using Image Editing Software
Image editing software such as Adobe Photoshop, GIMP, and Canva can be used to check the DPI of an image. To do this, follow these steps:
1. Open the image in the image editing software.
2. Go to the “Image” or “File” menu and select “Properties” or “Image Properties”.
3. Look for the “Resolution” or “DPI” field, which will display the current DPI of the image.
Method 2: Using Online Tools
There are several online tools available that can help check the DPI of an image. To use these tools, follow these steps:
1. Go to the online tool’s website and upload the image.
2. The tool will analyze the image and display the DPI and other image properties.
Method 3: Using Operating System Features
Both Windows and macOS operating systems have built-in features that can be used to check the DPI of an image. To do this, follow these steps:
1. Right-click on the image file and select “Properties” (Windows) or “Get Info” (macOS).
2. Look for the “Resolution” or “DPI” field, which will display the current DPI of the image.
By following these methods, you can easily check the DPI of an image and ensure that it meets the required standards for your project.
Using Image Editing Software to Verify Image Resolution
Image editing software is a powerful tool for verifying image resolution. Popular software like Adobe Photoshop, GIMP, and Canva offer a range of features that make it easy to check the DPI of an image.
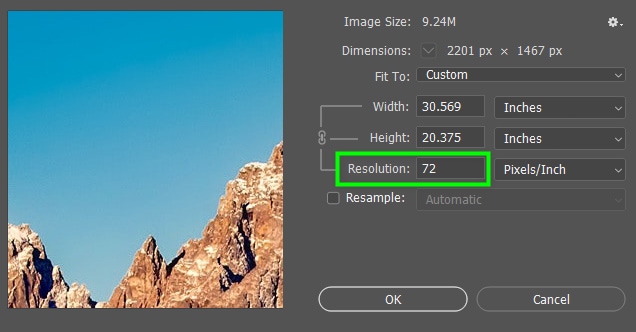
Adobe Photoshop, for example, allows users to check the DPI of an image by going to the “Image” menu and selecting “Image Size”. This will open the “Image Size” dialog box, which displays the current DPI of the image.
GIMP, another popular image editing software, also offers a similar feature. To check the DPI of an image in GIMP, go to the “Image” menu and select “Scale Image”. This will open the “Scale Image” dialog box, which displays the current DPI of the image.
Canva, a user-friendly graphic design software, also allows users to check the DPI of an image. To do this, go to the “File” menu and select “Image properties”. This will open the “Image properties” dialog box, which displays the current DPI of the image.
In addition to these software-specific methods, there are also some general tips to keep in mind when using image editing software to verify image resolution. For example, it’s a good idea to always check the DPI of an image before editing or sharing it, to ensure that it meets the required standards. Additionally, be sure to save images in a format that supports high-resolution images, such as TIFF or PSD.
By using image editing software to verify image resolution, you can ensure that your images are of the highest quality and meet the required standards for your project.
Online Tools for Checking Image Resolution
Online tools can be a convenient and efficient way to check the DPI of an image. There are many online DPI checkers and image analysis tools available that can help you verify the resolution of an image.
One popular online tool for checking image resolution is the DPI Checker tool. This tool allows you to upload an image and instantly check its DPI. It also provides information on the image’s dimensions, file size, and format.
Another online tool for checking image resolution is the Image Analyzer tool. This tool provides a detailed analysis of an image’s resolution, including its DPI, dimensions, and file size. It also offers suggestions for improving the image’s resolution and quality.
Online tools like these can be a great resource for checking image resolution, especially if you don’t have access to image editing software or prefer a more streamlined process. However, it’s essential to keep in mind that online tools may have limitations, such as file size restrictions or limited functionality.
When using online tools to check image resolution, make sure to choose a reputable and reliable tool that provides accurate results. Also, be aware of any potential security risks associated with uploading images to online tools.
By using online tools to check image resolution, you can quickly and easily verify the DPI of an image and ensure that it meets the required standards for your project.
Common Mistakes to Avoid When Checking Image Resolution
When checking image resolution, there are several common mistakes to avoid. These mistakes can lead to inaccurate results, poor image quality, and wasted time.
One common mistake is incorrect image scaling. When scaling an image, it’s essential to maintain the aspect ratio to avoid distorting the image. Failure to do so can result in a poor-quality image that is not suitable for printing or online display.
Another mistake is ignoring image metadata. Image metadata, such as EXIF data, can provide valuable information about the image, including its resolution, camera settings, and editing history. Ignoring this metadata can lead to inaccurate results and poor image quality.
Using outdated software is also a common mistake. Outdated software may not be able to accurately check image resolution or provide the necessary tools for editing and enhancing images. Using outdated software can lead to poor image quality and wasted time.
Additionally, not checking image resolution regularly can also lead to poor image quality. Image resolution can change during the editing process, and failing to check it regularly can result in a poor-quality image.
By avoiding these common mistakes, you can ensure that your images are of the highest quality and meet the required standards for printing and online display.
It’s also important to note that checking image resolution is an ongoing process. As you edit and enhance your images, it’s essential to regularly check the resolution to ensure that it meets the required standards.
Best Practices for Working with High-Resolution Images
Working with high-resolution images requires careful attention to detail to ensure that the image quality is maintained throughout the editing and sharing process. Here are some best practices to follow:
Image Compression: When working with high-resolution images, it’s essential to use image compression techniques to reduce the file size without compromising the image quality. This can be done using image editing software or online tools.
Formatting: When formatting high-resolution images, it’s crucial to use the correct file format to ensure that the image quality is maintained. For example, using a lossless file format like TIFF or PSD can help preserve the image quality.
Storage: When storing high-resolution images, it’s essential to use a reliable storage system that can handle large file sizes. This can include external hard drives, cloud storage, or network-attached storage (NAS) devices.
Maintaining Image Quality: To maintain image quality during editing and sharing, it’s essential to use high-quality image editing software and to avoid over-editing or over-compressing the image.
Sharing High-Resolution Images: When sharing high-resolution images, it’s essential to use the correct file format and to ensure that the image is optimized for the intended use. For example, using a JPEG file format can be suitable for web use, while a TIFF file format may be more suitable for printing.
By following these best practices, you can ensure that your high-resolution images are of the highest quality and meet the required standards for printing and online display.
Conclusion: Mastering Image Resolution for Professional Results
Verifying image resolution is a crucial step in ensuring that your images are of the highest quality and meet the required standards for printing and online display. By following the steps outlined in this guide, you can master the art of checking image resolution and achieve professional results.
Remember, checking image resolution is not a one-time task, but rather an ongoing process that requires attention to detail and a commitment to quality. By incorporating image resolution checks into your workflow, you can ensure that your images are always of the highest quality and meet the required standards.
Here is a final checklist to ensure that you are checking image resolution correctly:
1. Use image editing software to check DPI.
2. Use online tools to check image resolution.
3. Check image metadata for resolution information.
4. Avoid using outdated software or methods.
5. Use high-quality image editing software to maintain image quality.
By following these steps and incorporating image resolution checks into your workflow, you can achieve professional results and ensure that your images are always of the highest quality.


