Why You Might Need to Delete a WordPress Site
Deleting a WordPress site may seem like a drastic measure, but there are several scenarios where it’s necessary. Perhaps you’ve abandoned a project, and the site is no longer needed. Maybe you’re consolidating multiple sites, and one of them needs to be removed. Alternatively, you might have created a test site to experiment with WordPress, and now it’s time to delete it. Whatever the reason, deleting a WordPress site is a straightforward process that can be completed in a few steps.
Before you begin, it’s essential to understand that deleting a WordPress site will permanently remove all its content, including posts, pages, themes, and plugins. If you’re not careful, you might lose valuable data or content that you need. That’s why it’s crucial to backup and export your site’s content before deleting it. This way, you can ensure that you have a copy of your site’s data, just in case you need it in the future.
WordPress sites can be deleted for various reasons, including a change in business strategy, a shift in personal interests, or a desire to simplify online presence. Whatever the reason, it’s essential to follow the correct procedure to avoid any potential issues or complications. In the next section, we’ll explore the importance of backing up and exporting your site’s content before deleting it.
Before You Delete: Backup and Export Your Content
Before deleting a WordPress site, it’s essential to backup and export your content to prevent any potential data loss. This step is crucial, as deleting a site will permanently remove all its content, including posts, pages, themes, and plugins. By backing up and exporting your content, you can ensure that you have a copy of your site’s data, which can be useful for future reference or in case you need to restore your site.
There are several plugins available that can help you backup and export your WordPress site’s content, including Duplicator and UpdraftPlus. These plugins allow you to create a complete backup of your site, including files and databases, which can be easily restored if needed. Additionally, you can also use these plugins to export your site’s content, such as posts and pages, to a CSV or XML file, which can be easily imported into another WordPress site.
To backup and export your WordPress site’s content using Duplicator, follow these steps:
- Install and activate the Duplicator plugin on your WordPress site.
- Go to the Duplicator settings page and click on the “Create” button to create a new backup.
- Select the files and databases you want to include in the backup and click on the “Next” button.
- Choose the storage location for your backup and click on the “Next” button.
- Wait for the backup process to complete and then download the backup file.
Similarly, you can use UpdraftPlus to backup and export your WordPress site’s content. Simply install and activate the plugin, go to the settings page, and follow the instructions to create a backup and export your content.
Method 1: Deleting a WordPress Site from the Dashboard
Deleting a WordPress site from the dashboard is a straightforward process that can be completed in a few steps. This method is recommended if you have access to the WordPress dashboard and want to delete the site quickly and easily.
To delete a WordPress site from the dashboard, follow these steps:
- Log in to your WordPress site’s dashboard using your username and password.
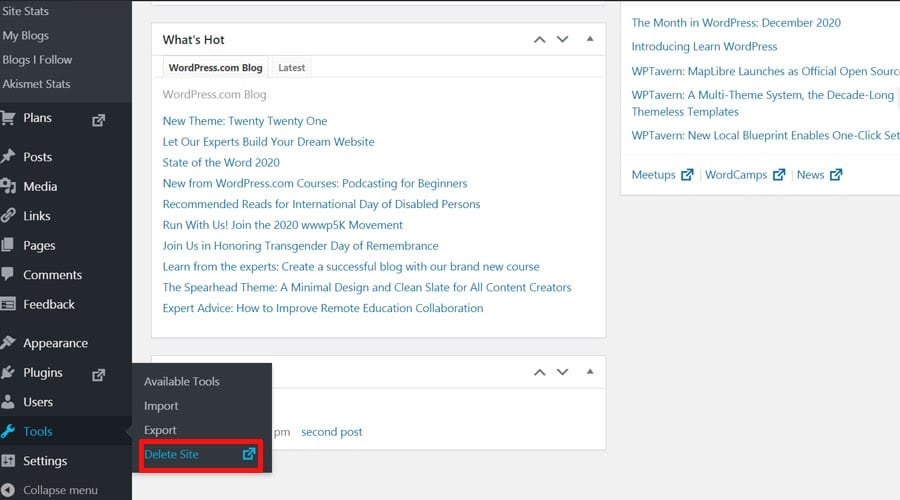
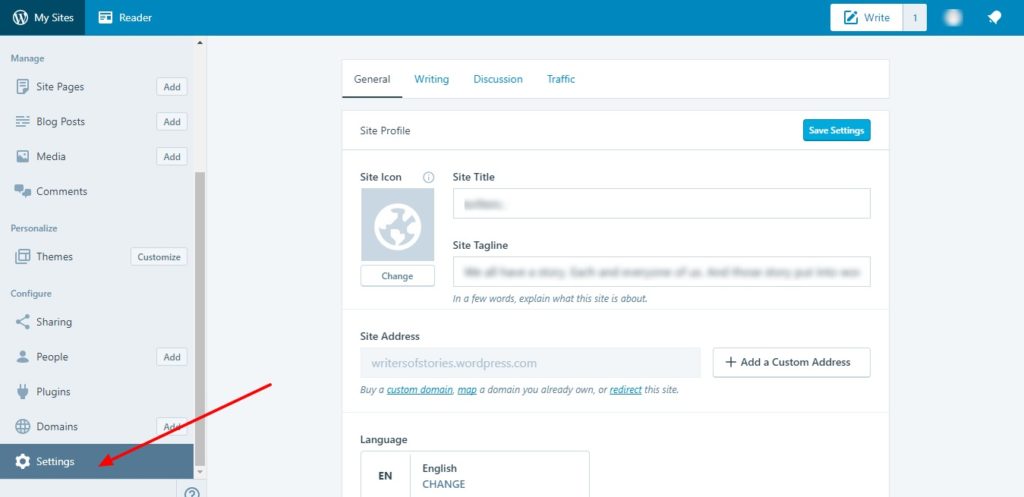
- Click on the “Settings” menu and select “General” from the drop-down list.
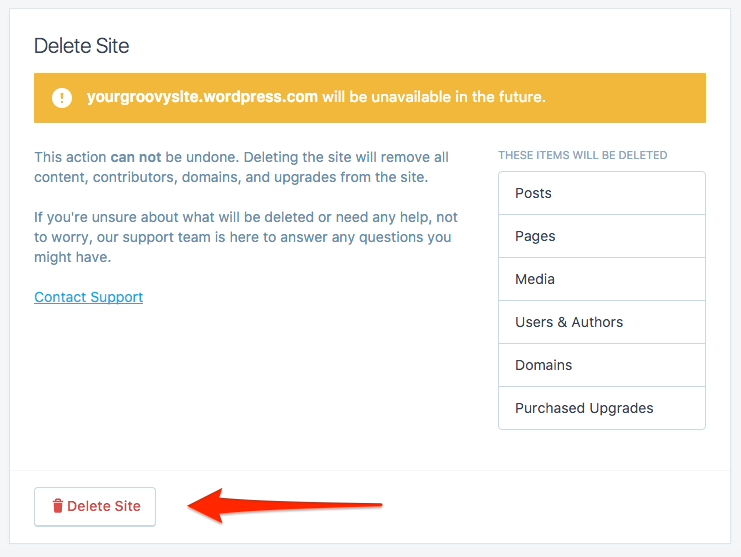
- Scroll down to the “Delete Site” section and click on the “Delete Site” button.
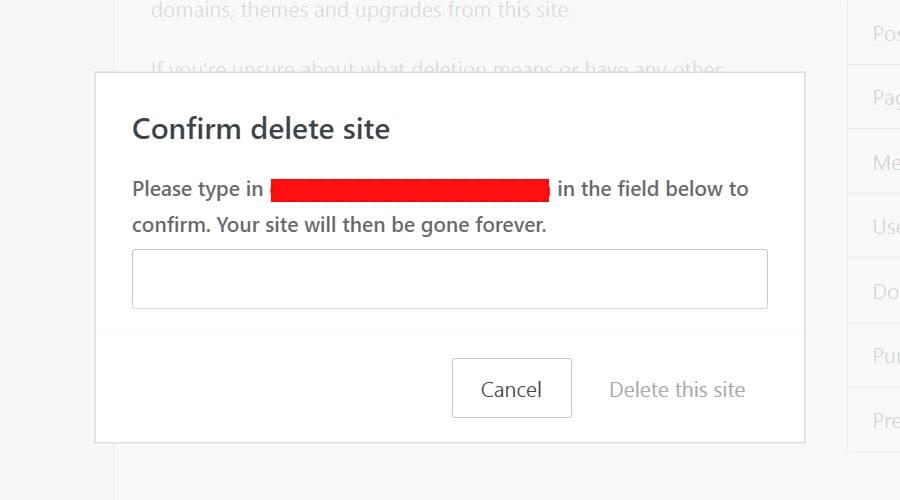
- Confirm that you want to delete the site by clicking on the “OK” button.
- Wait for the deletion process to complete. This may take a few minutes, depending on the size of your site.
Once the deletion process is complete, you will receive a confirmation message indicating that the site has been successfully deleted. You can then log out of the dashboard and verify that the site is no longer accessible.
It’s worth noting that deleting a WordPress site from the dashboard will permanently remove all its content, including posts, pages, themes, and plugins. Therefore, it’s essential to backup and export your site’s content before deleting it, as discussed in the previous section.
In addition to deleting the site, you may also want to consider canceling or modifying your hosting plan, depending on your specific needs. This will be discussed in more detail in the next section.
Method 2: Deleting a WordPress Site via FTP or SFTP
Deleting a WordPress site via FTP or SFTP is a more advanced method that requires some technical knowledge. This method is recommended if you have access to your site’s files and databases via FTP or SFTP and want to delete the site manually.
To delete a WordPress site via FTP or SFTP, follow these steps:
- Connect to your site’s files and databases using an FTP or SFTP client, such as FileZilla or Cyberduck.
- Navigate to the root directory of your WordPress site and delete the following files and folders:
- wp-admin
- wp-includes
- wp-content
- index.php
- wp-config.php
- Delete the WordPress database using the FTP or SFTP client. This will vary depending on your hosting provider and database management system.
- Confirm that the site has been deleted by checking the FTP or SFTP client and verifying that the files and databases are no longer present.
It’s essential to note that deleting a WordPress site via FTP or SFTP will permanently remove all its content, including posts, pages, themes, and plugins. Therefore, it’s crucial to backup and export your site’s content before deleting it, as discussed in the previous section.
Additionally, deleting a WordPress site via FTP or SFTP may also affect your hosting plan and domain. This will be discussed in more detail in the next section.
Method 3: Deleting a WordPress Site from cPanel or Plesk
Deleting a WordPress site from cPanel or Plesk is a straightforward process that can be completed in a few steps. This method is recommended if you have access to your site’s control panel and want to delete the site quickly and easily.
To delete a WordPress site from cPanel or Plesk, follow these steps:
- Log in to your cPanel or Plesk account using your username and password.
- Navigate to the “File Manager” or “File Explorer” section of your control panel.
- Locate the folder that contains your WordPress site and click on it to open it.
- Click on the “Delete” button to delete the folder and all its contents.
- Confirm that you want to delete the site by clicking on the “OK” button.
Alternatively, you can also delete a WordPress site from cPanel or Plesk using the “Softaculous” or “Installatron” installer. This method is recommended if you installed your WordPress site using one of these installers.
To delete a WordPress site using Softaculous or Installatron, follow these steps:
- Log in to your cPanel or Plesk account using your username and password.
- Navigate to the “Softaculous” or “Installatron” section of your control panel.
- Locate the WordPress site you want to delete and click on the “Remove” button.
- Confirm that you want to delete the site by clicking on the “OK” button.
Once you have deleted your WordPress site from cPanel or Plesk, you will need to update your domain and hosting settings to reflect the changes. This will be discussed in more detail in the next section.
What Happens to Your Domain and Hosting After Deletion
After deleting a WordPress site, you may be wondering what happens to your domain and hosting. The good news is that deleting a WordPress site does not affect your domain or hosting plan. However, you may need to take some additional steps to ensure that your domain and hosting are properly configured.
If you have a domain name associated with your WordPress site, you will need to update your domain settings to point to a new website or hosting provider. This can be done through your domain registrar or hosting provider. You may also need to update your DNS settings to ensure that your domain is properly configured.
In terms of hosting, deleting a WordPress site will not affect your hosting plan. However, you may need to cancel or modify your hosting plan if you no longer need it. This can be done through your hosting provider’s control panel or by contacting their customer support team.
It’s also important to note that deleting a WordPress site may affect any other websites or applications that are hosted on the same server. If you have multiple websites or applications hosted on the same server, you may need to take additional steps to ensure that they are properly configured and functioning correctly.
To avoid any potential issues, it’s a good idea to review your domain and hosting settings after deleting a WordPress site. This will help ensure that your domain and hosting are properly configured and that any other websites or applications are functioning correctly.
Common Issues and Troubleshooting
When deleting a WordPress site, you may encounter some common issues or errors. Here are some troubleshooting tips and solutions to help you resolve these issues:
Issue 1: Error 404 – Page Not Found
If you encounter an Error 404 – Page Not Found error after deleting a WordPress site, it may be due to a misconfigured DNS setting or a caching issue. To resolve this issue, try clearing your browser cache and checking your DNS settings to ensure that they are properly configured.
Issue 2: Database Connection Error
If you encounter a database connection error after deleting a WordPress site, it may be due to a misconfigured database setting or a corrupted database file. To resolve this issue, try checking your database settings to ensure that they are properly configured and try repairing or replacing the corrupted database file.
Issue 3: File Not Found Error
If you encounter a File Not Found error after deleting a WordPress site, it may be due to a misconfigured file path or a missing file. To resolve this issue, try checking your file paths to ensure that they are properly configured and try uploading the missing file to the correct location.
Issue 4: Permission Error
If you encounter a permission error after deleting a WordPress site, it may be due to a misconfigured file permission or a missing permission. To resolve this issue, try checking your file permissions to ensure that they are properly configured and try granting the necessary permissions to the affected files or folders.
By following these troubleshooting tips and solutions, you should be able to resolve any common issues or errors that may arise when deleting a WordPress site.
Conclusion: Successfully Removing a WordPress Site
Removing a WordPress site can be a straightforward process if you follow the steps outlined in this article. By backing up and exporting your content, deleting the site from the dashboard or via FTP/SFTP, and updating your domain and hosting settings, you can successfully remove a WordPress site.
Remember to also troubleshoot any common issues that may arise during the deletion process, such as error 404, database connection errors, file not found errors, and permission errors.
By following these steps and tips, you can ensure a smooth and successful removal of your WordPress site. Whether you’re abandoning a project, consolidating multiple sites, or removing a test site, deleting a WordPress site is a necessary step in maintaining your online presence.
Before you start the deletion process, make sure to take a few moments to review your site’s content and settings to ensure that you’re not deleting anything important. Additionally, consider taking a backup of your site’s files and databases before deleting the site, just in case you need to restore it later.
By being mindful of these considerations and following the steps outlined in this article, you can successfully remove a WordPress site and move on to your next project.


