Unlocking the Power of CSS Styling
CSS styling is a crucial aspect of WordPress website development, allowing users to customize the visual appeal of their site and enhance the overall user experience. By editing style CSS in WordPress, users can improve the layout, typography, and color scheme of their website, making it more engaging and effective. In this article, we will explore the importance of CSS styling in WordPress and provide a comprehensive guide on how to edit style CSS in WordPress.
Customizing CSS styles can have a significant impact on a website’s success. A well-designed website can increase brand recognition, improve user engagement, and ultimately drive more conversions. By learning how to edit style CSS in WordPress, users can take control of their website’s visual appeal and create a unique and professional-looking site that reflects their brand identity.
Furthermore, CSS styling is an essential skill for any WordPress user, from beginners to advanced developers. By understanding how to edit style CSS in WordPress, users can troubleshoot common CSS issues, optimize their website’s performance, and create custom styles that enhance the user experience. Whether you’re looking to improve your website’s design, increase conversions, or simply learn more about WordPress development, this article will provide you with the knowledge and skills you need to succeed.
In the following sections, we will delve deeper into the world of CSS styling in WordPress, covering topics such as accessing the WordPress Customizer, understanding CSS selectors and properties, and editing CSS styles in the WordPress Customizer. By the end of this article, you will have a comprehensive understanding of how to edit style CSS in WordPress and be able to apply your new skills to create a stunning and effective website.
Accessing the WordPress Customizer
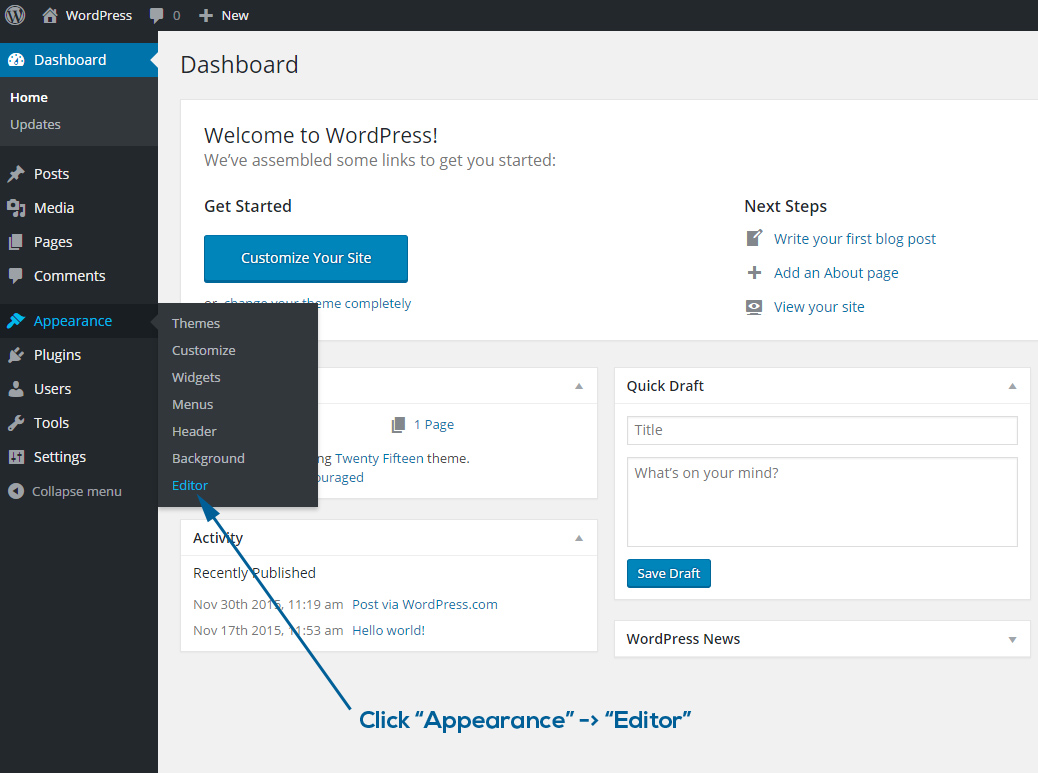
To start customizing your WordPress site’s visual appeal, you need to access the WordPress Customizer. The Customizer is a powerful tool that allows you to make changes to your site’s design and layout in real-time. To access the Customizer, follow these steps:
1. Log in to your WordPress dashboard and navigate to the Appearance section.
2. Click on the Customize button, which is usually located at the top of the Appearance section.
3. This will open the Customizer panel, which provides a range of options for customizing your site’s design and layout.
Once you are in the Customizer panel, you can start exploring the various options and tools available. The Customizer is divided into several sections, including Colors, Fonts, and Layout. Each section provides a range of options for customizing your site’s design and layout.
For example, in the Colors section, you can choose from a range of pre-defined color schemes or create your own custom color scheme. In the Fonts section, you can select from a range of font families and sizes to customize your site’s typography.
In addition to these options, the Customizer also provides a range of advanced tools and settings for more experienced users. These include options for customizing your site’s CSS code, adding custom JavaScript code, and more.
By using the WordPress Customizer, you can make a wide range of changes to your site’s design and layout, from simple tweaks to more complex customizations. In the next section, we will explore the basics of CSS selectors and properties, which will help you to make the most of the Customizer’s advanced features.
Understanding CSS Selectors and Properties
CSS selectors and properties are the building blocks of CSS styling. To edit style CSS in WordPress, you need to understand how to use selectors and properties to target specific HTML elements and apply styles to them.
A CSS selector is a string of characters that identifies an HTML element or a group of elements. There are several types of CSS selectors, including:
- Element selectors: These select HTML elements based on their tag name, such as `h1`, `p`, or `img`.
- Class selectors: These select HTML elements based on their class attribute, such as `.header` or `.footer`.
- ID selectors: These select HTML elements based on their ID attribute, such as `#header` or `#footer`.
CSS properties, on the other hand, define the styles that are applied to the selected HTML elements. There are many different CSS properties, including:
- Color properties: These define the color of an element, such as `color`, `background-color`, or `border-color`.
- Font properties: These define the font family, size, and style of an element, such as `font-family`, `font-size`, or `font-weight`.
- Layout properties: These define the layout of an element, such as `width`, `height`, `margin`, or `padding`.
When you combine CSS selectors and properties, you can create powerful styles that enhance the visual appeal of your WordPress site. For example, you can use the `h1` selector to target all `h1` elements on your site and apply a specific font family, size, and color.
In WordPress, you can use the Customizer to edit CSS styles and apply them to your site. The Customizer provides a range of tools and options for editing CSS styles, including a code editor and a live preview feature.
By understanding CSS selectors and properties, you can take control of your WordPress site’s visual appeal and create custom styles that enhance the user experience. In the next section, we will explore how to edit CSS styles in the WordPress Customizer.
Editing CSS Styles in the WordPress Customizer
Now that you understand the basics of CSS selectors and properties, it’s time to learn how to edit CSS styles in the WordPress Customizer. The Customizer provides a range of tools and options for editing CSS styles, including a code editor and a live preview feature.
To edit CSS styles in the Customizer, follow these steps:
1. Access the Customizer by navigating to the Appearance section of your WordPress dashboard and clicking on the Customize button.
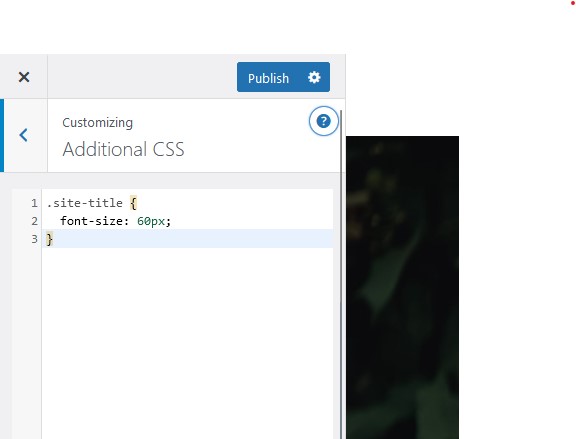
2. In the Customizer panel, click on the Additional CSS tab.
3. In the Additional CSS editor, you can add new CSS styles or edit existing ones. You can use the code editor to write your own CSS code, or you can use the visual editor to select from a range of pre-defined styles.
4. To add a new style, click on the Add New Style button and enter your CSS code in the editor.
5. To edit an existing style, click on the Edit Style button and make your changes in the editor.
6. Once you’ve made your changes, click on the Save & Publish button to save your changes and publish them to your live site.
The Customizer also provides a live preview feature, which allows you to see how your changes will look on your live site before you save and publish them. This feature is especially useful for testing and iterating on your custom styles.
In addition to editing CSS styles, the Customizer also provides a range of other tools and options for customizing your WordPress site’s visual appeal. These include options for customizing your site’s layout, typography, and color scheme.
By using the Customizer to edit CSS styles, you can take control of your WordPress site’s visual appeal and create custom styles that enhance the user experience. In the next section, we will explore how to use the WordPress Additional CSS panel to add custom CSS code to your website.
Using the WordPress Additional CSS Panel
The WordPress Additional CSS panel is a powerful tool that allows you to add custom CSS code to your website. This panel is especially useful for overriding default styles and adding custom styles to your website.
To access the Additional CSS panel, follow these steps:
1. Log in to your WordPress dashboard and navigate to the Appearance section.
2. Click on the Customize button to access the Customizer panel.
3. In the Customizer panel, click on the Additional CSS tab.
4. In the Additional CSS editor, you can add your custom CSS code. You can use this editor to write your own CSS code or paste in code from another source.
5. Once you’ve added your custom CSS code, click on the Save & Publish button to save your changes and publish them to your live site.
The Additional CSS panel is a great way to add custom styles to your website without having to edit your theme’s code. This makes it easy to customize your website’s visual appeal without having to worry about breaking your theme.
Some tips for using the Additional CSS panel include:
- Use the panel to override default styles and add custom styles to your website.
- Use the panel to add custom CSS code for specific pages or posts.
- Use the panel to test and iterate on custom styles before publishing them to your live site.
By using the WordPress Additional CSS panel, you can take control of your website’s visual appeal and create custom styles that enhance the user experience. In the next section, we will explore some common CSS customizations for WordPress sites.
Common CSS Customizations for WordPress Sites
When it comes to customizing the visual appeal of a WordPress site, there are several common CSS customizations that can make a big impact. In this section, we’ll explore some of the most popular CSS customizations for WordPress sites, including how to change font sizes and colors, how to adjust spacing and margins, and how to customize button styles.
One of the most common CSS customizations for WordPress sites is changing the font size and color. This can be done using the `font-size` and `color` properties in CSS. For example, to change the font size of all paragraphs on a site, you could use the following code:
p { font-size: 18px; }
To change the font color of all headings on a site, you could use the following code:
h1, h2, h3, h4, h5, h6 { color: #00698f; }
Another common CSS customization for WordPress sites is adjusting the spacing and margins of elements. This can be done using the `margin` and `padding` properties in CSS. For example, to add a margin of 20 pixels to the top and bottom of all images on a site, you could use the following code:
img { margin: 20px 0; }
To add a padding of 10 pixels to the left and right of all paragraphs on a site, you could use the following code:
p { padding: 0 10px; }
Customizing button styles is another popular CSS customization for WordPress sites. This can be done using the `background-color`, `border`, and `color` properties in CSS. For example, to change the background color and text color of all buttons on a site, you could use the following code:
button { background-color: #00698f; color: #ffffff; }
These are just a few examples of common CSS customizations for WordPress sites. By using CSS to customize the visual appeal of your site, you can create a unique and professional-looking design that reflects your brand and enhances the user experience.
Troubleshooting Common CSS Issues in WordPress
When working with CSS in WordPress, it’s not uncommon to encounter issues that can affect the layout and design of your website. In this section, we’ll explore some common CSS issues in WordPress and provide troubleshooting tips to help you resolve them.
One of the most common CSS issues in WordPress is conflicts between styles. This can occur when multiple CSS files are loaded on a page, causing styles to override each other. To resolve this issue, you can use the `important` keyword to specify which style should take precedence.
.example { background-color: #00698f !important; }
Another common issue is broken layouts. This can occur when CSS styles are not properly applied to HTML elements, causing the layout to break. To resolve this issue, you can use the WordPress Customizer to preview and adjust your CSS styles in real-time.
Optimizing CSS code for better performance is also an important consideration. This can be achieved by using CSS preprocessors like Sass or Less, which can help to reduce the size of your CSS files and improve page load times.
Additionally, you can use tools like the WordPress CSS Editor to optimize your CSS code and identify areas for improvement.
Other common CSS issues in WordPress include:
- Incorrectly targeting HTML elements with CSS selectors
- Using outdated or deprecated CSS properties
- Not properly testing and iterating on custom styles
By following these troubleshooting tips and best practices, you can resolve common CSS issues in WordPress and create a website that is visually appealing and functional.
Best Practices for CSS Customization in WordPress
When it comes to customizing the visual appeal of a WordPress site, there are several best practices to keep in mind. In this section, we’ll summarize some of the most important best practices for CSS customization in WordPress.
One of the most important best practices is to use a child theme. A child theme is a theme that inherits the functionality of a parent theme, but allows you to make customizations without affecting the parent theme. This is especially useful when working with CSS, as it allows you to make changes to the CSS code without affecting the parent theme.
Another best practice is to use a CSS preprocessor like Sass or Less. These preprocessors allow you to write more efficient and modular CSS code, which can help to improve the performance of your website.
Testing and iterating on custom styles is also an important best practice. This involves testing your custom styles in different browsers and devices, and making adjustments as needed to ensure that your website looks and functions as intended.
Additionally, it’s a good idea to use a CSS framework like Bootstrap or Foundation to help streamline your CSS code and improve the responsiveness of your website.
Other best practices for CSS customization in WordPress include:
- Using a consistent naming convention for your CSS classes and IDs
- Using a CSS reset to normalize the styling of different browsers
- Using a CSS validator to check for errors in your CSS code
By following these best practices, you can create a visually appealing and functional WordPress website that meets the needs of your users.

