Understanding the Importance of Image Resolution on Your iPhone
Image resolution is a crucial aspect of photography, and it plays a significant role in determining the quality of your photos. When it comes to iPhone photography, understanding image resolution is essential to ensure that your photos turn out sharp, clear, and visually appealing. But what exactly is image resolution, and why is it so important?

Click Image to Find Market Products
In simple terms, image resolution refers to the number of pixels that make up an image. The more pixels an image has, the higher its resolution and the more detailed it will appear. On an iPhone, image resolution is typically measured in megapixels (MP), with higher-end models boasting cameras with higher megapixel counts.
So, why is it essential to know the resolution of your iPhone photos? For starters, it can help you determine the best way to use and share your photos. For example, if you want to print a large photo, you’ll need to ensure that it has a high enough resolution to avoid pixelation. Similarly, if you’re sharing photos online, you may want to reduce the resolution to save storage space and improve loading times.
Moreover, understanding image resolution can also help you take better photos with your iPhone. By knowing the limitations of your camera’s resolution, you can adjust your photography techniques to get the best possible results. For instance, you may need to use a tripod or adjust your lighting to compensate for a lower resolution camera.
Fortunately, finding the resolution of your iPhone photos is relatively straightforward. In the next section, we’ll explore the different ways to check the resolution of your iPhone photos, including using the Photos app, the Settings app, and third-party apps.
How to Check the Resolution of Your iPhone Photos
Now that you understand the importance of image resolution on your iPhone, it’s time to learn how to check the resolution of your photos. Fortunately, there are several ways to do this, and we’ll explore each method in detail.
Method 1: Using the Photos App
To check the resolution of a photo using the Photos app, follow these steps:
- Open the Photos app on your iPhone and select the photo you want to check.
- Tap the “Share” icon (represented by a box with an arrow coming out of it) in the bottom left corner of the screen.
- Tap “More” and then select “Get Info” from the menu.
- Scroll down to the “Image” section, where you’ll see the resolution listed in pixels (e.g., 4032 x 3024).
Method 2: Using the Settings App
Alternatively, you can check the resolution of your iPhone photos using the Settings app. Here’s how:
- Open the Settings app on your iPhone and scroll down to the “Photos” section.
- Tap “Photos” and then select “Camera” from the menu.
- Look for the “Image Resolution” option and select it.
- Here, you’ll see the resolution of your camera listed in megapixels (e.g., 12MP).
Method 3: Using Third-Party Apps
If you want more detailed information about your iPhone photos, including the resolution, you can use third-party apps like Photo Investigator or EXIF Viewer. These apps provide a wealth of information about your photos, including the resolution, camera settings, and more.
To use these apps, simply download and install them from the App Store, then follow the in-app instructions to view the resolution of your photos.
By following these methods, you can easily check the resolution of your iPhone photos and ensure that they meet your needs. In the next section, we’ll explore the different measurements of image resolution and how they relate to the quality of your photos.

What Do the Numbers Mean? Understanding Image Resolution Measurements
When it comes to image resolution, there are several measurements that can be confusing, especially for those new to photography. In this section, we’ll break down the different measurements of image resolution, including pixels, megapixels, and dpi, and explain how they relate to the quality of your photos.
Pixels: The Building Blocks of Image Resolution
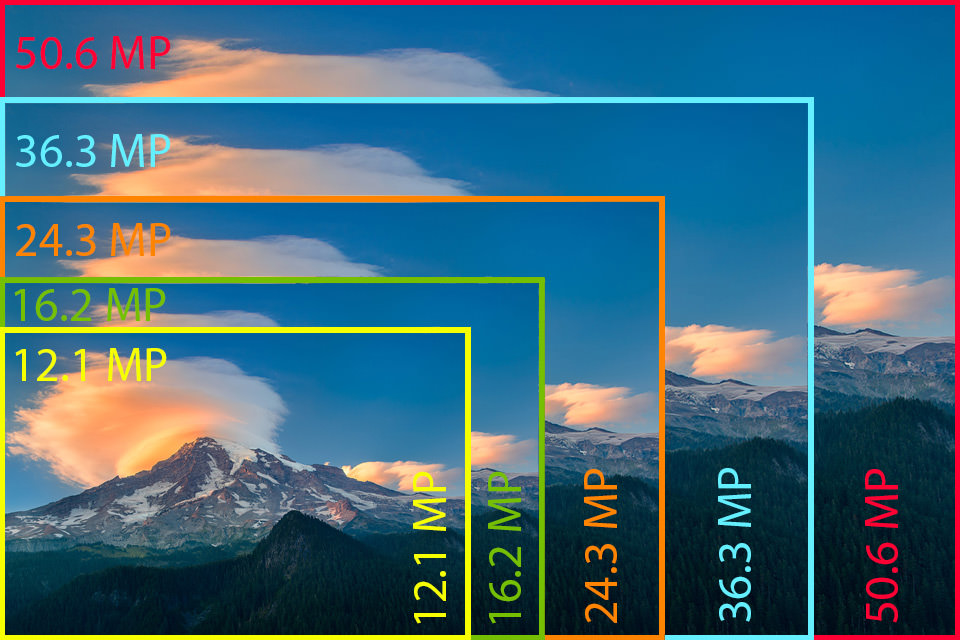
A pixel is the smallest unit of a digital image, and it’s made up of three colors: red, green, and blue. The number of pixels in an image determines its resolution. For example, an image with a resolution of 4032 x 3024 pixels has a total of 12,192,768 pixels.
Megapixels: A Measure of Camera Resolution
A megapixel is equal to one million pixels. Camera resolution is often measured in megapixels, with higher-end cameras having more megapixels. For example, the iPhone 13 Pro has a 12-megapixel camera, while the iPhone 12 Pro has a 12-megapixel camera as well.
DPI: A Measure of Print Resolution
DPI, or dots per inch, is a measure of print resolution. It refers to the number of dots of ink that a printer can place within a linear inch. DPI is important when printing photos, as it determines the level of detail and quality of the print. A higher DPI generally results in a higher-quality print.
How Do These Measurements Relate to Photo Quality?
The relationship between pixels, megapixels, and DPI is complex, but here’s a simplified explanation: pixels determine the resolution of a digital image, megapixels determine the resolution of a camera, and DPI determines the quality of a print. When you take a photo with your iPhone, the camera captures a certain number of pixels, which determines the resolution of the image. If you want to print the photo, the DPI of the printer will determine the quality of the print.
By understanding these measurements, you can better appreciate the quality of your iPhone photos and make informed decisions when printing or sharing them. In the next section, we’ll provide tips and tricks for taking high-resolution photos with your iPhone.
![]()
Tips for Taking High-Resolution Photos with Your iPhone
Taking high-resolution photos with your iPhone requires a combination of good camera settings, lighting, and composition techniques. Here are some tips to help you get the best possible results:
Use the Right Camera Settings
To take high-resolution photos, you need to use the right camera settings. Here are a few tips:
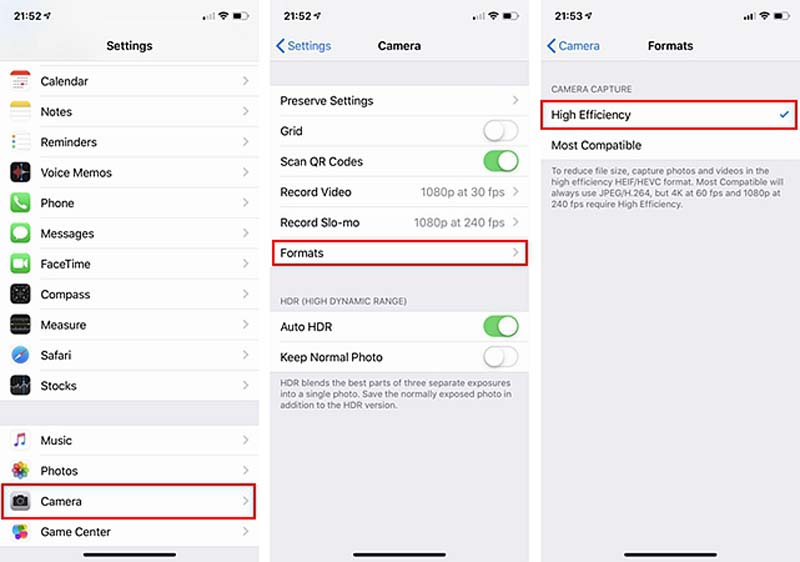
- Use the HDR (High Dynamic Range) feature to capture more detail in both bright and dark areas of the image.
- Turn on the “High Efficiency” mode to capture more detailed images.
- Use the “Pro” mode to manually adjust camera settings such as ISO, exposure, and focus.
Pay Attention to Lighting
Lighting is one of the most critical factors in taking high-resolution photos. Here are a few tips:
- Use natural light whenever possible. Shoot near a window or outside during the golden hour (the hour just before sunset) for the best results.
- Avoid harsh direct light, which can create unflattering shadows and highlights.
- Use a reflector or a flash to add depth and dimension to your images.
Master Composition Techniques
Composition is key to taking high-resolution photos that are visually appealing. Here are a few tips:
- Use the rule of thirds to balance your composition and create more interesting images.
- Experiment with different angles and perspectives to add depth and dimension to your images.
- Pay attention to the background and use a shallow depth of field to blur it and emphasize your subject.
By following these tips, you can take high-resolution photos with your iPhone that are sure to impress. In the next section, we’ll discuss how to edit and enhance your iPhone photos for better resolution.

How to Edit and Enhance Your iPhone Photos for Better Resolution
Once you’ve taken a high-resolution photo with your iPhone, you can further enhance its quality by editing it with the right apps and software. In this section, we’ll discuss the different editing apps and software available for enhancing the resolution of your iPhone photos.
Adobe Lightroom: A Powerful Editing App
Adobe Lightroom is a popular editing app that offers a range of tools and features for enhancing the resolution of your iPhone photos. With Lightroom, you can adjust the exposure, contrast, and color balance of your photos, as well as apply filters and effects to give them a professional look.
Adobe Photoshop: A Professional-Grade Editing Software
Adobe Photoshop is a professional-grade editing software that offers advanced tools and features for enhancing the resolution of your iPhone photos. With Photoshop, you can adjust the resolution of your photos, as well as apply advanced editing techniques such as noise reduction and sharpening.
Other Editing Apps and Software
In addition to Adobe Lightroom and Photoshop, there are many other editing apps and software available for enhancing the resolution of your iPhone photos. Some popular options include:
- Skylum Luminar: A powerful editing app that offers a range of tools and features for enhancing the resolution of your iPhone photos.
- VSCO: A popular editing app that offers a range of filters and effects for giving your iPhone photos a professional look.
- TouchRetouch: A handy editing app that allows you to remove unwanted objects and blemishes from your iPhone photos.
By using these editing apps and software, you can enhance the resolution of your iPhone photos and give them a professional look. In the next section, we’ll discuss common issues that can affect the resolution of your iPhone photos and provide solutions for fixing these problems.
Common Issues with iPhone Photo Resolution and How to Fix Them
Despite the high-quality cameras on iPhones, there are still some common issues that can affect the resolution of your photos. In this section, we’ll address some of these issues and provide solutions for fixing them.
Blurry Images: A Common Problem
Blurry images are a common problem that can be caused by a variety of factors, including camera shake, low light, and poor focus. To fix this issue, try using a tripod or a stabilizer to keep your camera steady, and make sure to focus on your subject before taking the photo.
Low Light: A Challenge for iPhone Cameras
Low light can be a challenge for iPhone cameras, as it can result in noisy or grainy photos. To fix this issue, try using the HDR feature on your iPhone, which can help to improve the contrast and color of your photos in low-light conditions.
Poor Focus: A Common Issue
Poor focus is another common issue that can affect the resolution of your iPhone photos. To fix this issue, try using the tap-to-focus feature on your iPhone, which allows you to select the area of the photo that you want to focus on.
Other Common Issues
In addition to blurry images, low light, and poor focus, there are several other common issues that can affect the resolution of your iPhone photos. These include:
- Noise or grain: This can be caused by low light or high ISO settings. To fix this issue, try using noise reduction software or apps.
- Distortion: This can be caused by wide-angle lenses or poor camera settings. To fix this issue, try using distortion correction software or apps.
- Color casts: This can be caused by poor white balance or color settings. To fix this issue, try using color correction software or apps.
By addressing these common issues and using the right techniques and software, you can improve the resolution of your iPhone photos and take stunning images. In the next section, we’ll compare the camera capabilities of different iPhone models and discuss which one takes the highest resolution photos.

Comparing iPhone Models: Which One Takes the Highest Resolution Photos?
When it comes to taking high-resolution photos with your iPhone, the model you use can make a big difference. In this section, we’ll compare the camera capabilities of different iPhone models, including the iPhone 13 Pro, iPhone 12 Pro, and iPhone 11 Pro, and discuss which one takes the highest resolution photos.
iPhone 13 Pro: The Highest Resolution Camera
The iPhone 13 Pro has a quad-camera setup with a 48-megapixel main camera, a 12-megapixel telephoto camera, and a 12-megapixel ultra-wide-angle camera. This camera setup allows for high-resolution photos with excellent detail and color accuracy.
iPhone 12 Pro: A Close Second
The iPhone 12 Pro has a triple-camera setup with a 12-megapixel main camera, a 12-megapixel telephoto camera, and a 12-megapixel ultra-wide-angle camera. While the camera resolution is lower than the iPhone 13 Pro, the iPhone 12 Pro still takes excellent high-resolution photos.
iPhone 11 Pro: A Good Option for Those on a Budget
The iPhone 11 Pro has a dual-camera setup with a 12-megapixel main camera and a 12-megapixel telephoto camera. While the camera resolution is lower than the iPhone 13 Pro and iPhone 12 Pro, the iPhone 11 Pro still takes good high-resolution photos, especially considering its lower price point.
Comparison Chart
Here’s a comparison chart of the camera capabilities of the iPhone 13 Pro, iPhone 12 Pro, and iPhone 11 Pro:
| iPhone Model | Main Camera Resolution | Telephoto Camera Resolution | Ultra-Wide-Angle Camera Resolution |
|---|---|---|---|
| iPhone 13 Pro | 48 megapixels | 12 megapixels | 12 megapixels |
| iPhone 12 Pro | 12 megapixels | 12 megapixels | 12 megapixels |
| iPhone 11 Pro | 12 megapixels | 12 megapixels | N/A |
By comparing the camera capabilities of different iPhone models, you can make an informed decision about which one is best for your photography needs. In the next section, we’ll summarize the key takeaways from the article and encourage readers to practice finding and optimizing the resolution of their iPhone photos for stunning results.
Conclusion: Mastering iPhone Photo Resolution for Stunning Images
In this article, we’ve explored the importance of image resolution on your iPhone, including how to check the resolution of your photos, understand image resolution measurements, and take high-resolution photos with your iPhone. We’ve also discussed how to edit and enhance your iPhone photos for better resolution, common issues that can affect the resolution of your iPhone photos, and compared the camera capabilities of different iPhone models.
By mastering the art of finding and optimizing the resolution of your iPhone photos, you can take stunning images that will impress your friends and family. Whether you’re a professional photographer or just a casual iPhone user, understanding image resolution is essential for getting the most out of your iPhone’s camera.
So, the next time you take a photo with your iPhone, remember to check the resolution and adjust your camera settings accordingly. With practice and patience, you’ll be taking high-resolution photos like a pro in no time.
Thanks for reading, and we hope you found this article informative and helpful. Happy snapping!
