What is Reverse Image Search and How Does it Work?
Reverse image search is a powerful tool that allows users to search for images on the internet using an existing image as a query. This technology has numerous benefits, including identifying unknown images, finding similar images, and verifying the authenticity of an image. By using reverse image search, users can uncover a wealth of information about an image, such as its origin, usage, and related content.
Reverse image search works by analyzing the visual content of an image and matching it to similar images in a database. This process involves complex algorithms that can identify patterns, shapes, and colors within an image. When a user uploads an image or enters a URL, the algorithm searches for matching images in the database and returns relevant results.
One of the most popular ways to perform a reverse image search is by using Google. Google’s reverse image search feature allows users to upload an image or enter a URL and search for similar images across the web. This feature is particularly useful for identifying unknown images, finding similar images, or verifying the authenticity of an image.
For example, if you want to know more about an image you found online, you can use Google’s reverse image search feature to uncover more information. Simply upload the image or enter the URL, and Google will return a list of similar images, including information about the image’s origin, usage, and related content.
Reverse image search is a valuable tool for anyone looking to uncover more information about an image. Whether you’re a researcher, a student, or simply someone curious about an image, reverse image search can help you find the answers you’re looking for. By using this technology, you can gain a deeper understanding of an image and its context, and make more informed decisions about how to use it.
In the next section, we’ll explore how to use Google to search for images on your iPhone, including how to access Google on your iPhone and how to use the Google search bar to find images.
Using Google to Search for Images on Your iPhone
To search for images on your iPhone using Google, you’ll need to access the Google app or website. You can do this by opening the Google app on your iPhone or by navigating to the Google website in your mobile browser.
Once you’re on the Google homepage, you can use the search bar to find images. Simply type in a keyword or phrase related to the image you’re looking for, and Google will return a list of relevant results. You can also use the “Images” tab to filter your search results and only show images.
For example, if you’re looking for images of a specific landmark, you can type in the name of the landmark and Google will return a list of images related to it. You can also use specific keywords like “sunsets” or “mountains” to find images that match your search query.
Google’s image search feature is particularly useful for finding images on your iPhone because it allows you to search for images using keywords or phrases. This makes it easy to find specific images or types of images, even if you don’t know the exact name of the image.
In addition to using keywords, you can also use the “Advanced search” feature to refine your search results. This feature allows you to specify the size, color, and type of image you’re looking for, which can help you find exactly what you need.
Using Google to search for images on your iPhone is a quick and easy way to find the images you need. Whether you’re looking for images for a project or just want to find some inspiration, Google’s image search feature is a powerful tool that can help you achieve your goals.
In the next section, we’ll explore how to upload an image to Google from your iPhone, including how to access the Google app, select the image, and initiate the search.
How to Upload an Image to Google from Your iPhone
Uploading an image to Google from your iPhone is a straightforward process that can be completed in a few steps. To start, you’ll need to access the Google app on your iPhone. You can do this by opening the Google app from your home screen or by searching for it in the App Store.
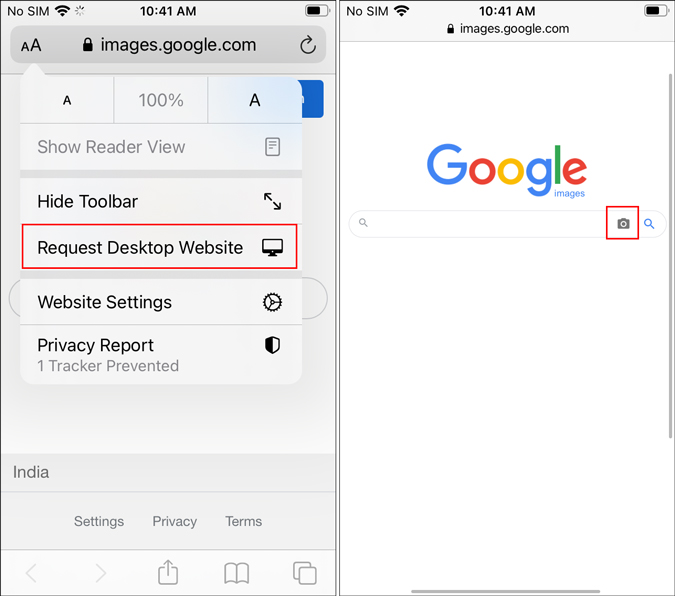
Once you’ve opened the Google app, tap on the camera icon in the search bar. This will open the camera view, where you can select an image from your iPhone’s photo library or take a new photo.
To select an image from your photo library, tap on the “Photos” tab and choose the image you want to upload. You can also use the “Albums” tab to select an image from a specific album.
Once you’ve selected the image, tap on the “Upload” button to initiate the upload process. Google will then analyze the image and return a list of search results.
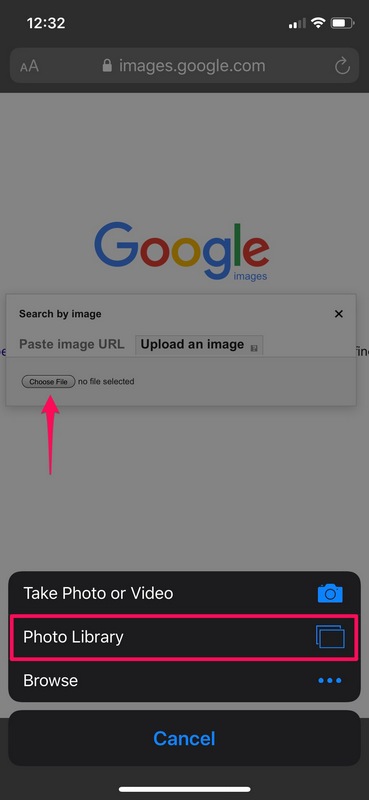
Alternatively, you can also upload an image to Google from your iPhone’s Safari browser. To do this, open Safari and navigate to the Google website. Tap on the camera icon in the search bar and select the image you want to upload from your photo library.
Google will then analyze the image and return a list of search results. You can use the search results to find more information about the image, such as its origin, usage, and related content.
Uploading an image to Google from your iPhone is a quick and easy way to search for images and find more information about them. Whether you’re looking for images for a project or just want to learn more about an image, Google’s image search feature is a powerful tool that can help you achieve your goals.
In the next section, we’ll explore how to use the Google Lens app for reverse image search on an iPhone, including how to download and install the app, and how to use it to search for images.
Using the Google Lens App for Reverse Image Search
The Google Lens app is a powerful tool for reverse image search on an iPhone. The app uses artificial intelligence to identify objects, scenes, and activities within an image, and provides information about what it sees.
To use the Google Lens app for reverse image search, you’ll need to download and install the app from the App Store. Once you’ve installed the app, you can open it and select the image you want to search for.
The Google Lens app offers a range of features that make it easy to use for reverse image search. For example, you can use the app to search for images of objects, scenes, and activities, and get information about what you’re seeing.
One of the most useful features of the Google Lens app is its ability to identify objects and provide information about them. For example, if you’re looking at a picture of a landmark, the app can identify the landmark and provide information about its history, location, and significance.
The Google Lens app also offers a range of other features that make it useful for reverse image search. For example, you can use the app to search for images of products, and get information about prices, reviews, and availability.
In addition to its features, the Google Lens app is also easy to use. The app’s interface is simple and intuitive, making it easy to navigate and find what you’re looking for.
Overall, the Google Lens app is a powerful tool for reverse image search on an iPhone. Its range of features, ease of use, and ability to identify objects and provide information make it a valuable resource for anyone looking to learn more about an image.
In the next section, we’ll explore some tips and tricks for getting the most out of reverse image search on an iPhone, including how to use specific keywords, filter search results, and use other advanced search features.
Tips and Tricks for Effective Reverse Image Search on iPhone
To get the most out of reverse image search on your iPhone, there are several tips and tricks you can use. One of the most effective ways to use reverse image search is to use specific keywords. By using keywords related to the image you’re searching for, you can narrow down the search results and find more relevant information.
Another way to improve your reverse image search results is to filter the search results. Google allows you to filter search results by size, color, and type, which can help you find the exact image you’re looking for.
In addition to using keywords and filtering search results, you can also use other advanced search features to improve your reverse image search results. For example, you can use the “Similar images” feature to find images that are similar to the one you’re searching for.
Another useful feature is the “Reverse image search” feature, which allows you to search for images that are similar to the one you’re searching for. This feature can be especially useful if you’re trying to find more information about an image, but don’t know where to start.
Finally, it’s also important to use high-quality images when performing a reverse image search. High-quality images will produce more accurate search results, and will help you find the information you’re looking for more quickly.
By using these tips and tricks, you can get the most out of reverse image search on your iPhone, and find the information you need more quickly and easily.
In the next section, we’ll discuss some common issues that may arise when using reverse image search on an iPhone, and provide troubleshooting tips to resolve these issues.
Common Issues and Troubleshooting for Reverse Image Search on iPhone
While reverse image search on an iPhone can be a powerful tool, there are some common issues that may arise. One of the most common issues is poor internet connectivity. If your internet connection is slow or unstable, it may affect the accuracy of your search results.
To troubleshoot this issue, try checking your internet connection and ensuring that it is stable and fast. You can also try restarting your iPhone or closing and reopening the Google app to see if it resolves the issue.
Another common issue is image upload errors. If you’re having trouble uploading an image to Google, try checking the size and format of the image. Google may have specific requirements for image size and format, so ensure that your image meets these requirements.
Search result inaccuracies are also a common issue. If you’re not getting accurate search results, try refining your search query or using more specific keywords. You can also try using other advanced search features, such as filtering by size or color, to get more accurate results.
In addition to these common issues, there are also some other troubleshooting tips you can try. For example, if you’re having trouble with the Google app, try uninstalling and reinstalling it to see if it resolves the issue.
By following these troubleshooting tips, you can resolve common issues and get the most out of reverse image search on your iPhone.
In the next section, we’ll discuss alternative methods for reverse image search on an iPhone, including using other search engines or third-party apps.
Alternative Methods for Reverse Image Search on iPhone
While Google is a popular choice for reverse image search on an iPhone, there are other alternative methods that you can use. One of these alternatives is Bing, which is a search engine developed by Microsoft.
Bing offers a reverse image search feature that allows you to search for images using a query image. To use Bing for reverse image search, simply go to the Bing website and click on the “Images” tab. Then, click on the “Reverse image search” button and upload your query image.
Another alternative method for reverse image search on an iPhone is TinEye. TinEye is a third-party app that allows you to search for images using a query image. To use TinEye, simply download and install the app, then upload your query image and search for similar images.
Reversee is another third-party app that offers reverse image search capabilities. Reversee allows you to search for images using a query image, and also offers features such as image filtering and sorting.
These alternative methods can be useful if you’re looking for more options for reverse image search on your iPhone. However, it’s worth noting that Google is still one of the most popular and widely used search engines, and its reverse image search feature is highly effective.
In the next section, we’ll summarize the key takeaways from the article and provide a conclusion.
Conclusion: Mastering Reverse Image Search on Your iPhone
Reverse image search on an iPhone is a powerful tool that can be used to identify unknown images, find similar images, or verify the authenticity of an image. By using the methods described in this article, you can master the art of reverse image search on your iPhone and take your image searching skills to the next level.
Whether you’re using Google, the Google Lens app, or alternative methods such as Bing or TinEye, reverse image search on an iPhone is a convenient and easy-to-use feature that can be accessed from anywhere. With the tips and tricks provided in this article, you can get the most out of reverse image search and find the information you need quickly and easily.
So why not give reverse image search on your iPhone a try? With its ease of use and powerful features, it’s a tool that can be used by anyone, regardless of their level of technical expertise. Whether you’re a student, a professional, or simply someone who loves to learn, reverse image search on an iPhone is a valuable resource that can help you achieve your goals.
By mastering the art of reverse image search on your iPhone, you can unlock a world of possibilities and take your image searching skills to new heights. So why wait? Start using reverse image search on your iPhone today and discover the power of image searching at your fingertips!

:max_bytes(150000):strip_icc()/Reverse-Image-Search-annotated-dd6c4bbbb3044ecbb97ec4af09ccfedb.jpg)


