Getting Started with Google Images on Your Phone
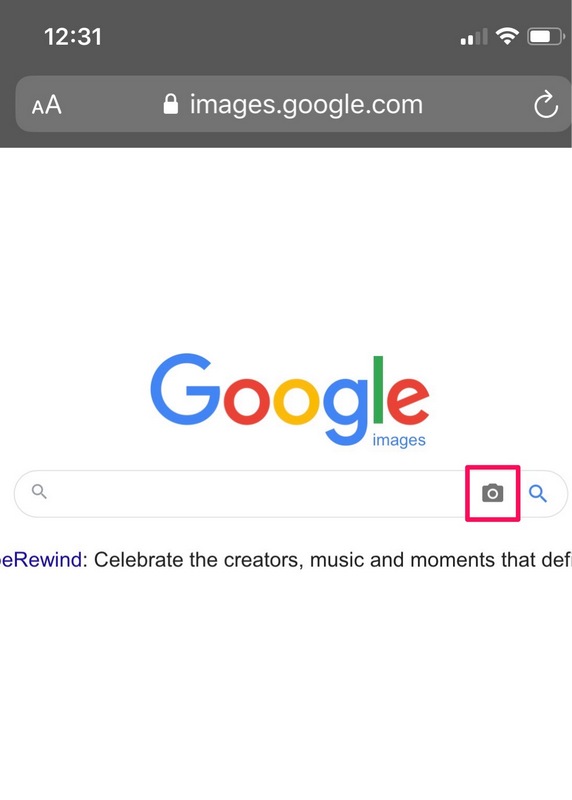
To get started with reverse image search on your phone, you’ll need to access Google Images. There are several ways to do this, depending on your device and operating system. If you have an Android device, you can find the Google Images app on your home screen or in your app drawer. If you have an iPhone, you can access Google Images through the Google app or by visiting the Google Images website in your mobile browser.
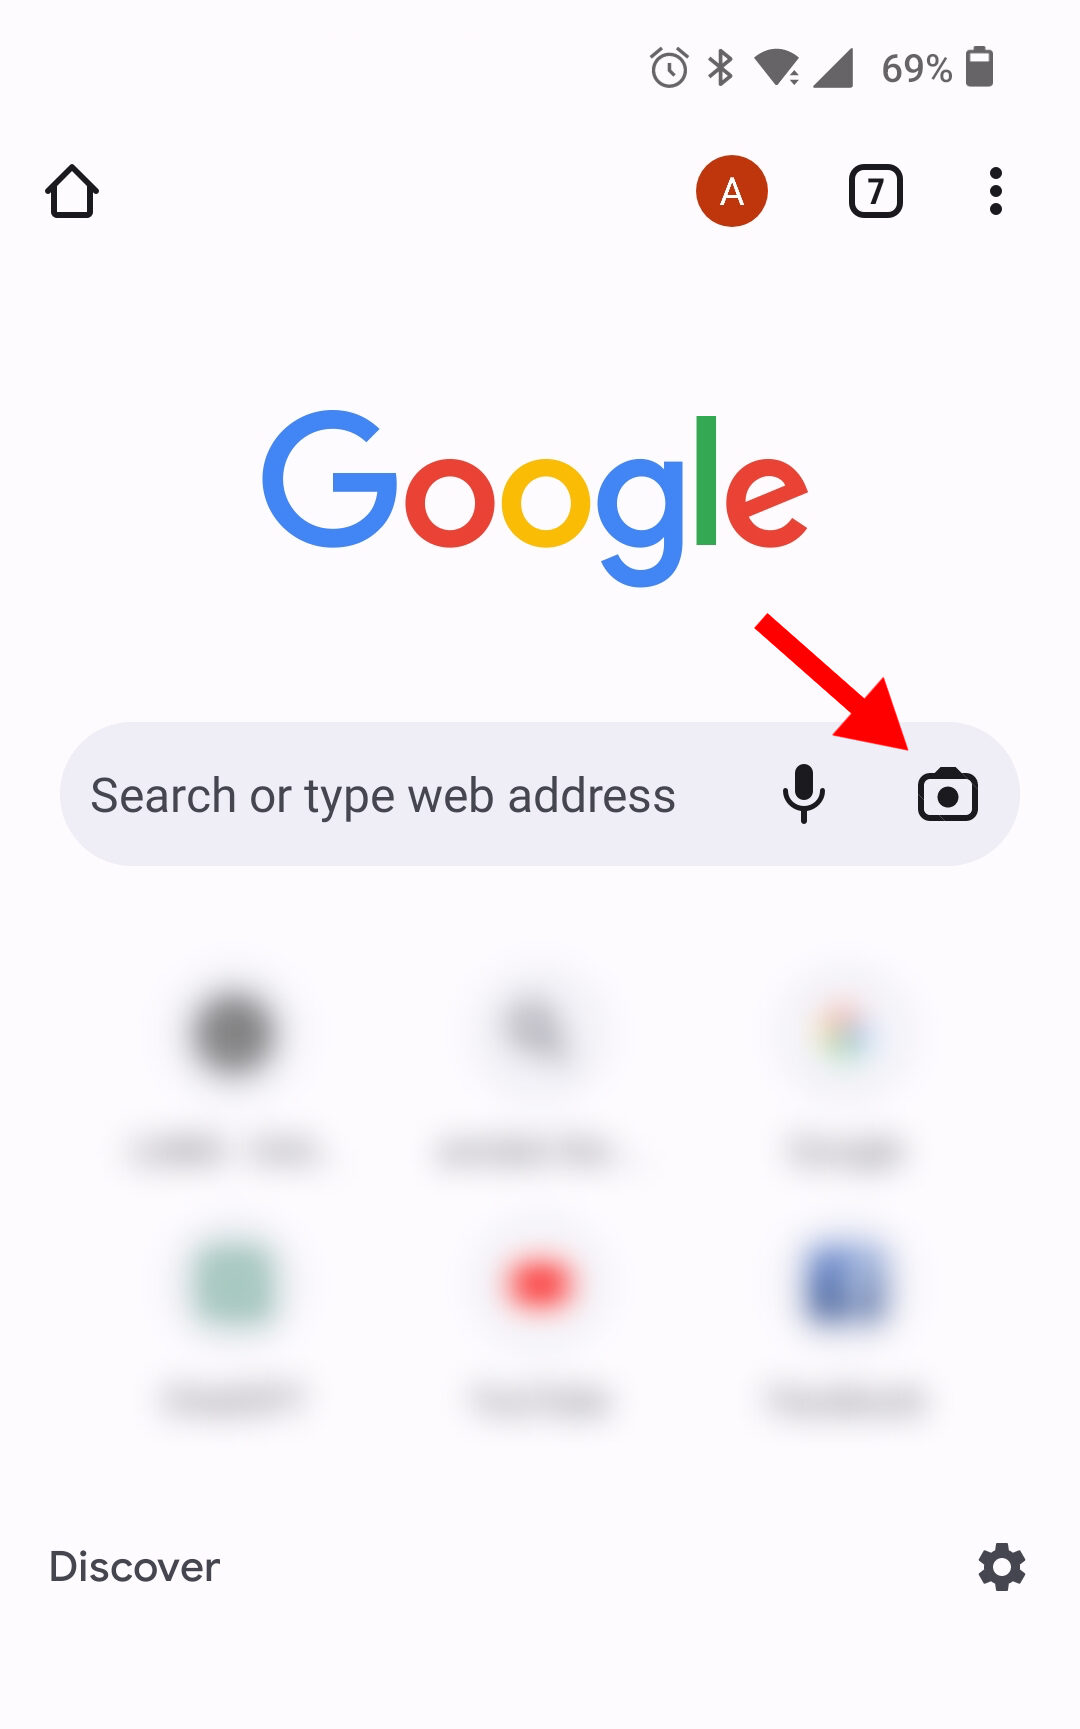
Once you’ve opened Google Images, you’ll see a search bar at the top of the screen. You can type in keywords or phrases to search for images, or you can use the camera icon to search for images using your phone’s camera. You can also use the microphone icon to search for images using voice commands.
In addition to the search bar, Google Images also offers several other features and tools to help you find what you’re looking for. You can use the “Tools” menu to filter your search results by size, color, and type, or to search for images that are similar to a specific image. You can also use the “Related images” feature to find images that are related to your search query.
Google Images also offers a feature called “Google Lens,” which allows you to search for images using your phone’s camera. With Google Lens, you can take a photo of an object or scene, and then search for images that are similar to what’s in the photo. This feature is particularly useful for identifying unknown objects or finding more information about a specific topic.
How to Search an Image on Google Using Your Phone’s Camera
To search for an image on Google using your phone’s camera, follow these steps:
1. Open the Google app on your phone and tap the camera icon in the search bar.
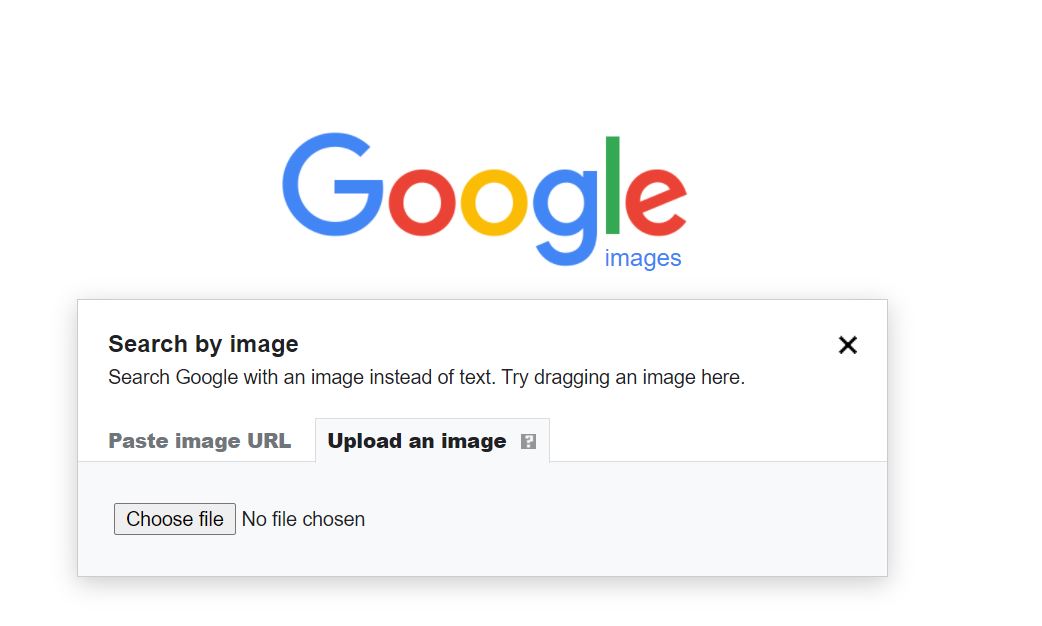
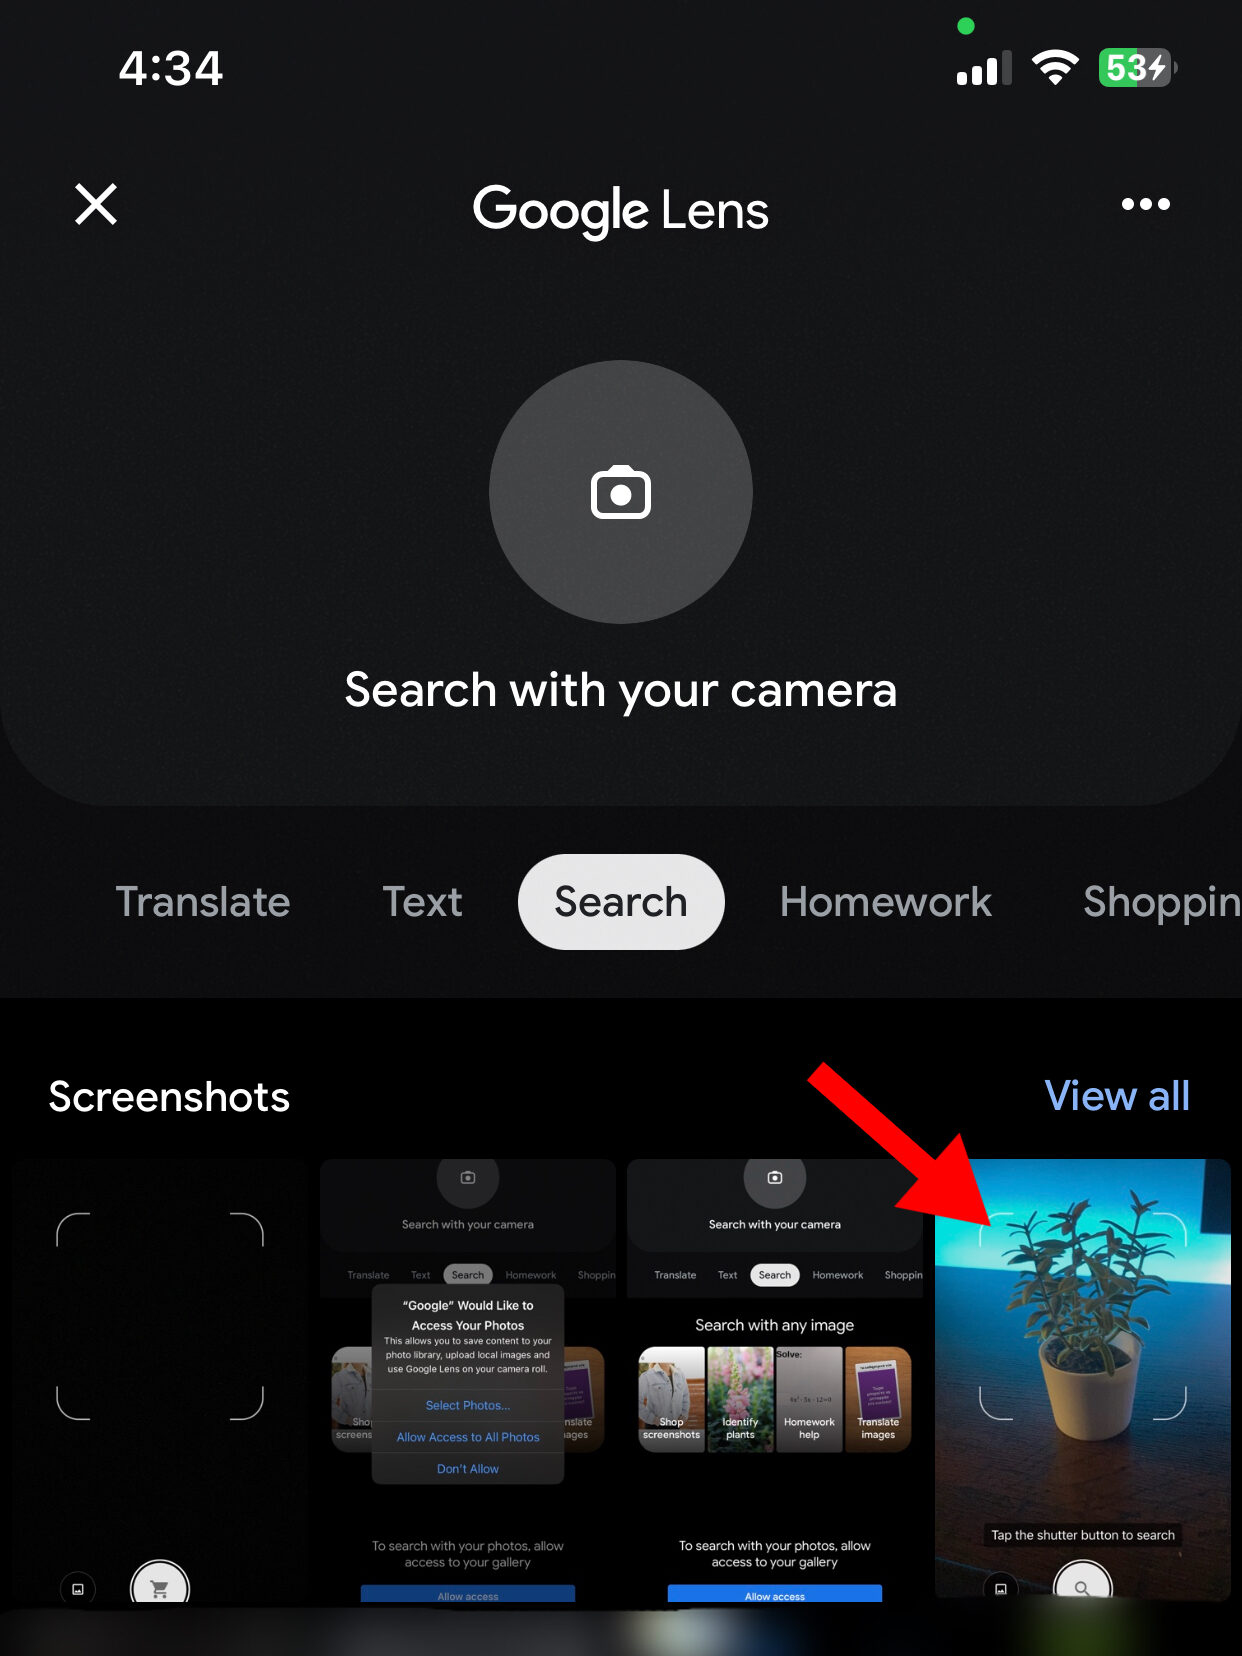
2. Take a photo of the image you want to search for, or select an image from your phone’s gallery.
3. Tap the “Search with Google Lens” button to upload the image to Google Images.
4. Wait for the image to be processed, and then browse through the search results to find what you’re looking for.
Using your phone’s camera to search for images on Google is a convenient and efficient way to find what you’re looking for. With Google Lens, you can search for images in real-time, without having to type in keywords or phrases.
In addition to searching for images, Google Lens can also be used to identify objects, scan barcodes and QR codes, and translate text. To access these features, simply tap the “Google Lens” button in the Google app, and then select the feature you want to use.
By using your phone’s camera to search for images on Google, you can quickly and easily find what you’re looking for, without having to type in keywords or phrases. This feature is particularly useful for identifying unknown objects, finding similar images, and verifying the authenticity of online content.
Uploading an Image to Google Images on Your Phone
To upload an image to Google Images on your phone, follow these steps:
1. Open the Google Images app on your phone and tap the “Upload” button.
2. Select the image you want to upload from your phone’s gallery.
3. Crop the image to focus on the specific object or area you want to search for.
4. Adjust the search settings to specify the type of search you want to perform, such as searching for similar images or identifying objects.
5. Tap the “Search” button to upload the image to Google Images and start the search process.
Uploading an image to Google Images on your phone is a quick and easy way to search for images, identify objects, and get more information about what’s in the image. By following these steps, you can use Google Images to search for images on your phone and get the results you need.
When uploading an image to Google Images, you can also use the “Search with Google Lens” feature to get more information about the image. This feature uses artificial intelligence to identify objects, scenes, and actions in the image, and provides more detailed information about what’s in the image.
In addition to uploading images from your phone’s gallery, you can also use the camera to take a new photo and upload it to Google Images. This feature is particularly useful for identifying unknown objects, finding similar images, and verifying the authenticity of online content.
Uploading an Image to Google Images on Your Phone
Uploading an image from your phone’s gallery to Google Images is a straightforward process that can be completed in a few steps. To get started, open the Google Images app on your phone and tap the “Search by image” button, usually represented by a camera icon. This will prompt you to select an image from your phone’s gallery or take a new photo.
Once you’ve selected the image you want to upload, you can crop it to focus on a specific area or object. This can help improve the accuracy of the search results. To crop the image, tap the “Crop” button and adjust the edges of the crop box to select the desired area.
After cropping the image, you can adjust the search settings to refine the results. For example, you can select the image size, aspect ratio, and color to get more specific results. You can also use the “SafeSearch” filter to exclude explicit content from the search results.
Once you’ve adjusted the search settings, tap the “Search” button to upload the image to Google Images. The app will then analyze the image and provide you with a list of relevant search results, including similar images, websites, and information about the objects or scenes in the image.
Uploading an image to Google Images on your phone can be a useful way to identify unknown objects, find similar images, or verify the authenticity of online content. By following these steps, you can quickly and easily upload an image and get the information you need.
For example, if you’re shopping online and want to find more information about a product, you can upload an image of the product to Google Images and get a list of relevant search results, including reviews, prices, and availability. Similarly, if you’re trying to identify a mysterious object or scene, uploading an image to Google Images can help you get more information and context.
Overall, uploading an image to Google Images on your phone is a powerful tool that can help you get more information and insights about the world around you. By following these steps and using the app’s features and settings, you can get the most out of your image searches and find the information you need quickly and easily.
Using Google Lens to Search for Images on Your Phone
Google Lens is a powerful tool that allows you to search for images on your phone using artificial intelligence and machine learning algorithms. With Google Lens, you can identify objects, scenes, and activities within an image, and get more information about what’s in the image.
To use Google Lens, open the Google Images app on your phone and tap the “Lens” button, usually represented by a camera icon with a dot in the center. This will activate the camera, and you can point it at an object or scene to search for more information.
Google Lens can identify a wide range of objects, including animals, plants, landmarks, and products. It can also recognize text, such as street signs, menus, and labels, and translate it into your preferred language.
One of the most useful features of Google Lens is its ability to identify products and provide more information about them. For example, if you’re shopping and want to know more about a product, you can use Google Lens to scan the product’s packaging or label, and get information about its price, reviews, and availability.
Google Lens can also help you identify artwork, including paintings, sculptures, and other forms of visual art. Simply point the camera at the artwork, and Google Lens will provide you with information about the artist, the style, and the period in which it was created.
In addition to identifying objects and scenes, Google Lens can also help you solve problems and answer questions. For example, if you’re trying to assemble a piece of furniture, you can use Google Lens to scan the instructions and get step-by-step guidance on how to complete the task.
Overall, Google Lens is a powerful tool that can help you get more information about the world around you. By using Google Lens to search for images on your phone, you can identify objects, scenes, and activities, and get more information about what’s in the image.
When using Google Lens, keep in mind that it’s not perfect, and it may not always be able to identify the object or scene correctly. However, it’s a powerful tool that can provide you with a wealth of information, and it’s definitely worth trying out.
As you practice using Google Lens, you’ll become more proficient and efficient in your searches. You’ll be able to quickly and easily identify objects, scenes, and activities, and get more information about what’s in the image. With Google Lens, you’ll be able to unlock the full potential of reverse image search on your phone.
Tips and Tricks for Effective Image Search on Your Phone
To get the most out of reverse image search on your phone, there are several tips and tricks you can use to improve your search results. Here are some of the most effective ways to use reverse image search on your phone:
Use filters to narrow down your search results. Google Images allows you to filter your search results by size, color, and type of image. This can help you quickly find the image you’re looking for and exclude irrelevant results.
Adjust the search settings to get more specific results. Google Images allows you to adjust the search settings to get more specific results. For example, you can select the image size, aspect ratio, and color to get more specific results.
Use other image search apps. While Google Images is one of the most popular image search apps, there are other apps available that can provide more specific results. For example, TinEye is an image search app that specializes in finding exact matches for images.
Use the “Search by image” feature on other websites. Many websites, such as Pinterest and Flickr, allow you to search by image. This can be a great way to find similar images or identify objects in an image.
Take a clear and well-lit photo. When using the camera to search for an image, make sure to take a clear and well-lit photo. This will help the image recognition software to identify the object or scene more accurately.
Use the “Search with Google Lens” feature. Google Lens is a powerful tool that can help you identify objects, scenes, and activities within an image. By using the “Search with Google Lens” feature, you can get more information about what’s in the image and find similar images.
Practice makes perfect. The more you use reverse image search on your phone, the more proficient and efficient you’ll become. Practice using different search techniques and apps to find the best results for your needs.
By following these tips and tricks, you can get the most out of reverse image search on your phone and find the information you need quickly and easily. Whether you’re trying to identify an unknown object, find similar images, or verify the authenticity of online content, reverse image search can be a powerful tool in your arsenal.
Remember, the key to effective image search is to be specific and use the right tools. By using filters, adjusting the search settings, and using other image search apps, you can find the information you need and get the most out of reverse image search on your phone.
Common Issues and Troubleshooting
While reverse image search on your phone can be a powerful tool, there are some common issues that may arise. Here are some troubleshooting tips to help you resolve errors, resolve connectivity issues, and improve search results:
Error messages: If you encounter an error message while searching for an image, try checking your internet connection and ensuring that you have the latest version of the Google Images app. You can also try restarting the app or your phone to resolve the issue.
Connectivity issues: If you’re experiencing connectivity issues while searching for an image, try checking your internet connection and ensuring that you have a stable connection. You can also try switching to a different network or restarting your router to resolve the issue.
Poor search results: If you’re not getting the desired search results, try adjusting the search settings or using different keywords. You can also try using other image search apps or websites to see if they provide better results.
Image recognition errors: If the image recognition software is not accurately identifying the object or scene in the image, try taking a clearer photo or uploading a higher-quality image. You can also try adjusting the search settings or using different keywords to improve the accuracy of the results.
Google Lens issues: If you’re experiencing issues with Google Lens, try checking the Google Lens settings and ensuring that it is enabled. You can also try restarting the app or your phone to resolve the issue.
Other issues: If you’re experiencing other issues while searching for an image, try checking the Google Images help center or contacting Google support for assistance.
By following these troubleshooting tips, you can resolve common issues and improve your search results when using reverse image search on your phone.
It’s also important to note that reverse image search is not always 100% accurate, and there may be instances where the results are not what you expected. However, by using the tips and tricks outlined in this article, you can improve the accuracy of your search results and get the most out of reverse image search on your phone.
Additionally, it’s always a good idea to verify the authenticity of online content by using multiple sources and fact-checking information. By being mindful of these best practices, you can use reverse image search on your phone to find accurate and reliable information.
Conclusion: Mastering Reverse Image Search on Your Phone
Reverse image search on your phone is a powerful tool that can help you identify unknown objects, find similar images, and verify the authenticity of online content. By following the steps outlined in this article, you can master the art of reverse image search on your phone and become more proficient and efficient in your searches.
Remember to use the camera to search for images, upload images from your phone’s gallery, and use Google Lens to get more information about what’s in the image. Don’t forget to adjust the search settings, use filters, and try other image search apps to get the best results.
Common issues may arise, but by troubleshooting errors, resolving connectivity issues, and improving search results, you can overcome these obstacles and get the most out of reverse image search on your phone.
Practice makes perfect, so don’t be afraid to experiment and try new things. With time and practice, you’ll become a pro at using reverse image search on your phone and be able to find the information you need quickly and easily.
By mastering reverse image search on your phone, you’ll be able to unlock a world of possibilities and discover new things. Whether you’re a student, a researcher, or just someone who loves to learn, reverse image search on your phone is an essential tool that can help you achieve your goals.
So, go ahead and give it a try Use the tips and tricks outlined in this article to become a master of reverse image search on your phone. With a little practice and patience, you’ll be able to find the information you need and become more proficient and efficient in your searches.
Happy searching!


